Wouldn’t it be nice to have a widget to place an advertisement, for example from Google Adsense, into the sidebar of your WordPress website?
After all; the layout of your sidebar(s) could be managed from the WordPress admin pages, and allows you to place ads in the sidebar where and as many times as you see fit.
There are probably plenty plugins for this, but I dislike plugins.
So here the simple code for the “functions.php” that creates your own WordPress Ad Widget.
Creating a widget, thanks to the wonderful WordPress “engine”, is really easy … once you know how … of course ….
Below the code that I use for creating a Google AdSense Widget, that can be used in Sidebar(s).
Naturally, this one is also suitable for ads from other parties, as long as you have HTML code to place the ad(s).
To create a widget, we only need to extend the standard WP_Widget class and modify some of its functions.
If you look at the minimal code I’ve used to create this widget, and if you are a little experienced in PHP, then you’ll see how easy this is.
You can easily customize the widget to your taste and needs.
You can call the function differently, if you’d like to do that, simply replace every occurrence of “t4a_google_adlinks” with whatever name you’d like to use (lines 2, 4 and 40).
The description, as seen in the admin pages can be changed by replacing the string ‘Google Ad widget‘ with whatever you’d like to write there (line 5).
There are 2 widget titles, and those can be found modified as well:
line 6: ‘T4A Google Ad’ is the title of the widget in the admin pages.
line 13 and 32: ‘Google Ads’ is the title of the widget in your blog/webpage.
If you want to do this to support translations, then do this by replacing these strings like so (see also WordPress Documentation):
1
| __('T4A Google Ad Links', 'tweaking4all') |
Where “tweaking4all” is the ‘domain’ (not to be confused with your website domain) of the translatable text parts or simply leave it out.
But that’s totally optional and only for use if you want things to be translatable.
The highlighted lines (17-23) are the lines you should replace with the code you get from Google AdSense (or other party).
Keep in mind that sidebars are not very wide, and remember the limitations and rules of Google ads. A maximum of 3 regular ads, and 3 adlink blocks, per page.
The following code has to be pasted into your theme’s “functions.php” file.
If you paste this after the first “<?php” tag, then you should not copy lines 1 and 41!
UPDATE: Updated the code to fix the “Notice: The called constructor method for WP_Widget in t4a_google_adlinks is deprecated since version 4.3.0! Use __construct() ” notification.
1
2
3
4
5
6
7
8
9
10
11
12
13
14
15
16
17
18
19
20
21
22
23
24
25
26
27
28
29
30
31
32
33
34
35
36
37
38
39
40
41
| <?php
class t4a_google_adlinks extends WP_Widget {
function __construct() {
$widget_ops = array('classname' => '', 'description' => 'Google Ad widget' );
parent::__construct('google_adlinks', 'T4A Google Ad', $widget_ops);
}
function widget($args, $instance) {
extract($args, EXTR_SKIP);
echo $before_widget;
echo $before_title.'Google Ads'.$after_title;
echo '<ul>';
?>
<script async src="//pagead2.googlesyndication.com/pagead/js/adsbygoogle.js"></script>
<ins class="adsbygoogle"
style="display:block"
data-ad-client="ca-pub-1234567890123456"
data-ad-slot="1234567890"
data-ad-format="link"></ins>
<script>(adsbygoogle = window.adsbygoogle || []).push({});</script>
<?php
echo '</ul>';
echo $after_widget;
}
function update($new_instance, $old_instance) {
$instance = $old_instance;
$instance['title'] = strip_tags('Google Ads');
return $instance;
}
function form($instance) {
}
}
register_widget('t4a_google_adlinks');
?> |
Our “new” widget in action:
The Ad Widget shows up in the WordPress admin pages under “Appearance” – “Widgets”.
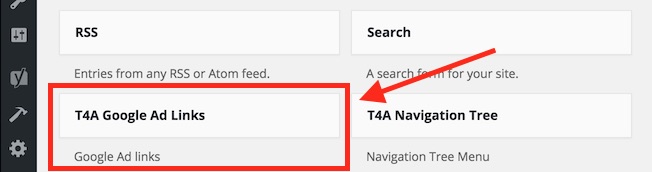
Google Ad Widget in the Admin Pages
And as usual with these widgets, we can drag the Ad Widget, as many as we like, into our sidebars.
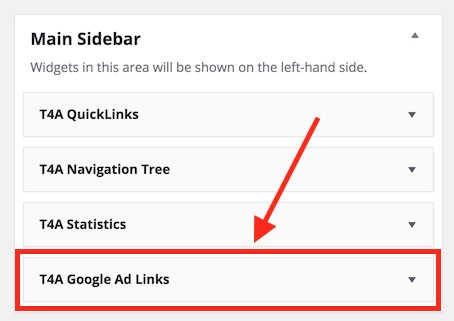
Google Ad Widget – Placed in a Sidebar
Right after placing this into a sidebar, they will appear on your WordPress blog or website:
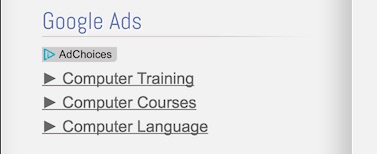
Widget visible at the Tweaking4All sidebar


Comments
There are no comments yet.
You can post your own comments by using the form below, or reply to existing comments by using the "Reply" button.