Back in the day, when Firewire was a standard for any Mac, we could use Firewire to directly connect one Mac to another and transfer files at a very respectable speed – the so called “Target Disk Mode” or “IP over Firewire”.
This did not only help us in sharing files between 2 Mac’s, it even allowed you to boot one Mac from the DVD or CDRom drive on the other Mac, which is great when you have only one Mac with a CD or DVD drive.
Unfortunately, Firewire has gone out of the graces of Apple and has been replaced with Thunderbolt (and USB 3.x), and the trick to connect 2 Mac to each other over a Firewire cable have been lost and forgotten.
Please keep in mind, in case you’re having old Mac’s that have Firewire: this works exactly the same as with FireWire, you’d just use a Firewire cable instead. The firewire trick works under Windows as well (see this old WeetHet.nl Article).
In this article, I’ll show you how you can have a very fast data transfer between two Mac’s, using a Thunderbolt cable.
High-Speed Data Transfers between Macs with Thunderbolt
If you’ve ever tried using “Target Disk Mode” or “IP over Firewire”, then I’m sure that you were impressed, at the time, about the achieved transfer speeds.
Now that Firewire is no longer, give Thunderbolt a try, you’ll be impressed again.
It is said that the theoretical speed of Thunderbolt is up to 10 Gbit/sec, where as Thunderbolt 2 even goes up to 20 Gbit/sec.
So in this article I’m going to show you, how to use a Thunderbolt cable, to transfer files very fast from one Mac to another.
All we need is:
- 2 Mac’s with a Thunderbolt connector (typically a model from 2011 or newer)
- One standard Thunderbolt cable (find them at the Apple Store or at Amazon)
- Both Mac’s need to run at least Mac OS X 10.6.8
Just make sure both Mac’s are up-to-date with their OS X and firmware updates.
If you’re running Mac OS X newer than 10.6.8 then you should be fine.
For this purpose we use a standard Thunderbolt cable, which we connect on the Thunderbolt port of each of the two Mac’s.
Identify Thunderbolt
As usual, with these tiny connectors, it’s always a guess if what we’re dealing with. For example: tiny displayport connectors look a lot like Thunderbolt connectors – but they are most certainly not the same.
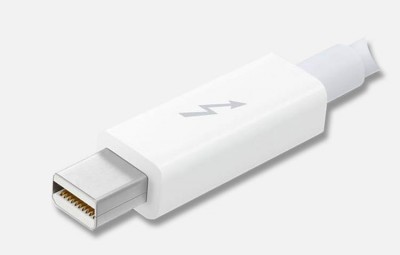
For the cable and connection on your computer, look for the Thunderbolt “lightning zap” logo:

Thunderbolt Logo
Some examples in real-life
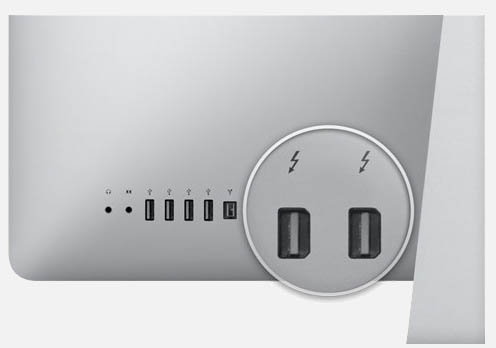
Thunderbolt on the back of an iMac
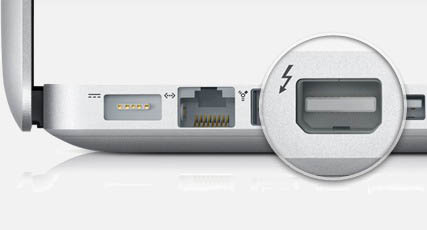
Thunderbolt on the side of a MacBook Pro
Thunderbolt Connector
Where confusion starts: DisplayPort vs Thunderbolt
This confused me in the beginning as well, but once you’re aware of the little lightning logo, you’ll be able to identify whether you’re dealing with a DisplayPort (for monitors only) or a Thunderbolt Port (Monitors, storage devices, etc etc).
Please keep in mind that a DisplayPort is NOT compatible with a Thunderbolt port, so you cannot connect Thunderbolt devices to the DisplayPort.
You can however connect DisplayPort devices to your Thunderbolt port (like a 4K Monitor).
So for this project the Thunderbolt connector is required!
It will NOT work with the DisplayPort connector.
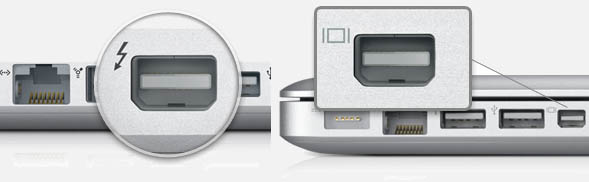
Thunderbolt (left) vs DisplayPort (right)
Which Modes are available?
There are two modes in which we can use this setup:
I consider Target Disk Mode, the quick and easy mode, where the drives of one Mac are mounted (completely!) on the other.
The IP over Thunderbolt method works with network file sharing which requires you to define what files and folders are being shared, which gives you more options (like “read-only”) but also more work to setup.
Target Disk Mode
So one method is the so called “Target Disk Mode” or TDM, that we’ve mentioned earlier. In that case one Mac (Mac-A) becomes the “slave” of the other (Mac-B), allowing you access to the drives (harddisk, CD/DVD) on the other.
So keep in mind: the drives of Mac-A will appear on Mac-B!
Which Mac is which Mac?
For your convenience, I’ve named both Mac’s … in writing this article I have noticed how easy it is to confuse both Mac’s when referring to it. So in this article:
Mac-A is the Mac that holds the drives you’d like to access – this is the Mac that will be put in Target Disk Mode. So Mac-A could be seen as “the source”,..
Mac-B is the Mac that will see the drives of Mac-A. So this would then be “the destination”.
Disable FileVault!
One thing to keep in mind, for this to work, is that the “FileVault” has to be disabled, if you’d like to access the harddrive of the other Mac. By default, during setup of your Mac, this is enabled, which encrypts your files.
You can disable encyption (FileVault) as follows:
Go to ” ” “System Preferences” “Security & Privacy” “File Vault“.
Click the pad-lock in the lower left corner, enter your password, and click “Turn OFF Filevault“.
Note: If it already says “Turn ON Filevault” then Filevault is already disabled.
Least understood … yet EASIEST to use …
Target Disk Mode is probably the mode that is least used and most misunderstood.
When you want to copy a few files and don’t want to bother with all kinds of settings, then this is definitely the fastest and easiest way to quickly access files on one Mac to transfer to another Mac.
Step 1 – Power down the Mac you’d like to access
This would be the Mac (Mac-A) who’s disks you’d like to access from the other Mac (Mac-B).
Step 2 – Connect the Thunderbolt cable to both Mac’s
Use a standard Thunderbolt cable and connect one end to Mac-A and the other to Mac-B.
Step 3 – Boot the Mac you want to access while holding the “T” key
Start the Mac (Mac-A) you’d like to access, and hold down the “T” key while booting, you should see a screen like this:

Your Mac in Target Disk Mode
Step 4 – Access the files and/or drives
Now in this step, it all depends how you wanted to use the Target Disk Mode. This can be during the boot of the Mac (Mac-B) you want to use to access the other Mac, or you just want to access files when the your Mac (Mac-B) is already running. In the latter you’d see the drives appear in Finder.
If you’ve called your hard disk on both Mac’s the same (stupid idea that I had), then things might be a bit confusing, since both drives will appear in the Finder and it might be tricky to identify which is which. Just remember that there will be an Eject symbol next to the drives that can be written to Mac-A,… Read-only drives will not show an eject symbol.
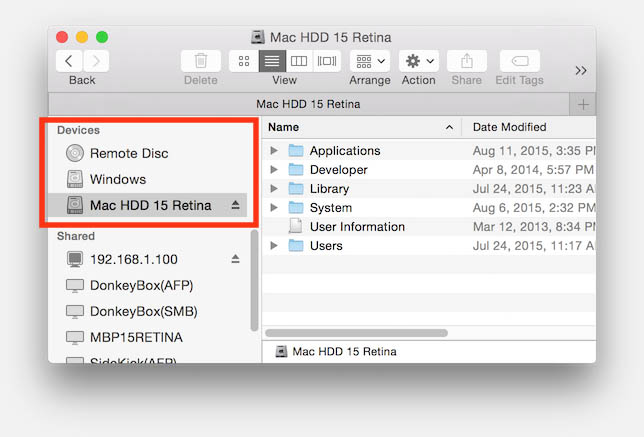
Target Disk Mode – Drives visible!
Step 5 – Closing the connection
Properly Eject Writable Drives!
Now this part you should pay attention to …
Like with a USB drive, on Mac-B, you will need to eject the drives that are writable properly before powering down the other Mac (Mac-A). Once ejected, you can power down Mac-A by pressing and holding the Power Button until the Mac shuts down (takes about 8 seconds) and reboot to Mac OS X if needed.
IP over Thunderbolt
Another way to access or share files is by using “IP over Thunderbolt“. Here we in essence make a tiny network connection between the two Mac’s so we can use existing network protocols to access files on either Mac.
This method is not super complicated, just takes a few more steps to setup. But in return you can get file sharing in two ways. So copy files to/from either Mac.
For this FileVault can stay on, but you’ll have to enable File Sharing.
Step 1 – Connect the Thunderbolt cable to both Mac’s
That’s easy …
Step 2 – Install or enable on both Mac’s the “Thunderbolt Bridge” network adapter
On both Mac’s you’ll need to make sure the “Thunderbolt Bridge” network adapter is installed.
On one of my Mac’s it was already installed, and on the other one I still had to add it – which is really very easy.
Go to “ ” “System Preferences” “Network” and see if there is a network defined called “Thunderbolt Bridge“.
If not available, click the “+” in the lower left corner, and add it now as shown below.
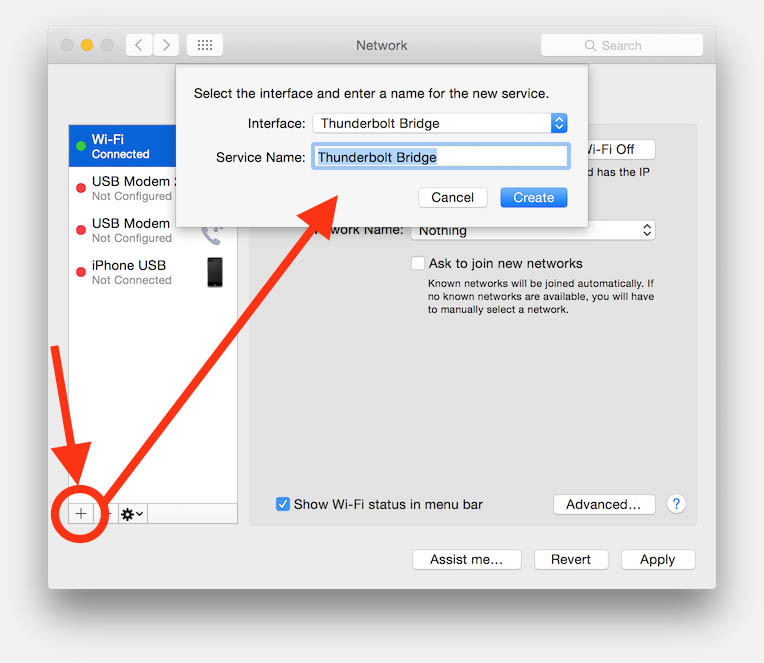
Add Thunderbolt Bridge under Network settings
Now there is something weird happening here, let’s call it a “bug” for now, but the “Thunderbolt Bridge” (spelled as “Thund..lt Bridge” or “Thunde..t Bridge”) will often show a “not connected“, even thought you’ve connected the Thunderbolt cable to both Mac’s, which is actually wrong. On some ocassions I have seen “Some connected”, which would be correct if you have 2 (or more) Thunderbolt ports on your Mac.
To verify if the connection is properly recognized, click the “Advanced” button and you’ll see something like this, indicating that the connection is good to go:
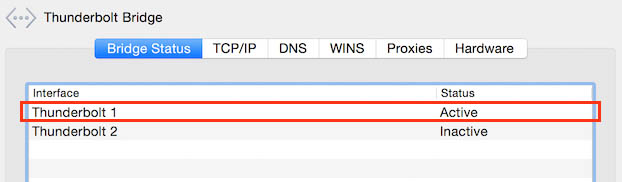
Thunderbolt Bridge Active
In contrast to popular believe, you do not need to assign an IP address, it will be handled automatically.
Step 3 – Enable File Sharing
For one or for both Mac’s we need to enable File Sharing so Bonjour will be able to find the files and/or folders you’d like to share.
Go to “ ” “System Preferences” “Sharing” and check the option “File Sharing“.
Under the heading “Shared Folders“, add or remove the folders you’d like to share.
The list next to that (Users) allows you to set access rights for users, for example “Read & Write”, “Read-Only”, “No Access”, etc.
Once you’ve enabled file sharing, the other Mac should be able to see the shared files and folders.
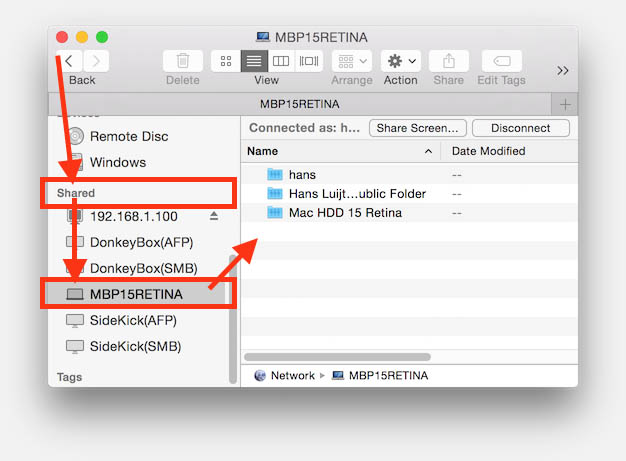
Thunderbolt Shares visible
Step 4 – Disable File Sharing when done
Don’t forget to disable File Sharing when done!!!
I cannot emphasize this enough …
When done sharing files, you should not forget to disable File Sharing when you weren’t using it before.
Or remove the shared folders if you did have File Sharing enabled before.
“File Sharing” also enables access over your regular network – which might not always be your network and might not always be safe.
Related links
These links can provide more information:


Comments
There are 11 comments. You can read them below.
You can post your own comments by using the form below, or reply to existing comments by using the "Reply" button.
Hi Hans,
so what is the performance for Target Disk and IP over thunderbolt? This cable is about $25?
Marini
Hi Marini,
yeah, Tunderbolt cable si about $25, not cheap, but it appear that there is quite some stuff in it. See this iFixIt tear apart.
As for speed; I didn’t benchmark it, but especially in Target Disk Mode it feels like the drive is actually in your computer. That fast.
IP over Thunderbolt is almost as fast it seems as Target Disk Mode, just lags app. 5% to 10% behind Target Disk Mode.
I looked up if I could find a benchmark, I found some here:
Thunderbolt 1
Read and write speeds of a 10GB file of just below 100 MBps. Smaller files and folders, we saw read speeds of 78 MBps and write speeds of 64 MBps.
Thunderbolt 2
(most newer Mac’s say as of 2013, incl. the new MacPro we all drool over)
Transfer speeds of a 10GB file jumped to a more impressive 241 MBps (write) and 390 MBps (read). The results in the files and folder test didn’t fare as well, with write speeds of just 133 MBps and read speeds of 243 MBps, but these results were still faster than when connected via gigabit ethernet.
So … it’s fast and great for transferring large files or large quantities of files from one Mac to another.
Like I said: it feels like the drive is in the computer you’re working on.
hans
Great results and very good review on ifixit…
Marini
Update, my Thunderbolt cable arrived, between iMac & mbp I can get up to 800MBps! :)
Marini
Awesome!
hans
I have FileVault enabled and yet the “Target Disk Mode” works fine. You just get prompted to enter the password as soon as the target mac boots up with the “T” pressed. However, I get copy speeds as low as 5 to 10MBps (via Finder), not sure if it is because of encryption (that is enabled on both disks) or something else is wrong. I am using 2015 15″ retina MBPs on both sides.
Hari
Hi Hari,
apologies for the late reply,
I have never tested this with FileVault enabled, but I’m sure encryption will come with it’s overhead and slow things down.
I’m not sure if other users tried this and experienced a similar slow down.
hans
I ended up doing an scp over LAN and got about 80MBps, which still goes through FileVault on both sides, so Target Disk Mode should have given at least this much speed, so something else seems to be the issue here, not the encryption overhead.
Hari
It seems this might be firmware related.
See also this [older] post in the Apple Forums suggesting similar issues to what you’re seeing.
hans
MBP 2015 have hardware encryption, it works fantastic
I am still using elCapetan on macbook and sierra on iMac and results are fantastic, here is my how to:
https://ai.rs/2016/11/connect-imac-and-macbook-with-20-gbit-thunderbolt-bridge/
Marini
Yes, looks like the same issue. Thanks for the link, I thought I was not doing something right :)
Hari