Overview
Framework – NeoPixel or FastLED
Well, I have to admit that I have become a FastLED fan – it’s become much more mature and advanced than NeoPixel. However, as with the original article, I wanted this to work for both. FastLED might be more advanced, but NeoPixel takes up less memory. This way you have a choice – it’s up to you. With the Arduino Uno R3 though, this works great with FastLED.
I do recommend reading the original article “LEDStrip effects for NeoPixel and FastLED“, but it is not required since I will be posting the full code for both libraries.
Installing FastLED or NeoPixel
The Arduino IDE has come a long way since I’ve written the original article, and installing a library has become much easier.
The Arduino IDE can be dowloaded from their website for free – I have never used their online IDE, so please stick with the regular one that you install on your computer.
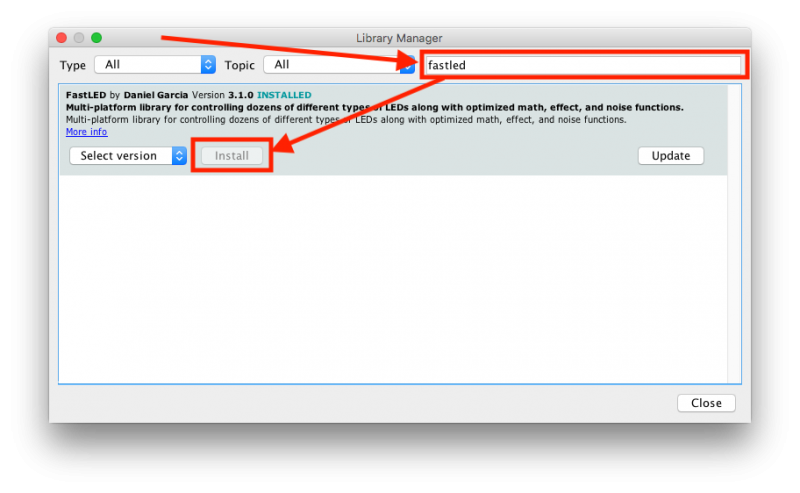
After starting the Arduino IDE, which may take a bit, go to the menu and choose “Sketch” “Include Library” “Manage Libraries“.
In the window that pops up, enter either “neopixel” or “fastled” in the filter field, and press ENTER for the library you’d like to use. I prefer FastLED, but I leave that choice up to you.
Your selected library will be listed, where you can select a version (I used v3.1.0 of FastLED and v1.1.3 of NeoPixel) and click “Install“.
And that’s all there is to it …
Arduino IDE – Install a Library
Ad Blocking Detected Please consider disabling your ad blocker for our website.
We rely on these ads to be able to run our website.
You can of course support us in other ways (see Support Us on the left).
Download LEDEffect Sketches
At the end I’ll list the full code, but you can save yourself the typing or copy and paste efforts by just downlading them here.
Settings … make sure you set them right!
Obviously, there are a few settings in the source code you will have to match to your setup.
#define PIN 5
Make sure this number (5) matches the PIN on your Arduino that you’re used for Din of your LED strip – this could for example by 6.
#define NUM_LEDS 60
Make sure this number (60) matches the LED count of your LED strip(s).
For FastLED, make sure the “FastLED.addLeds” function is set correctly for your LED strip – I’ve used a WS2811/WS218 LED stip – and the correct color order (RGB vs GRB)!
For NeoPixel, make sure the “Adafruit_NeoPixel strip” line matches your hardware – again: I used a WS2811/WS2812 – and the correct colors (NEO_RGB in this case).
Note :
The use of PIN 2 for the button is a requirement since it allows the button to interrupt your code. Pin 3 will work as well – just remember to chaneg the #define BUTTON 2 to #define BUTTON 3. This is all set for the Arduino UNO R3. Other Arduino models this might be a different pin.
Download - AllEffects LEDStrip Effect (FastLED)
Download - AllEffects LEDStrip Effect (NeoPixel)
LED Hardware Setup
Since we want to be able to toggle effects, we will need to change the hardware a little bit by adding a button.
Note: I’ve used PIN 6 in the drawing but PIN 5 in the code. So please either use PIN 6 (modify the #define PIN 5 line to #define PIN 6) or read the drawing below as PIN 5 (instead of PIN 6) – apologies for the confusion here.
The setup is the same as the original article, I’ve just added a push switch.
This push switch is of the type that makes contact when you push it, but breaks contact once you let it go.
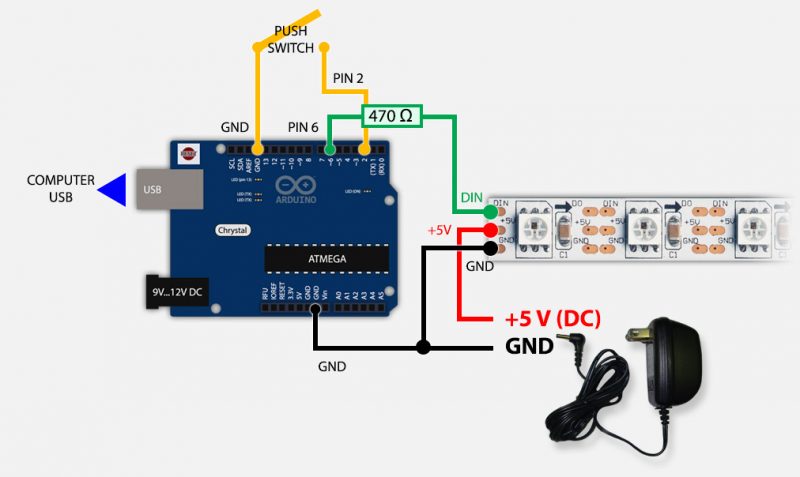
Arduino, LED strip, Switch and Power Supply setup
Ad Blocking Detected Please consider disabling your ad blocker for our website.
We rely on these ads to be able to run our website.
You can of course support us in other ways (see Support Us on the left).
Challenges Explained
Most users that tried to combine effects have ran into the same issues. I’ll briefly explain how I resolved them so it may be of use to someone – if you don’t care about the challenges, then feel free to ignore it and test the sketch right away.
Challenge 1 – Endless effects
Some of the effects last for ever – for example the bouncing balls. One of the visitors here, Daniel, pointed me in the right direction on how to address this. I made some improvements so it accommodates multiple bouncing balls.
In short, the bouncing balls kept going forever because of an endless while loop:
...

  while(true) {

  ...

  }

...
For one bouncing ball this could be caught in the if ( ImpactVelocity[i] < 0.01 ) { ... } part, but for multiple balls this became a little more challenging.
The basic solution was to keep track of all balls, to see if they are still finishing their bounce session. If all stopped bouncing then we exit the procedure.
Below you can see the final bouncingBalls() procedure.
I’ve added a parameter to this function so one can choose to let a ball bounce until it’s done, or have a ball restart bouncing over and over again.
1
2
3
4
5
6
7
8
9
10
11
12
13
14
15
16
17
18
19
20
21
22
23
24
25
26
27
28
29
30
31
32
33
34
35
36
37
38
39
40
41
42
43
44
45
46
47
48
49
50
51
52
53
54
55
56
57
| void BouncingColoredBalls(int BallCount, byte colors[][3], boolean continuous) {
float Gravity = -9.81;
int StartHeight = 1;
float Height[BallCount];
float ImpactVelocityStart = sqrt( -2 * Gravity * StartHeight );
float ImpactVelocity[BallCount];
float TimeSinceLastBounce[BallCount];
int Position[BallCount];
long ClockTimeSinceLastBounce[BallCount];
float Dampening[BallCount];
boolean ballBouncing[BallCount];
boolean ballsStillBouncing = true;
for (int i = 0 ; i < BallCount ; i++) {
ClockTimeSinceLastBounce[i] = millis();
Height[i] = StartHeight;
Position[i] = 0;
ImpactVelocity[i] = ImpactVelocityStart;
TimeSinceLastBounce[i] = 0;
Dampening[i] = 0.90 - float(i)/pow(BallCount,2);
ballBouncing[i]=true;
}
while (ballsStillBouncing) {
for (int i = 0 ; i < BallCount ; i++) {
TimeSinceLastBounce[i] = millis() - ClockTimeSinceLastBounce[i];
Height[i] = 0.5 * Gravity * pow( TimeSinceLastBounce[i]/1000 , 2.0 ) + ImpactVelocity[i] * TimeSinceLastBounce[i]/1000;
if ( Height[i] < 0 ) {
Height[i] = 0;
ImpactVelocity[i] = Dampening[i] * ImpactVelocity[i];
ClockTimeSinceLastBounce[i] = millis();
if ( ImpactVelocity[i] < 0.01 ) {
if (continuous) {
ImpactVelocity[i] = ImpactVelocityStart;
} else {
ballBouncing[i]=false;
}
}
}
Position[i] = round( Height[i] * (NUM_LEDS - 1) / StartHeight);
}
ballsStillBouncing = false; // assume no balls bouncing
for (int i = 0 ; i < BallCount ; i++) {
setPixel(Position[i],colors[i][0],colors[i][1],colors[i][2]);
if ( ballBouncing[i] ) {
ballsStillBouncing = true;
}
}
showStrip();
setAll(0,0,0);
}
} |
Next challenge was adding a button to toggle the effects.
Initially I started with following the good Button tutorial on the Arduino website, until I found a slightly easier method. As you can see in the Arduino tutorial, they use a resistor. Now it seems (took me a while before I bumped into that one by accident) there is an internal resistor for this as well – so I decided to use that to keep the hardware setup easier.
Of course we need to define what PIN we want to use for our button. Here we have to pay attention (you’ll see more about that in the next challenge).
We want the button to basically “interrupt” an effect so we can switch right away to another effect.
If we would do it the “usual” way, then we’d find ourselves adding lots and lots of code to try to catch the button status – something I’d like to avoid.
To have a button “interrupt” the flow of the code, we must use either PIN 2 and PIN 3 (on an Arduino UNO). Per the guide of the Arduino website:
Pins for Interrupt Button
|
|
| Uno, Nano, Mini, other 328-based |
2, 3 |
| Mega, Mega2560, MegaADK |
2, 3, 18, 19, 20, 21 |
| Micro, Leonardo, other 32u4-based |
0, 1, 2, 3, 7 |
| Zero |
All digital pins, except pin 4 |
| MKR1000 Rev.1 |
0, 1, 4, 5, 6, 7, 8, 9, A1, A2 |
| Due |
all digital pins |
| 101 |
2, 5, 7, 8, 10, 11, 12, 13 |
To make a button work with the internal pull-up resistor, we will have to add a line to the “setup()” function:
pinMode(2,INPUT_PULLUP); // internal pull-up resistor
Later we can test if a button was pressed with:
if (digitalRead (BUTTON) == HIGH) {

  ...

}
This method is what worked best for me, and I’m sure there are better options out there.
I used a so called interrupt, that’s why we choose pin 2 for the switch. We want to catch the button press at any given time and we want to attach a function to an interrupt caused by pressing the button and for this we can use the “attachInterrupt()” function. If you’d like to dig deeper in this topic, please read the Arduino attachInterrupt Documentation.
In essence: When the state of the button (BUTTON) changes (CHANGE), we’d like to call for our own function (changeEffect()).
Which in code would look something like this:
attachInterrupt (digitalPinToInterrupt(BUTTON), changeEffect, CHANGE); // pressed
When reading the documentation you might wonder why I used the “CHANGE” mode instead of the “LOW” or “HIGH” mode. The reason is that both produced unexpected effects, like I pressed the button multiple times. So instead I used “CHANGE” and in our own function “changeEffect()” I then determine what the button state is and react accordingly. This is super fast!
This works surprisingly well!
void changeEffect() {

  if (digitalRead (BUTTON) == HIGH) {

    selectedEffect++;

  }

}
Once a button is pressed, our function will increase the value of “selectedEffect” by one.
Challenge 4 – Initiate the start of a new effect
So now we can catch the button being pressed at any time. Great!
But how do we go back to the beginning of the “loop()” function?
Since we have different levels of nested loops and functions, simply using “break” or “return” is not going to cut it.
So I had to come up with something better. How do I restart the loop?
Well, again there is no simple straight forward method for that it seems, and where ever you look on the Internet; questions like these will simply not be answered since folks think they need to explain that we need to program things differently. What’s up with that?
Eventually I found a sweet little piece of assembler code (unlike the C language Arduino uses) that resets the Arduino and starts over again – we basically let the Arduino jump back to address 0 (zero) so it starts over again. This works great:
This line can be added anywhere in your code and your Arduino WILL reset.
Combined with the previous challenge, our button press will call:
1
2
3
4
5
6
| void changeEffect() {
if (digitalRead (BUTTON) == HIGH) {
selectedEffect++;
asm volatile (" jmp 0");
}
} |
Note: this is more complicated than it sounds and comes with consequences – none of them harm your Arduino – which more experienced developers will tell you to pay attention to.
There is a ginormous downside to resetting your Arduino though: you’ll loose all your variables!
Or better said: the value the variables had, since they will be reinitiated blank …
So … that’s a problem, since we now no longer know what the selected effect was supposed to be.
Challenge 5 – Variable surviving a reset
You can imagine I had a good day trying to figure all this out – it was fun though,… now that it works.
So how do we store a value (the selected effect) without losing it? It’s not like the Arduino has a harddrive or SD card on which we can store the value …
Ehm … that’s not entirely true. The Arduino has an EEPROM – a piece of memory that does not loose it’s content after power is dropped, or a reset is being done.
Your Arduino actually has some functions for that! See the EEPROM documentation for more details.
One side note: you should not use the EEPROM for excessive read/write operations, as it has a limited live span (they say that I may fail after 100,000 read/write operations). Considering that this would take an awful lot of clicks, I’m not very worried with this application of the EEPROM.
Back to our last challenge: we just store the selected effect number (byte) in the EEPROM.
For this to work we will need to include the EEPROM library:
Writing and reading an EEPROM address is surprisingly easy:
// read EEPORM address 0 (1 byte)

EEPROM.get(0,selectedEffect);


// write EEPROM address 0 (also 1 byte)

EEPROM.put(0, selectedEffect);
As you can see in the code, the variable “selectedEffect” is of the type byte – which I did intentionally to keep things easy.
Address “0” of the EEPROM seems to be commonly used, so I didn’t see a reason to divert from that. Not all Arduino’s have the same amount of EEPROM space.
We cannot “set” the EEPROM in the “setup()” function with an initial value. After all, after a reset, the same “setup()” function would be called and … reset that value as well.
So instead I decided to read whatever is there. If the returning value is larger than the number of effects (18), then we set it to zero so it starts with the first effect again. Perfect to catch an odd value that was not initialized, and perfect for us cycling through effects.
EEPROM.get(0,selectedEffect);


if(selectedEffect>18) {

  selectedEffect=0;

  EEPROM.put(0,0);

}
Our button press function will now look like this:
void changeEffect() {

  if (digitalRead (BUTTON) == HIGH) {

    selectedEffect++;

    EEPROM.put(0, selectedEffect); // store the chose effect

    asm volatile ("  jmp 0");      // reset the Arduino

  }

}
Sources
You can download the sources in the beginning of this article.
If you’d like to review, then take a look here;
FastLED
1
2
3
4
5
6
7
8
9
10
11
12
13
14
15
16
17
18
19
20
21
22
23
24
25
26
27
28
29
30
31
32
33
34
35
36
37
38
39
40
41
42
43
44
45
46
47
48
49
50
51
52
53
54
55
56
57
58
59
60
61
62
63
64
65
66
67
68
69
70
71
72
73
74
75
76
77
78
79
80
81
82
83
84
85
86
87
88
89
90
91
92
93
94
95
96
97
98
99
100
101
102
103
104
105
106
107
108
109
110
111
112
113
114
115
116
117
118
119
120
121
122
123
124
125
126
127
128
129
130
131
132
133
134
135
136
137
138
139
140
141
142
143
144
145
146
147
148
149
150
151
152
153
154
155
156
157
158
159
160
161
162
163
164
165
166
167
168
169
170
171
172
173
174
175
176
177
178
179
180
181
182
183
184
185
186
187
188
189
190
191
192
193
194
195
196
197
198
199
200
201
202
203
204
205
206
207
208
209
210
211
212
213
214
215
216
217
218
219
220
221
222
223
224
225
226
227
228
229
230
231
232
233
234
235
236
237
238
239
240
241
242
243
244
245
246
247
248
249
250
251
252
253
254
255
256
257
258
259
260
261
262
263
264
265
266
267
268
269
270
271
272
273
274
275
276
277
278
279
280
281
282
283
284
285
286
287
288
289
290
291
292
293
294
295
296
297
298
299
300
301
302
303
304
305
306
307
308
309
310
311
312
313
314
315
316
317
318
319
320
321
322
323
324
325
326
327
328
329
330
331
332
333
334
335
336
337
338
339
340
341
342
343
344
345
346
347
348
349
350
351
352
353
354
355
356
357
358
359
360
361
362
363
364
365
366
367
368
369
370
371
372
373
374
375
376
377
378
379
380
381
382
383
384
385
386
387
388
389
390
391
392
393
394
395
396
397
398
399
400
401
402
403
404
405
406
407
408
409
410
411
412
413
414
415
416
417
418
419
420
421
422
423
424
425
426
427
428
429
430
431
432
433
434
435
436
437
438
439
440
441
442
443
444
445
446
447
448
449
450
451
452
453
454
455
456
457
458
459
460
461
462
463
464
465
466
467
468
469
470
471
472
473
474
475
476
477
478
479
480
481
482
483
484
485
486
487
488
489
490
491
492
493
494
495
496
497
498
499
500
501
502
503
504
505
506
507
508
509
510
511
512
513
514
515
516
517
518
519
520
521
522
523
524
525
526
527
528
529
530
531
532
533
534
535
536
537
538
539
540
541
542
543
544
545
546
547
548
549
550
551
552
553
554
555
556
557
558
559
560
561
562
563
564
565
566
567
568
569
570
571
572
573
574
575
576
577
578
579
580
581
582
583
584
585
586
587
588
589
590
591
592
593
594
595
596
597
598
599
600
601
602
603
604
605
606
607
608
609
610
611
612
613
614
615
616
617
618
619
620
621
622
623
624
625
626
627
628
629
630
631
632
633
634
635
636
637
638
639
640
641
642
643
644
645
646
647
648
649
650
651
652
653
654
655
656
657
658
659
660
661
662
663
664
665
666
667
668
669
670
671
672
673
674
675
676
677
678
679
680
681
682
683
684
685
686
687
688
689
690
691
692
693
694
695
696
697
698
699
700
701
702
703
704
705
706
707
708
709
710
711
712
713
714
715
716
717
718
719
720
721
722
723
724
725
726
727
728
729
730
731
732
733
734
735
736
737
738
739
740
741
742
743
744
745
746
747
| #include "FastLED.h"
#include <EEPROM.h>
#define NUM_LEDS 60
CRGB leds[NUM_LEDS];
#define PIN 5
#define BUTTON 2
byte selectedEffect=0;
void setup()
{
FastLED.addLeds<WS2811, PIN, GRB>(leds, NUM_LEDS).setCorrection( TypicalLEDStrip );
pinMode(2,INPUT_PULLUP); // internal pull-up resistor
attachInterrupt (digitalPinToInterrupt (BUTTON), changeEffect, CHANGE); // pressed
}
// *** REPLACE FROM HERE ***
void loop() {
EEPROM.get(0,selectedEffect);
  if(selectedEffect>18) {
    selectedEffect=0;
    EEPROM.put(0,0);
  }
switch(selectedEffect) {
case 0 : {
// RGBLoop - no parameters
RGBLoop();
break;
}
case 1 : {
// FadeInOut - Color (red, green. blue)
FadeInOut(0xff, 0x00, 0x00); // red
FadeInOut(0xff, 0xff, 0xff); // white
FadeInOut(0x00, 0x00, 0xff); // blue
break;
}
    case 2  : {
                // Strobe - Color (red, green, blue), number of flashes, flash speed, end pause
                Strobe(0xff, 0xff, 0xff, 10, 50, 1000);
                break;
              }
case 3 : {
// HalloweenEyes - Color (red, green, blue), Size of eye, space between eyes, fade (true/false), steps, fade delay, end pause
HalloweenEyes(0xff, 0x00, 0x00,
1, 4,
true, random(5,50), random(50,150),
random(1000, 10000));
HalloweenEyes(0xff, 0x00, 0x00,
1, 4,
true, random(5,50), random(50,150),
random(1000, 10000));
break;
}
case 4 : {
// CylonBounce - Color (red, green, blue), eye size, speed delay, end pause
CylonBounce(0xff, 0x00, 0x00, 4, 10, 50);
break;
}
case 5 : {
// NewKITT - Color (red, green, blue), eye size, speed delay, end pause
NewKITT(0xff, 0x00, 0x00, 8, 10, 50);
break;
}
case 6 : {
// Twinkle - Color (red, green, blue), count, speed delay, only one twinkle (true/false)
Twinkle(0xff, 0x00, 0x00, 10, 100, false);
break;
}
case 7 : {
// TwinkleRandom - twinkle count, speed delay, only one (true/false)
TwinkleRandom(20, 100, false);
break;
}
case 8 : {
// Sparkle - Color (red, green, blue), speed delay
Sparkle(0xff, 0xff, 0xff, 0);
break;
}
case 9 : {
// SnowSparkle - Color (red, green, blue), sparkle delay, speed delay
SnowSparkle(0x10, 0x10, 0x10, 20, random(100,1000));
break;
}
case 10 : {
// Running Lights - Color (red, green, blue), wave dealy
RunningLights(0xff,0x00,0x00, 50); // red
RunningLights(0xff,0xff,0xff, 50); // white
RunningLights(0x00,0x00,0xff, 50); // blue
break;
}
case 11 : {
// colorWipe - Color (red, green, blue), speed delay
colorWipe(0x00,0xff,0x00, 50);
colorWipe(0x00,0x00,0x00, 50);
break;
}
case 12 : {
// rainbowCycle - speed delay
rainbowCycle(20);
break;
}
case 13 : {
// theatherChase - Color (red, green, blue), speed delay
theaterChase(0xff,0,0,50);
break;
}
case 14 : {
// theaterChaseRainbow - Speed delay
theaterChaseRainbow(50);
break;
}
case 15 : {
// Fire - Cooling rate, Sparking rate, speed delay
Fire(55,120,15);
break;
}
// simple bouncingBalls not included, since BouncingColoredBalls can perform this as well as shown below
// BouncingColoredBalls - Number of balls, color (red, green, blue) array, continuous
// CAUTION: If set to continuous then this effect will never stop!!!
case 16 : {
// mimic BouncingBalls
byte onecolor[1][3] = { {0xff, 0x00, 0x00} };
BouncingColoredBalls(1, onecolor, false);
break;
}
case 17 : {
// multiple colored balls
byte colors[3][3] = { {0xff, 0x00, 0x00},
{0xff, 0xff, 0xff},
{0x00, 0x00, 0xff} };
BouncingColoredBalls(3, colors, false);
break;
}
case 18 : {
// meteorRain - Color (red, green, blue), meteor size, trail decay, random trail decay (true/false), speed delay
meteorRain(0xff,0xff,0xff,10, 64, true, 30);
break;
}
}
}
void changeEffect() {
if (digitalRead (BUTTON) == HIGH) {
selectedEffect++;
EEPROM.put(0, selectedEffect);
asm volatile (" jmp 0");
}
}
// *************************
// ** LEDEffect Functions **
// *************************
void RGBLoop(){
for(int j = 0; j < 3; j++ ) {
// Fade IN
for(int k = 0; k < 256; k++) {
switch(j) {
case 0: setAll(k,0,0); break;
case 1: setAll(0,k,0); break;
case 2: setAll(0,0,k); break;
}
showStrip();
delay(3);
}
// Fade OUT
for(int k = 255; k >= 0; k--) {
switch(j) {
case 0: setAll(k,0,0); break;
case 1: setAll(0,k,0); break;
case 2: setAll(0,0,k); break;
}
showStrip();
delay(3);
}
}
}
void FadeInOut(byte red, byte green, byte blue){
float r, g, b;
for(int k = 0; k < 256; k=k+1) {
r = (k/256.0)*red;
g = (k/256.0)*green;
b = (k/256.0)*blue;
setAll(r,g,b);
showStrip();
}
for(int k = 255; k >= 0; k=k-2) {
r = (k/256.0)*red;
g = (k/256.0)*green;
b = (k/256.0)*blue;
setAll(r,g,b);
showStrip();
}
}
void Strobe(byte red, byte green, byte blue, int StrobeCount, int FlashDelay, int EndPause){
for(int j = 0; j < StrobeCount; j++) {
setAll(red,green,blue);
showStrip();
delay(FlashDelay);
setAll(0,0,0);
showStrip();
delay(FlashDelay);
}
delay(EndPause);
}
void HalloweenEyes(byte red, byte green, byte blue,
int EyeWidth, int EyeSpace,
boolean Fade, int Steps, int FadeDelay,
int EndPause){
randomSeed(analogRead(0));
int i;
int StartPoint = random( 0, NUM_LEDS - (2*EyeWidth) - EyeSpace );
int Start2ndEye = StartPoint + EyeWidth + EyeSpace;
for(i = 0; i < EyeWidth; i++) {
setPixel(StartPoint + i, red, green, blue);
setPixel(Start2ndEye + i, red, green, blue);
}
showStrip();
if(Fade==true) {
float r, g, b;
for(int j = Steps; j >= 0; j--) {
r = j*(red/Steps);
g = j*(green/Steps);
b = j*(blue/Steps);
for(i = 0; i < EyeWidth; i++) {
setPixel(StartPoint + i, r, g, b);
setPixel(Start2ndEye + i, r, g, b);
}
showStrip();
delay(FadeDelay);
}
}
setAll(0,0,0); // Set all black
delay(EndPause);
}
void CylonBounce(byte red, byte green, byte blue, int EyeSize, int SpeedDelay, int ReturnDelay){
for(int i = 0; i < NUM_LEDS-EyeSize-2; i++) {
setAll(0,0,0);
setPixel(i, red/10, green/10, blue/10);
for(int j = 1; j <= EyeSize; j++) {
setPixel(i+j, red, green, blue);
}
setPixel(i+EyeSize+1, red/10, green/10, blue/10);
showStrip();
delay(SpeedDelay);
}
delay(ReturnDelay);
for(int i = NUM_LEDS-EyeSize-2; i > 0; i--) {
setAll(0,0,0);
setPixel(i, red/10, green/10, blue/10);
for(int j = 1; j <= EyeSize; j++) {
setPixel(i+j, red, green, blue);
}
setPixel(i+EyeSize+1, red/10, green/10, blue/10);
showStrip();
delay(SpeedDelay);
}
delay(ReturnDelay);
}
void NewKITT(byte red, byte green, byte blue, int EyeSize, int SpeedDelay, int ReturnDelay){
RightToLeft(red, green, blue, EyeSize, SpeedDelay, ReturnDelay);
LeftToRight(red, green, blue, EyeSize, SpeedDelay, ReturnDelay);
OutsideToCenter(red, green, blue, EyeSize, SpeedDelay, ReturnDelay);
CenterToOutside(red, green, blue, EyeSize, SpeedDelay, ReturnDelay);
LeftToRight(red, green, blue, EyeSize, SpeedDelay, ReturnDelay);
RightToLeft(red, green, blue, EyeSize, SpeedDelay, ReturnDelay);
OutsideToCenter(red, green, blue, EyeSize, SpeedDelay, ReturnDelay);
CenterToOutside(red, green, blue, EyeSize, SpeedDelay, ReturnDelay);
}
// used by NewKITT
void CenterToOutside(byte red, byte green, byte blue, int EyeSize, int SpeedDelay, int ReturnDelay) {
for(int i =((NUM_LEDS-EyeSize)/2); i>=0; i--) {
setAll(0,0,0);
setPixel(i, red/10, green/10, blue/10);
for(int j = 1; j <= EyeSize; j++) {
setPixel(i+j, red, green, blue);
}
setPixel(i+EyeSize+1, red/10, green/10, blue/10);
setPixel(NUM_LEDS-i, red/10, green/10, blue/10);
for(int j = 1; j <= EyeSize; j++) {
setPixel(NUM_LEDS-i-j, red, green, blue);
}
setPixel(NUM_LEDS-i-EyeSize-1, red/10, green/10, blue/10);
showStrip();
delay(SpeedDelay);
}
delay(ReturnDelay);
}
// used by NewKITT
void OutsideToCenter(byte red, byte green, byte blue, int EyeSize, int SpeedDelay, int ReturnDelay) {
for(int i = 0; i<=((NUM_LEDS-EyeSize)/2); i++) {
setAll(0,0,0);
setPixel(i, red/10, green/10, blue/10);
for(int j = 1; j <= EyeSize; j++) {
setPixel(i+j, red, green, blue);
}
setPixel(i+EyeSize+1, red/10, green/10, blue/10);
setPixel(NUM_LEDS-i, red/10, green/10, blue/10);
for(int j = 1; j <= EyeSize; j++) {
setPixel(NUM_LEDS-i-j, red, green, blue);
}
setPixel(NUM_LEDS-i-EyeSize-1, red/10, green/10, blue/10);
showStrip();
delay(SpeedDelay);
}
delay(ReturnDelay);
}
// used by NewKITT
void LeftToRight(byte red, byte green, byte blue, int EyeSize, int SpeedDelay, int ReturnDelay) {
for(int i = 0; i < NUM_LEDS-EyeSize-2; i++) {
setAll(0,0,0);
setPixel(i, red/10, green/10, blue/10);
for(int j = 1; j <= EyeSize; j++) {
setPixel(i+j, red, green, blue);
}
setPixel(i+EyeSize+1, red/10, green/10, blue/10);
showStrip();
delay(SpeedDelay);
}
delay(ReturnDelay);
}
// used by NewKITT
void RightToLeft(byte red, byte green, byte blue, int EyeSize, int SpeedDelay, int ReturnDelay) {
for(int i = NUM_LEDS-EyeSize-2; i > 0; i--) {
setAll(0,0,0);
setPixel(i, red/10, green/10, blue/10);
for(int j = 1; j <= EyeSize; j++) {
setPixel(i+j, red, green, blue);
}
setPixel(i+EyeSize+1, red/10, green/10, blue/10);
showStrip();
delay(SpeedDelay);
}
delay(ReturnDelay);
}
void Twinkle(byte red, byte green, byte blue, int Count, int SpeedDelay, boolean OnlyOne) {
setAll(0,0,0);
for (int i=0; i<Count; i++) {
setPixel(random(NUM_LEDS),red,green,blue);
showStrip();
delay(SpeedDelay);
if(OnlyOne) {
setAll(0,0,0);
}
}
delay(SpeedDelay);
}
void TwinkleRandom(int Count, int SpeedDelay, boolean OnlyOne) {
setAll(0,0,0);
for (int i=0; i<Count; i++) {
setPixel(random(NUM_LEDS),random(0,255),random(0,255),random(0,255));
showStrip();
delay(SpeedDelay);
if(OnlyOne) {
setAll(0,0,0);
}
}
delay(SpeedDelay);
}
void Sparkle(byte red, byte green, byte blue, int SpeedDelay) {
int Pixel = random(NUM_LEDS);
setPixel(Pixel,red,green,blue);
showStrip();
delay(SpeedDelay);
setPixel(Pixel,0,0,0);
}
void SnowSparkle(byte red, byte green, byte blue, int SparkleDelay, int SpeedDelay) {
setAll(red,green,blue);
int Pixel = random(NUM_LEDS);
setPixel(Pixel,0xff,0xff,0xff);
showStrip();
delay(SparkleDelay);
setPixel(Pixel,red,green,blue);
showStrip();
delay(SpeedDelay);
}
void RunningLights(byte red, byte green, byte blue, int WaveDelay) {
int Position=0;
for(int i=0; i<NUM_LEDS*2; i++)
{
Position++; // = 0; //Position + Rate;
for(int i=0; i<NUM_LEDS; i++) {
// sine wave, 3 offset waves make a rainbow!
//float level = sin(i+Position) * 127 + 128;
//setPixel(i,level,0,0);
//float level = sin(i+Position) * 127 + 128;
setPixel(i,((sin(i+Position) * 127 + 128)/255)*red,
((sin(i+Position) * 127 + 128)/255)*green,
((sin(i+Position) * 127 + 128)/255)*blue);
}
showStrip();
delay(WaveDelay);
}
}
void colorWipe(byte red, byte green, byte blue, int SpeedDelay) {
for(uint16_t i=0; i<NUM_LEDS; i++) {
setPixel(i, red, green, blue);
showStrip();
delay(SpeedDelay);
}
}
void rainbowCycle(int SpeedDelay) {
byte *c;
uint16_t i, j;
for(j=0; j<256*5; j++) { // 5 cycles of all colors on wheel
for(i=0; i< NUM_LEDS; i++) {
c=Wheel(((i * 256 / NUM_LEDS) + j) & 255);
setPixel(i, *c, *(c+1), *(c+2));
}
showStrip();
delay(SpeedDelay);
}
}
// used by rainbowCycle and theaterChaseRainbow
byte * Wheel(byte WheelPos) {
static byte c[3];
if(WheelPos < 85) {
c[0]=WheelPos * 3;
c[1]=255 - WheelPos * 3;
c[2]=0;
} else if(WheelPos < 170) {
WheelPos -= 85;
c[0]=255 - WheelPos * 3;
c[1]=0;
c[2]=WheelPos * 3;
} else {
WheelPos -= 170;
c[0]=0;
c[1]=WheelPos * 3;
c[2]=255 - WheelPos * 3;
}
return c;
}
void theaterChase(byte red, byte green, byte blue, int SpeedDelay) {
for (int j=0; j<10; j++) { //do 10 cycles of chasing
for (int q=0; q < 3; q++) {
for (int i=0; i < NUM_LEDS; i=i+3) {
setPixel(i+q, red, green, blue); //turn every third pixel on
}
showStrip();
delay(SpeedDelay);
for (int i=0; i < NUM_LEDS; i=i+3) {
setPixel(i+q, 0,0,0); //turn every third pixel off
}
}
}
}
void theaterChaseRainbow(int SpeedDelay) {
byte *c;
for (int j=0; j < 256; j++) { // cycle all 256 colors in the wheel
for (int q=0; q < 3; q++) {
for (int i=0; i < NUM_LEDS; i=i+3) {
c = Wheel( (i+j) % 255);
setPixel(i+q, *c, *(c+1), *(c+2)); //turn every third pixel on
}
showStrip();
delay(SpeedDelay);
for (int i=0; i < NUM_LEDS; i=i+3) {
setPixel(i+q, 0,0,0); //turn every third pixel off
}
}
}
}
void Fire(int Cooling, int Sparking, int SpeedDelay) {
static byte heat[NUM_LEDS];
int cooldown;
// Step 1. Cool down every cell a little
for( int i = 0; i < NUM_LEDS; i++) {
cooldown = random(0, ((Cooling * 10) / NUM_LEDS) + 2);
if(cooldown>heat[i]) {
heat[i]=0;
} else {
heat[i]=heat[i]-cooldown;
}
}
// Step 2. Heat from each cell drifts 'up' and diffuses a little
for( int k= NUM_LEDS - 1; k >= 2; k--) {
heat[k] = (heat[k - 1] + heat[k - 2] + heat[k - 2]) / 3;
}
// Step 3. Randomly ignite new 'sparks' near the bottom
if( random(255) < Sparking ) {
int y = random(7);
heat[y] = heat[y] + random(160,255);
//heat[y] = random(160,255);
}
// Step 4. Convert heat to LED colors
for( int j = 0; j < NUM_LEDS; j++) {
setPixelHeatColor(j, heat[j] );
}
showStrip();
delay(SpeedDelay);
}
void setPixelHeatColor (int Pixel, byte temperature) {
// Scale 'heat' down from 0-255 to 0-191
byte t192 = round((temperature/255.0)*191);
// calculate ramp up from
byte heatramp = t192 & 0x3F; // 0..63
heatramp <<= 2; // scale up to 0..252
// figure out which third of the spectrum we're in:
if( t192 > 0x80) { // hottest
setPixel(Pixel, 255, 255, heatramp);
} else if( t192 > 0x40 ) { // middle
setPixel(Pixel, 255, heatramp, 0);
} else { // coolest
setPixel(Pixel, heatramp, 0, 0);
}
}
void BouncingColoredBalls(int BallCount, byte colors[][3], boolean continuous) {
float Gravity = -9.81;
int StartHeight = 1;
float Height[BallCount];
float ImpactVelocityStart = sqrt( -2 * Gravity * StartHeight );
float ImpactVelocity[BallCount];
float TimeSinceLastBounce[BallCount];
int Position[BallCount];
long ClockTimeSinceLastBounce[BallCount];
float Dampening[BallCount];
boolean ballBouncing[BallCount];
boolean ballsStillBouncing = true;
for (int i = 0 ; i < BallCount ; i++) {
ClockTimeSinceLastBounce[i] = millis();
Height[i] = StartHeight;
Position[i] = 0;
ImpactVelocity[i] = ImpactVelocityStart;
TimeSinceLastBounce[i] = 0;
Dampening[i] = 0.90 - float(i)/pow(BallCount,2);
ballBouncing[i]=true;
}
while (ballsStillBouncing) {
for (int i = 0 ; i < BallCount ; i++) {
TimeSinceLastBounce[i] = millis() - ClockTimeSinceLastBounce[i];
Height[i] = 0.5 * Gravity * pow( TimeSinceLastBounce[i]/1000 , 2.0 ) + ImpactVelocity[i] * TimeSinceLastBounce[i]/1000;
if ( Height[i] < 0 ) {
Height[i] = 0;
ImpactVelocity[i] = Dampening[i] * ImpactVelocity[i];
ClockTimeSinceLastBounce[i] = millis();
if ( ImpactVelocity[i] < 0.01 ) {
if (continuous) {
ImpactVelocity[i] = ImpactVelocityStart;
} else {
ballBouncing[i]=false;
}
}
}
Position[i] = round( Height[i] * (NUM_LEDS - 1) / StartHeight);
}
ballsStillBouncing = false; // assume no balls bouncing
for (int i = 0 ; i < BallCount ; i++) {
setPixel(Position[i],colors[i][0],colors[i][1],colors[i][2]);
if ( ballBouncing[i] ) {
ballsStillBouncing = true;
}
}
showStrip();
setAll(0,0,0);
}
}
void meteorRain(byte red, byte green, byte blue, byte meteorSize, byte meteorTrailDecay, boolean meteorRandomDecay, int SpeedDelay) {
setAll(0,0,0);
for(int i = 0; i < NUM_LEDS+NUM_LEDS; i++) {
// fade brightness all LEDs one step
for(int j=0; j<NUM_LEDS; j++) {
if( (!meteorRandomDecay) || (random(10)>5) ) {
fadeToBlack(j, meteorTrailDecay );
}
}
// draw meteor
for(int j = 0; j < meteorSize; j++) {
if( ( i-j <NUM_LEDS) && (i-j>=0) ) {
setPixel(i-j, red, green, blue);
}
}
showStrip();
delay(SpeedDelay);
}
}
// used by meteorrain
void fadeToBlack(int ledNo, byte fadeValue) {
#ifdef ADAFRUIT_NEOPIXEL_H
// NeoPixel
uint32_t oldColor;
uint8_t r, g, b;
int value;
oldColor = strip.getPixelColor(ledNo);
r = (oldColor & 0x00ff0000UL) >> 16;
g = (oldColor & 0x0000ff00UL) >> 8;
b = (oldColor & 0x000000ffUL);
r=(r<=10)? 0 : (int) r-(r*fadeValue/256);
g=(g<=10)? 0 : (int) g-(g*fadeValue/256);
b=(b<=10)? 0 : (int) b-(b*fadeValue/256);
strip.setPixelColor(ledNo, r,g,b);
#endif
#ifndef ADAFRUIT_NEOPIXEL_H
// FastLED
leds[ledNo].fadeToBlackBy( fadeValue );
#endif
}
// *** REPLACE TO HERE ***
// ***************************************
// ** FastLed/NeoPixel Common Functions **
// ***************************************
// Apply LED color changes
void showStrip() {
#ifdef ADAFRUIT_NEOPIXEL_H
// NeoPixel
strip.show();
#endif
#ifndef ADAFRUIT_NEOPIXEL_H
// FastLED
FastLED.show();
#endif
}
// Set a LED color (not yet visible)
void setPixel(int Pixel, byte red, byte green, byte blue) {
#ifdef ADAFRUIT_NEOPIXEL_H
// NeoPixel
strip.setPixelColor(Pixel, strip.Color(red, green, blue));
#endif
#ifndef ADAFRUIT_NEOPIXEL_H
// FastLED
leds[Pixel].r = red;
leds[Pixel].g = green;
leds[Pixel].b = blue;
#endif
}
// Set all LEDs to a given color and apply it (visible)
void setAll(byte red, byte green, byte blue) {
for(int i = 0; i < NUM_LEDS; i++ ) {
setPixel(i, red, green, blue);
}
showStrip();
} |
NeoPixel
1
2
3
4
5
6
7
8
9
10
11
12
13
14
15
16
17
18
19
20
21
22
23
24
25
26
27
28
29
30
31
32
33
34
35
36
37
38
39
40
41
42
43
44
45
46
47
48
49
50
51
52
53
54
55
56
57
58
59
60
61
62
63
64
65
66
67
68
69
70
71
72
73
74
75
76
77
78
79
80
81
82
83
84
85
86
87
88
89
90
91
92
93
94
95
96
97
98
99
100
101
102
103
104
105
106
107
108
109
110
111
112
113
114
115
116
117
118
119
120
121
122
123
124
125
126
127
128
129
130
131
132
133
134
135
136
137
138
139
140
141
142
143
144
145
146
147
148
149
150
151
152
153
154
155
156
157
158
159
160
161
162
163
164
165
166
167
168
169
170
171
172
173
174
175
176
177
178
179
180
181
182
183
184
185
186
187
188
189
190
191
192
193
194
195
196
197
198
199
200
201
202
203
204
205
206
207
208
209
210
211
212
213
214
215
216
217
218
219
220
221
222
223
224
225
226
227
228
229
230
231
232
233
234
235
236
237
238
239
240
241
242
243
244
245
246
247
248
249
250
251
252
253
254
255
256
257
258
259
260
261
262
263
264
265
266
267
268
269
270
271
272
273
274
275
276
277
278
279
280
281
282
283
284
285
286
287
288
289
290
291
292
293
294
295
296
297
298
299
300
301
302
303
304
305
306
307
308
309
310
311
312
313
314
315
316
317
318
319
320
321
322
323
324
325
326
327
328
329
330
331
332
333
334
335
336
337
338
339
340
341
342
343
344
345
346
347
348
349
350
351
352
353
354
355
356
357
358
359
360
361
362
363
364
365
366
367
368
369
370
371
372
373
374
375
376
377
378
379
380
381
382
383
384
385
386
387
388
389
390
391
392
393
394
395
396
397
398
399
400
401
402
403
404
405
406
407
408
409
410
411
412
413
414
415
416
417
418
419
420
421
422
423
424
425
426
427
428
429
430
431
432
433
434
435
436
437
438
439
440
441
442
443
444
445
446
447
448
449
450
451
452
453
454
455
456
457
458
459
460
461
462
463
464
465
466
467
468
469
470
471
472
473
474
475
476
477
478
479
480
481
482
483
484
485
486
487
488
489
490
491
492
493
494
495
496
497
498
499
500
501
502
503
504
505
506
507
508
509
510
511
512
513
514
515
516
517
518
519
520
521
522
523
524
525
526
527
528
529
530
531
532
533
534
535
536
537
538
539
540
541
542
543
544
545
546
547
548
549
550
551
552
553
554
555
556
557
558
559
560
561
562
563
564
565
566
567
568
569
570
571
572
573
574
575
576
577
578
579
580
581
582
583
584
585
586
587
588
589
590
591
592
593
594
595
596
597
598
599
600
601
602
603
604
605
606
607
608
609
610
611
612
613
614
615
616
617
618
619
620
621
622
623
624
625
626
627
628
629
630
631
632
633
634
635
636
637
638
639
640
641
642
643
644
645
646
647
648
649
650
651
652
653
654
655
656
657
658
659
660
661
662
663
664
665
666
667
668
669
670
671
672
673
674
675
676
677
678
679
680
681
682
683
684
685
686
687
688
689
690
691
692
693
694
695
696
697
698
699
700
701
702
703
704
705
706
707
708
709
710
711
712
713
714
715
716
717
718
719
720
721
722
723
724
725
726
727
728
729
730
731
732
733
734
735
736
737
738
739
740
741
742
743
744
745
746
747
748
749
| #include <Adafruit_NeoPixel.h>
#include <EEPROM.h>
#define NUM_LEDS 60
#define PIN 5
Adafruit_NeoPixel strip = Adafruit_NeoPixel(NUM_LEDS, PIN, NEO_GRB + NEO_KHZ800);
#define BUTTON 2
byte selectedEffect=0;
void setup()
{
strip.begin();
strip.show(); // Initialize all pixels to 'off'
pinMode(2,INPUT_PULLUP); // internal pull-up resistor
attachInterrupt (digitalPinToInterrupt (BUTTON), changeEffect, CHANGE); // pressed
}
// *** REPLACE FROM HERE ***
void loop() {
EEPROM.get(0,selectedEffect);
if(selectedEffect>18) {
selectedEffect=0;
EEPROM.put(0,0);
}
switch(selectedEffect) {
case 0 : {
// RGBLoop - no parameters
RGBLoop();
break;
}
case 1 : {
// FadeInOut - Color (red, green. blue)
FadeInOut(0xff, 0x00, 0x00); // red
FadeInOut(0xff, 0xff, 0xff); // white
FadeInOut(0x00, 0x00, 0xff); // blue
break;
}
case 2 : {
// Strobe - Color (red, green, blue), number of flashes, flash speed, end pause
Strobe(0xff, 0xff, 0xff, 10, 50, 1000);
break;
}
case 3 : {
// HalloweenEyes - Color (red, green, blue), Size of eye, space between eyes, fade (true/false), steps, fade delay, end pause
HalloweenEyes(0xff, 0x00, 0x00,
1, 4,
true, random(5,50), random(50,150),
random(1000, 10000));
HalloweenEyes(0xff, 0x00, 0x00,
1, 4,
true, random(5,50), random(50,150),
random(1000, 10000));
break;
}
case 4 : {
// CylonBounce - Color (red, green, blue), eye size, speed delay, end pause
CylonBounce(0xff, 0x00, 0x00, 4, 10, 50);
break;
}
case 5 : {
// NewKITT - Color (red, green, blue), eye size, speed delay, end pause
NewKITT(0xff, 0x00, 0x00, 8, 10, 50);
break;
}
case 6 : {
// Twinkle - Color (red, green, blue), count, speed delay, only one twinkle (true/false)
Twinkle(0xff, 0x00, 0x00, 10, 100, false);
break;
}
case 7 : {
// TwinkleRandom - twinkle count, speed delay, only one (true/false)
TwinkleRandom(20, 100, false);
break;
}
case 8 : {
// Sparkle - Color (red, green, blue), speed delay
Sparkle(0xff, 0xff, 0xff, 0);
break;
}
case 9 : {
// SnowSparkle - Color (red, green, blue), sparkle delay, speed delay
SnowSparkle(0x10, 0x10, 0x10, 20, random(100,1000));
break;
}
case 10 : {
// Running Lights - Color (red, green, blue), wave dealy
RunningLights(0xff,0x00,0x00, 50); // red
RunningLights(0xff,0xff,0xff, 50); // white
RunningLights(0x00,0x00,0xff, 50); // blue
break;
}
case 11 : {
// colorWipe - Color (red, green, blue), speed delay
colorWipe(0x00,0xff,0x00, 50);
colorWipe(0x00,0x00,0x00, 50);
break;
}
case 12 : {
// rainbowCycle - speed delay
rainbowCycle(20);
break;
}
case 13 : {
// theatherChase - Color (red, green, blue), speed delay
theaterChase(0xff,0,0,50);
break;
}
case 14 : {
// theaterChaseRainbow - Speed delay
theaterChaseRainbow(50);
break;
}
case 15 : {
// Fire - Cooling rate, Sparking rate, speed delay
Fire(55,120,15);
break;
}
// simple bouncingBalls not included, since BouncingColoredBalls can perform this as well as shown below
// BouncingColoredBalls - Number of balls, color (red, green, blue) array, continuous
// CAUTION: If set to continuous then this effect will never stop!!!
case 16 : {
// mimic BouncingBalls
byte onecolor[1][3] = { {0xff, 0x00, 0x00} };
BouncingColoredBalls(1, onecolor, false);
break;
}
case 17 : {
// multiple colored balls
byte colors[3][3] = { {0xff, 0x00, 0x00},
{0xff, 0xff, 0xff},
{0x00, 0x00, 0xff} };
BouncingColoredBalls(3, colors, false);
break;
}
case 18 : {
// meteorRain - Color (red, green, blue), meteor size, trail decay, random trail decay (true/false), speed delay
meteorRain(0xff,0xff,0xff,10, 64, true, 30);
break;
}
}
}
void changeEffect() {
if (digitalRead (BUTTON) == HIGH) {
selectedEffect++;
EEPROM.put(0, selectedEffect);
asm volatile (" jmp 0");
}
}
// *************************
// ** LEDEffect Functions **
// *************************
void RGBLoop(){
for(int j = 0; j < 3; j++ ) {
// Fade IN
for(int k = 0; k < 256; k++) {
switch(j) {
case 0: setAll(k,0,0); break;
case 1: setAll(0,k,0); break;
case 2: setAll(0,0,k); break;
}
showStrip();
delay(3);
}
// Fade OUT
for(int k = 255; k >= 0; k--) {
switch(j) {
case 0: setAll(k,0,0); break;
case 1: setAll(0,k,0); break;
case 2: setAll(0,0,k); break;
}
showStrip();
delay(3);
}
}
}
void FadeInOut(byte red, byte green, byte blue){
float r, g, b;
for(int k = 0; k < 256; k=k+1) {
r = (k/256.0)*red;
g = (k/256.0)*green;
b = (k/256.0)*blue;
setAll(r,g,b);
showStrip();
}
for(int k = 255; k >= 0; k=k-2) {
r = (k/256.0)*red;
g = (k/256.0)*green;
b = (k/256.0)*blue;
setAll(r,g,b);
showStrip();
}
}
void Strobe(byte red, byte green, byte blue, int StrobeCount, int FlashDelay, int EndPause){
for(int j = 0; j < StrobeCount; j++) {
setAll(red,green,blue);
showStrip();
delay(FlashDelay);
setAll(0,0,0);
showStrip();
delay(FlashDelay);
}
delay(EndPause);
}
void HalloweenEyes(byte red, byte green, byte blue,
int EyeWidth, int EyeSpace,
boolean Fade, int Steps, int FadeDelay,
int EndPause){
randomSeed(analogRead(0));
int i;
int StartPoint = random( 0, NUM_LEDS - (2*EyeWidth) - EyeSpace );
int Start2ndEye = StartPoint + EyeWidth + EyeSpace;
for(i = 0; i < EyeWidth; i++) {
setPixel(StartPoint + i, red, green, blue);
setPixel(Start2ndEye + i, red, green, blue);
}
showStrip();
if(Fade==true) {
float r, g, b;
for(int j = Steps; j >= 0; j--) {
r = j*(red/Steps);
g = j*(green/Steps);
b = j*(blue/Steps);
for(i = 0; i < EyeWidth; i++) {
setPixel(StartPoint + i, r, g, b);
setPixel(Start2ndEye + i, r, g, b);
}
showStrip();
delay(FadeDelay);
}
}
setAll(0,0,0); // Set all black
delay(EndPause);
}
void CylonBounce(byte red, byte green, byte blue, int EyeSize, int SpeedDelay, int ReturnDelay){
for(int i = 0; i < NUM_LEDS-EyeSize-2; i++) {
setAll(0,0,0);
setPixel(i, red/10, green/10, blue/10);
for(int j = 1; j <= EyeSize; j++) {
setPixel(i+j, red, green, blue);
}
setPixel(i+EyeSize+1, red/10, green/10, blue/10);
showStrip();
delay(SpeedDelay);
}
delay(ReturnDelay);
for(int i = NUM_LEDS-EyeSize-2; i > 0; i--) {
setAll(0,0,0);
setPixel(i, red/10, green/10, blue/10);
for(int j = 1; j <= EyeSize; j++) {
setPixel(i+j, red, green, blue);
}
setPixel(i+EyeSize+1, red/10, green/10, blue/10);
showStrip();
delay(SpeedDelay);
}
delay(ReturnDelay);
}
void NewKITT(byte red, byte green, byte blue, int EyeSize, int SpeedDelay, int ReturnDelay){
RightToLeft(red, green, blue, EyeSize, SpeedDelay, ReturnDelay);
LeftToRight(red, green, blue, EyeSize, SpeedDelay, ReturnDelay);
OutsideToCenter(red, green, blue, EyeSize, SpeedDelay, ReturnDelay);
CenterToOutside(red, green, blue, EyeSize, SpeedDelay, ReturnDelay);
LeftToRight(red, green, blue, EyeSize, SpeedDelay, ReturnDelay);
RightToLeft(red, green, blue, EyeSize, SpeedDelay, ReturnDelay);
OutsideToCenter(red, green, blue, EyeSize, SpeedDelay, ReturnDelay);
CenterToOutside(red, green, blue, EyeSize, SpeedDelay, ReturnDelay);
}
// used by NewKITT
void CenterToOutside(byte red, byte green, byte blue, int EyeSize, int SpeedDelay, int ReturnDelay) {
for(int i =((NUM_LEDS-EyeSize)/2); i>=0; i--) {
setAll(0,0,0);
setPixel(i, red/10, green/10, blue/10);
for(int j = 1; j <= EyeSize; j++) {
setPixel(i+j, red, green, blue);
}
setPixel(i+EyeSize+1, red/10, green/10, blue/10);
setPixel(NUM_LEDS-i, red/10, green/10, blue/10);
for(int j = 1; j <= EyeSize; j++) {
setPixel(NUM_LEDS-i-j, red, green, blue);
}
setPixel(NUM_LEDS-i-EyeSize-1, red/10, green/10, blue/10);
showStrip();
delay(SpeedDelay);
}
delay(ReturnDelay);
}
// used by NewKITT
void OutsideToCenter(byte red, byte green, byte blue, int EyeSize, int SpeedDelay, int ReturnDelay) {
for(int i = 0; i<=((NUM_LEDS-EyeSize)/2); i++) {
setAll(0,0,0);
setPixel(i, red/10, green/10, blue/10);
for(int j = 1; j <= EyeSize; j++) {
setPixel(i+j, red, green, blue);
}
setPixel(i+EyeSize+1, red/10, green/10, blue/10);
setPixel(NUM_LEDS-i, red/10, green/10, blue/10);
for(int j = 1; j <= EyeSize; j++) {
setPixel(NUM_LEDS-i-j, red, green, blue);
}
setPixel(NUM_LEDS-i-EyeSize-1, red/10, green/10, blue/10);
showStrip();
delay(SpeedDelay);
}
delay(ReturnDelay);
}
// used by NewKITT
void LeftToRight(byte red, byte green, byte blue, int EyeSize, int SpeedDelay, int ReturnDelay) {
for(int i = 0; i < NUM_LEDS-EyeSize-2; i++) {
setAll(0,0,0);
setPixel(i, red/10, green/10, blue/10);
for(int j = 1; j <= EyeSize; j++) {
setPixel(i+j, red, green, blue);
}
setPixel(i+EyeSize+1, red/10, green/10, blue/10);
showStrip();
delay(SpeedDelay);
}
delay(ReturnDelay);
}
// used by NewKITT
void RightToLeft(byte red, byte green, byte blue, int EyeSize, int SpeedDelay, int ReturnDelay) {
for(int i = NUM_LEDS-EyeSize-2; i > 0; i--) {
setAll(0,0,0);
setPixel(i, red/10, green/10, blue/10);
for(int j = 1; j <= EyeSize; j++) {
setPixel(i+j, red, green, blue);
}
setPixel(i+EyeSize+1, red/10, green/10, blue/10);
showStrip();
delay(SpeedDelay);
}
delay(ReturnDelay);
}
void Twinkle(byte red, byte green, byte blue, int Count, int SpeedDelay, boolean OnlyOne) {
setAll(0,0,0);
for (int i=0; i<Count; i++) {
setPixel(random(NUM_LEDS),red,green,blue);
showStrip();
delay(SpeedDelay);
if(OnlyOne) {
setAll(0,0,0);
}
}
delay(SpeedDelay);
}
void TwinkleRandom(int Count, int SpeedDelay, boolean OnlyOne) {
setAll(0,0,0);
for (int i=0; i<Count; i++) {
setPixel(random(NUM_LEDS),random(0,255),random(0,255),random(0,255));
showStrip();
delay(SpeedDelay);
if(OnlyOne) {
setAll(0,0,0);
}
}
delay(SpeedDelay);
}
void Sparkle(byte red, byte green, byte blue, int SpeedDelay) {
int Pixel = random(NUM_LEDS);
setPixel(Pixel,red,green,blue);
showStrip();
delay(SpeedDelay);
setPixel(Pixel,0,0,0);
}
void SnowSparkle(byte red, byte green, byte blue, int SparkleDelay, int SpeedDelay) {
setAll(red,green,blue);
int Pixel = random(NUM_LEDS);
setPixel(Pixel,0xff,0xff,0xff);
showStrip();
delay(SparkleDelay);
setPixel(Pixel,red,green,blue);
showStrip();
delay(SpeedDelay);
}
void RunningLights(byte red, byte green, byte blue, int WaveDelay) {
int Position=0;
for(int i=0; i<NUM_LEDS*2; i++)
{
Position++; // = 0; //Position + Rate;
for(int i=0; i<NUM_LEDS; i++) {
// sine wave, 3 offset waves make a rainbow!
//float level = sin(i+Position) * 127 + 128;
//setPixel(i,level,0,0);
//float level = sin(i+Position) * 127 + 128;
setPixel(i,((sin(i+Position) * 127 + 128)/255)*red,
((sin(i+Position) * 127 + 128)/255)*green,
((sin(i+Position) * 127 + 128)/255)*blue);
}
showStrip();
delay(WaveDelay);
}
}
void colorWipe(byte red, byte green, byte blue, int SpeedDelay) {
for(uint16_t i=0; i<NUM_LEDS; i++) {
setPixel(i, red, green, blue);
showStrip();
delay(SpeedDelay);
}
}
void rainbowCycle(int SpeedDelay) {
byte *c;
uint16_t i, j;
for(j=0; j<256*5; j++) { // 5 cycles of all colors on wheel
for(i=0; i< NUM_LEDS; i++) {
c=Wheel(((i * 256 / NUM_LEDS) + j) & 255);
setPixel(i, *c, *(c+1), *(c+2));
}
showStrip();
delay(SpeedDelay);
}
}
// used by rainbowCycle and theaterChaseRainbow
byte * Wheel(byte WheelPos) {
static byte c[3];
if(WheelPos < 85) {
c[0]=WheelPos * 3;
c[1]=255 - WheelPos * 3;
c[2]=0;
} else if(WheelPos < 170) {
WheelPos -= 85;
c[0]=255 - WheelPos * 3;
c[1]=0;
c[2]=WheelPos * 3;
} else {
WheelPos -= 170;
c[0]=0;
c[1]=WheelPos * 3;
c[2]=255 - WheelPos * 3;
}
return c;
}
void theaterChase(byte red, byte green, byte blue, int SpeedDelay) {
for (int j=0; j<10; j++) { //do 10 cycles of chasing
for (int q=0; q < 3; q++) {
for (int i=0; i < NUM_LEDS; i=i+3) {
setPixel(i+q, red, green, blue); //turn every third pixel on
}
showStrip();
delay(SpeedDelay);
for (int i=0; i < NUM_LEDS; i=i+3) {
setPixel(i+q, 0,0,0); //turn every third pixel off
}
}
}
}
void theaterChaseRainbow(int SpeedDelay) {
byte *c;
for (int j=0; j < 256; j++) { // cycle all 256 colors in the wheel
for (int q=0; q < 3; q++) {
for (int i=0; i < NUM_LEDS; i=i+3) {
c = Wheel( (i+j) % 255);
setPixel(i+q, *c, *(c+1), *(c+2)); //turn every third pixel on
}
showStrip();
delay(SpeedDelay);
for (int i=0; i < NUM_LEDS; i=i+3) {
setPixel(i+q, 0,0,0); //turn every third pixel off
}
}
}
}
void Fire(int Cooling, int Sparking, int SpeedDelay) {
static byte heat[NUM_LEDS];
int cooldown;
// Step 1. Cool down every cell a little
for( int i = 0; i < NUM_LEDS; i++) {
cooldown = random(0, ((Cooling * 10) / NUM_LEDS) + 2);
if(cooldown>heat[i]) {
heat[i]=0;
} else {
heat[i]=heat[i]-cooldown;
}
}
// Step 2. Heat from each cell drifts 'up' and diffuses a little
for( int k= NUM_LEDS - 1; k >= 2; k--) {
heat[k] = (heat[k - 1] + heat[k - 2] + heat[k - 2]) / 3;
}
// Step 3. Randomly ignite new 'sparks' near the bottom
if( random(255) < Sparking ) {
int y = random(7);
heat[y] = heat[y] + random(160,255);
//heat[y] = random(160,255);
}
// Step 4. Convert heat to LED colors
for( int j = 0; j < NUM_LEDS; j++) {
setPixelHeatColor(j, heat[j] );
}
showStrip();
delay(SpeedDelay);
}
void setPixelHeatColor (int Pixel, byte temperature) {
// Scale 'heat' down from 0-255 to 0-191
byte t192 = round((temperature/255.0)*191);
// calculate ramp up from
byte heatramp = t192 & 0x3F; // 0..63
heatramp <<= 2; // scale up to 0..252
// figure out which third of the spectrum we're in:
if( t192 > 0x80) { // hottest
setPixel(Pixel, 255, 255, heatramp);
} else if( t192 > 0x40 ) { // middle
setPixel(Pixel, 255, heatramp, 0);
} else { // coolest
setPixel(Pixel, heatramp, 0, 0);
}
}
void BouncingColoredBalls(int BallCount, byte colors[][3], boolean continuous) {
float Gravity = -9.81;
int StartHeight = 1;
float Height[BallCount];
float ImpactVelocityStart = sqrt( -2 * Gravity * StartHeight );
float ImpactVelocity[BallCount];
float TimeSinceLastBounce[BallCount];
int Position[BallCount];
long ClockTimeSinceLastBounce[BallCount];
float Dampening[BallCount];
boolean ballBouncing[BallCount];
boolean ballsStillBouncing = true;
for (int i = 0 ; i < BallCount ; i++) {
ClockTimeSinceLastBounce[i] = millis();
Height[i] = StartHeight;
Position[i] = 0;
ImpactVelocity[i] = ImpactVelocityStart;
TimeSinceLastBounce[i] = 0;
Dampening[i] = 0.90 - float(i)/pow(BallCount,2);
ballBouncing[i]=true;
}
while (ballsStillBouncing) {
for (int i = 0 ; i < BallCount ; i++) {
TimeSinceLastBounce[i] = millis() - ClockTimeSinceLastBounce[i];
Height[i] = 0.5 * Gravity * pow( TimeSinceLastBounce[i]/1000 , 2.0 ) + ImpactVelocity[i] * TimeSinceLastBounce[i]/1000;
if ( Height[i] < 0 ) {
Height[i] = 0;
ImpactVelocity[i] = Dampening[i] * ImpactVelocity[i];
ClockTimeSinceLastBounce[i] = millis();
if ( ImpactVelocity[i] < 0.01 ) {
if (continuous) {
ImpactVelocity[i] = ImpactVelocityStart;
} else {
ballBouncing[i]=false;
}
}
}
Position[i] = round( Height[i] * (NUM_LEDS - 1) / StartHeight);
}
ballsStillBouncing = false; // assume no balls bouncing
for (int i = 0 ; i < BallCount ; i++) {
setPixel(Position[i],colors[i][0],colors[i][1],colors[i][2]);
if ( ballBouncing[i] ) {
ballsStillBouncing = true;
}
}
showStrip();
setAll(0,0,0);
}
}
void meteorRain(byte red, byte green, byte blue, byte meteorSize, byte meteorTrailDecay, boolean meteorRandomDecay, int SpeedDelay) {
setAll(0,0,0);
for(int i = 0; i < NUM_LEDS+NUM_LEDS; i++) {
// fade brightness all LEDs one step
for(int j=0; j<NUM_LEDS; j++) {
if( (!meteorRandomDecay) || (random(10)>5) ) {
fadeToBlack(j, meteorTrailDecay );
}
}
// draw meteor
for(int j = 0; j < meteorSize; j++) {
if( ( i-j <NUM_LEDS) && (i-j>=0) ) {
setPixel(i-j, red, green, blue);
}
}
showStrip();
delay(SpeedDelay);
}
}
// used by meteorrain
void fadeToBlack(int ledNo, byte fadeValue) {
#ifdef ADAFRUIT_NEOPIXEL_H
// NeoPixel
uint32_t oldColor;
uint8_t r, g, b;
int value;
oldColor = strip.getPixelColor(ledNo);
r = (oldColor & 0x00ff0000UL) >> 16;
g = (oldColor & 0x0000ff00UL) >> 8;
b = (oldColor & 0x000000ffUL);
r=(r<=10)? 0 : (int) r-(r*fadeValue/256);
g=(g<=10)? 0 : (int) g-(g*fadeValue/256);
b=(b<=10)? 0 : (int) b-(b*fadeValue/256);
strip.setPixelColor(ledNo, r,g,b);
#endif
#ifndef ADAFRUIT_NEOPIXEL_H
// FastLED
leds[ledNo].fadeToBlackBy( fadeValue );
#endif
}
// *** REPLACE TO HERE ***
// ***************************************
// ** FastLed/NeoPixel Common Functions **
// ***************************************
// Apply LED color changes
void showStrip() {
#ifdef ADAFRUIT_NEOPIXEL_H
// NeoPixel
strip.show();
#endif
#ifndef ADAFRUIT_NEOPIXEL_H
// FastLED
FastLED.show();
#endif
}
// Set a LED color (not yet visible)
void setPixel(int Pixel, byte red, byte green, byte blue) {
#ifdef ADAFRUIT_NEOPIXEL_H
// NeoPixel
strip.setPixelColor(Pixel, strip.Color(red, green, blue));
#endif
#ifndef ADAFRUIT_NEOPIXEL_H
// FastLED
leds[Pixel].r = red;
leds[Pixel].g = green;
leds[Pixel].b = blue;
#endif
}
// Set all LEDs to a given color and apply it (visible)
void setAll(byte red, byte green, byte blue) {
for(int i = 0; i < NUM_LEDS; i++ ) {
setPixel(i, red, green, blue);
}
showStrip();
} |


Comments
There are 566 comments. You can read them below.
You can post your own comments by using the form below, or reply to existing comments by using the "Reply" button.
Hi Hans,
Thank you so much for working all this out and sharing it with us.
It is all way above my ability, which explains why I never managed to get it to work :-)
I’m looking forward to getting the time to try this out.
All the best
Spike
Spike
Thanks Spike!
And you’re most welcome – wish I could do these kind of articles all day long
But … keep in mind that I had to do my share of research as well, since some of these challenges are exactly that: challenges.
Enjoy!
hans
Hi guys! I use led strip ws2812 with 60 leds on my quad copter, flying like a UFO at night… But using one effect each time when return tô ground. Please have The way to changes effects automatics?
Sorry my poor english.
Junior
Hi Junior,
Yes you can modify the code, without too much work, to rotate through the effects automatically.
Instead of using an interrupt for a button press, you could create an time based interrupt that increases the value for “selectedEffect” by one, and resets it to zero when the maximum has been reached.
Having said that: There could be a better way to do this without the need for a timer.
You may have to tweak the individual “case” statements, since some of the effects depend on being repeated over and over again.
For example calling “RGBLoop()” in the “case 0:” block: you may want to call the function “RGBLoop()” several times, or create a loop around it that checks the time so it runs for at least a second (if needed).
The basics: Change this
to this (basically remove the EEPROM and interrupt related code, and modify the effect selection):
This is untested code, but I’m pretty confident this will work.
Hope this helps.
NOTE: If you want to discuss this more in depth: please start a forum topic to avoid us posting code here.
Hans
Thanks my friend, I Will try change The code to make automatic, thanks só much Hans.
Junior
You’re welcome Junior!
Hans
Could You advice how to change it also for Adafruit_NeoPixel?
Lukas
Hi Lukas,
The code for AdaFruit NeoPixel is listed below the FastLED code (here).
Hans
Hi thanks, but this is the full code I need without the button 2. Automatically change.
Lukas
Removing a button is the same for FastLED and NeoPixel.
Say you want to remove effect #2 (Strobe, which is the 3rd effect – effects start counting at zero, so from zero to 17 for 18 effects):
Change (around line #23):
if(selectedEffect>18) {selectedEffect=0;
EEPROM.put(0,0);
}
to (reduce the number 18 by one):
if(selectedEffect>17) { // <--- 18 minus 1selectedEffect=0;
EEPROM.put(0,0);
}
Remove:
case 2 : {// Strobe - Color (red, green, blue), number of flashes, flash speed, end pause
Strobe(0xff, 0xff, 0xff, 10, 50, 1000);
break;
}
Update:
All “case” lines after where “case 2” used to be, and reduce the numbers by one.
Eg “case 3:” -> “case 2:“,
“case 4:” -> “case 3:”
etc.
And you should be good to go. (I assume this is what you meant).
Hans
Hello Hans, thanks for the nice “All-in-One” Wonder!
I test it and all seams to work ok.
I smole problem that i have is the debouncing problem of
the button, i use a Nano 328 and the latest Arduino IDE.
When pushing the button, it jumps from selectedEffect 0
to lets say 3 or 5, so i must click very fast the button to jump to
nr. 2 and 3…
In your setup()
you use: digitalWrite (BUTTON, HIGH); // internal pull-up resistor
for buttons i use this line: pinMode(2,INPUT_PULLUP);
…this sets the D2 as input and also activates the internal 40 kOhm
in one wash.
The new “meteorRain” is the coolest effect :-)
With “FastLED”-Library i have some colored points in the String,
behind this Effect, but only white color in “Adafruit_NeoPixel”.
Is that the same in your string? Is “Adafruit_NeoPixel”
not able to handle this colors?
Daniel
Hi Daniel,
So using
instead of
works better? If you confirm that, then I will modify the code accordingly.
(can’t test right now, since I stowed my stuff away again – argh – I need a workshop!)
I did not experience the debouncing problem though – maybe the nature of the switch I’m using?
FastLED is much more advanced when it comes to colors, ADAFruit NeoPixel is pretty limited. On my strand the meteor rain works correct with both, however the effect is much more refined with FastLED. A refinement of the fadeToBlack function might be helpful – as you can see, for FastLED I use a build in function, and for neoPixel I have to glue something together.
hans
Hello Hans, yes i allways use
because it is all done in one line, set digitalport to input and also set this input to +5v
so i dont need any aditional 10k resistors from input-pin to ground and a button from
input to +5v.
This is allway better with PULUP because all ports are FET Inputs and so they have a very
hi impedance witch is good …but a high impedance input, always pick up some noise or
static loads…so the pins driving slowly to HIGH or at least 2-3V from ground away.
I made a VU-Meter with Neopixels and i have the problem…in the pause (no sound)…
the A= port starts climbing up and my Pixel starts one after another…so i put
a 1 Megaohm from A0 to ground, then the port can not start growibg up because the 1M
resistor descharge the port. 1M is very high, i use it to not influence the A0 port.
Here in this case i can not PULLUP because the Pixels will light all full from the +5V.
But for Buttons i’m allways using PULLUP, no need of 10kohm and port is not rising up
because he is allready at +5v :-)
You don’t have to change the code for this, i hope other readers understand what i mean.
Ok i hade no problems till now with the NeoPixel -lIbrary, but i also try the FastLED, it use
around 1kb more memory but else no relevant changes.
Ok Hans have a nice weekend, cheers de Daniel 72
Daniel
Thanks Daniel!
Thanks for the great explanation – I can (and like to) learn something every day as well!
I’ll play with your suggestion once I get time to play again.
hans
I know I am resurrecting this from the dead, but I had the same issue of the push button being random on my Metro Mini. Changing the code to this fixed my problem as mentioned above :
leigh
Thanks Leigh!
hans
With the issue of the code jumping past certain effects, if you add a 50ms delay in the setup section. I had the same problem and this fixed it.
Scott
hans
Please, how can i add 50ms on setup code to eliminate boucing on button?
Thanks for all.
Junior
Hi Junior,
you could try something like this (derived from Arduino – Debounce):
Add to the beginning of the code (before “void setup()”):
And change the changeEffect function to this:
void changeEffect() {if ((millis() - lastDebounceTime) > debounceDelay)
{
if (digitalRead (BUTTON) == HIGH) {
selectedEffect++;
EEPROM.put(0, selectedEffect);
asm volatile (" jmp 0");
}
}
}
The value for lastDebounceTime does not need to be reset, since we reset the Arduino and lastDebounceTime will become zero again.
Note: I have not tested this code.
Hans
Please let me know if this works – then I’ll add it to the main article.
(i have not been able to reproduce the bouncing issue with my gear, so I cannot test)
Hans
Hi Hans! I solve my boucing issues using in a place of button one optocoupler 817!. Magnifc results and a use with my controler RC. Thanks, late Will send YouTube link demostraining in use!
Junior
Cool! Interesting approach! But that would do the trick I suppose!
Curious how you hooked it up!
Hans
In time..
In the rádio i have option in milliseconds The switching in put in on position ex. 10secs close position tô release a key… Do you understand my f*** poor english?
Thanks Hans!
Junior
Haha, I’ll admit that it takes some decoding hahah 😜
Hans
Hahaha, sorry Hans. On vídeo i Will explain more easily… I hope hahahahahahahah if write is a terror, imagine speaking…. Hahaha
Do you have some other way to contact? Instagram? The imagens and vídeos of my Project is there.
Thanks for all Hans.
Junior
I do have Instagram (but rarely use it). You can also use the forum, or even email me (webmaster at tweaking4all dot com).
Hans
I found your Instagram! When you have a little time, follow me to see my project with ws2812b strip led based in your work! Thanks one more time!
Junior
Cool, I’ve requested to follow you as well
I’ll be traveling tomorrow, so apologies up front if I do not respond right away.
Hans
Here is the brain of the lights project, arduino pro mini With 18 lighting effects controlled via the ch7 key on my radio control! I was trying to use a button on the arduino itself, but without success, there were several defects … But now everything is perfect, added to a coupler that was perfect without the effect of boucing. Use an L817! ..thanks Hans to make it happens!
https://www.instagram.com/p/CDbAQmMnrIEfhzptmueFo_kEBrUtDVp50o-YPY0/?igshid=1uuinq3t6zca6
Junior
Hi Junior!
That looks great!
Awesome that you got it resolved and thanks for the pictures!
Thanks for posting the fix as well.
Hans
Thanks for all Hans, next week i will post vídeo on my Instagram with my RC working and demostrating all effects on my quad copter! Bye and thanks so much Hans!
Junior
Thank you as well – I’ll be looking forward to your video 😊
Hans
Hello Hans, there is the link with project working perfect
https://www.instagram.com/tv/CDfLLQ_nEdKD0qfSUTv-9CtNWyxzHyV6F3CgY00/?igshid=mceirp0vvqa8
Junior
That looks awesome! Haha!
Please try to record the faces of the neighbors when you hover over their house at night
Hans
Hahaha, good idea Hans, I do if possible….
I will be forever grateful for the tips you taught me! Thank you very much for your help, Hans you have a great friend here in Brazil. God bless you.
Junior
Thanks Junior – that’s really nice to hear! Have fun! Hope to see you here again!
Hans
I’m sure I’ll be here, even if I don’t need anything, I’m always reading your posts in search of more knowledge in the area of general electronics. My next step is to assemble a strobe unit, to put on the belly of my drone, a similar strobe used in old cameras … The circuit is not very difficult, but I still have to study a little more! Thank you Hans.
Junior
Awesome! Thanks Junior!
Have a good weekend!
Hans
Apologies to all for somehow totally forgetting to update the code with Daniels brilliant modification.
I’ve updated the code and the download! Thanks again Daniel!
And thanks Leigh for reminding me!
hans
I want to thank you for this awesome articular on LEDS strips. It gave me some great ideas for my latest Jukebox project using these Neo-pixal strips. Your welcome to check out my latest LED effects using some of your coding at https://youtu.be/ZWGdVXJNOww. I am using a Arduino Mega to control three strips of 180 leds per strip plus additional 59 leds that I am using in a keyboard/index display which is controlled by a Arduino Micro. The complete Jukebox build can be viewed here if you are interested. https://youtu.be/mNt3cUORvak
Thanks
Bob
Hi Bob!
Thanks you for taking the time to post a thank you note.
I’ve just looked at your jukebox project – that’s awesome!!! (the first YouTube link didn’t work)
Wow, you’ve given me an idea for a project – amazingly well build!
hans
Oops. Try this link. Not sure how what happen with the other link.
https://youtu.be/ZWGdVXJNOww
Bob
Thanks Bob – oh well, sh*t happens, no worries hahah.
Thanks for posting the link.
Man, I really love what you’ve created there!
hans
Hi Hans,
thank you so much for this nice work!
What changes in setup and define section do I have to make for SPI (APA102) LEDs working for that demo?
Marco Weinkauf
Hi Marco!
Thank you for the compliment! It’s much appreciated!
I’ve never worked with the APA102, so I’m afraid I will have to point you to the reference of (for example) FastLED: Setting up LEDs.
I did see an example there:
And I did find more info here: SPI Hardware or Bit banging:
There is even the option to change the frequency:
There is more info, especially on that second link.
I hope this is helpful.
hans
Hans–
Great stuff. Readily tweakable to all the color palettes I like. Using it on two diff 5M neopixel strips to pep up my house’s entrance way for a party.
My one question: Would there be an easy way to insert an analog potentiometer input into the wiring and code that could control brightness universally through all the cases?
Alan
Hi Alan,
Awesome!
Yes, I would assume so. I have not tried this yet, but with the use of one of the Analog pins of the Arduino, and some code to set the overall brightness (FastLED is really good at that) should do the trick.
The only issue I’d see is that turning a potentiometer would have to be read, kind-a like the push of the button, to make sure it works right away. This then makes it a challenge since triggering this works for buttons, but not (as far as I know) for potentiometers.
hans
Thank you for this awesome write-up!! I am trying to do exactly this but instead of a button I need to trigger by serial input, when a particular character is read it would trigger a particular effect. This is all new to me so I’m a bit in over my head.
Jimmie M
Hi Jimmie,
your approach would come with a challenge. Unless you add some electronics and/or a second Arduino.
The switch is connected to a pin that allows interruption of your program. I don’t think this will work with serial data though.
hans
Dear Sir, My interesting subject and most helpful. Thanks lot
Samim SK
Hi Samim!
thank you very much for the complement and for taking the time to post a thank-you – it’s very much appreciated!
hans
great proyect, im new on arduino programing, but is any way or guide to control with a bluetooth instead of a push button?
kabodos
Hi Kabodos,
I have yet to play with Bluetooth, but I’m sure there must be a way to do this.
There will be 2 challenges; get Bluetooth to work of course and make sure that a response from Bluetooth can actually interrupt the code. The latter might be a little challenging, as I have zero experience with Bluetooth and Arduino.
hans
I would like to run a continuous light show using all the different patterns without using a button to switch between them.
Jerry Campbell
Hi Jerry,
You can, by modifying the “loop()”, something like this:
void loop() {
                // RGBLoop - no parameters
                RGBLoop();

                // FadeInOut - Color (red, green. blue)
                FadeInOut(0xff, 0x00, 0x00); // red
                FadeInOut(0xff, 0xff, 0xff); // white
                FadeInOut(0x00, 0x00, 0xff); // blue

                // Strobe - Color (red, green, blue), number of flashes, flash speed, end pause
                Strobe(0xff, 0xff, 0xff, 10, 50, 1000);

                // HalloweenEyes - Color (red, green, blue), Size of eye, space between eyes, fade (true/false), steps, fade delay, end pause
                HalloweenEyes(0xff, 0x00, 0x00,
                              1, 4,
                              true, random(5,50), random(50,150),
                              random(1000, 10000));
                HalloweenEyes(0xff, 0x00, 0x00,
                              1, 4,
                              true, random(5,50), random(50,150),
                              random(1000, 10000));

                // CylonBounce - Color (red, green, blue), eye size, speed delay, end pause
                CylonBounce(0xff, 0x00, 0x00, 4, 10, 50);

                // NewKITT - Color (red, green, blue), eye size, speed delay, end pause
                NewKITT(0xff, 0x00, 0x00, 8, 10, 50);

                // Twinkle - Color (red, green, blue), count, speed delay, only one twinkle (true/false)
                Twinkle(0xff, 0x00, 0x00, 10, 100, false);

                // TwinkleRandom - twinkle count, speed delay, only one (true/false)
                TwinkleRandom(20, 100, false);

                // Sparkle - Color (red, green, blue), speed delay
                Sparkle(0xff, 0xff, 0xff, 0);

                // SnowSparkle - Color (red, green, blue), sparkle delay, speed delay
                SnowSparkle(0x10, 0x10, 0x10, 20, random(100,1000));

                // Running Lights - Color (red, green, blue), wave dealy
                RunningLights(0xff,0x00,0x00, 50);  // red
                RunningLights(0xff,0xff,0xff, 50);  // white
                RunningLights(0x00,0x00,0xff, 50);  // blue

                // colorWipe - Color (red, green, blue), speed delay
                colorWipe(0x00,0xff,0x00, 50);
                colorWipe(0x00,0x00,0x00, 50);

                // rainbowCycle - speed delay
                rainbowCycle(20);

                // theatherChase - Color (red, green, blue), speed delay
                theaterChase(0xff,0,0,50);

                // theaterChaseRainbow - Speed delay
                theaterChaseRainbow(50);

                // Fire - Cooling rate, Sparking rate, speed delay
                Fire(55,120,15);

              // simple bouncingBalls not included, since BouncingColoredBalls can perform this as well as shown below
              // BouncingColoredBalls - Number of balls, color (red, green, blue) array, continuous
              // CAUTION: If set to continuous then this effect will never stop!!!

                // mimic BouncingBalls
                byte onecolor[1][3] = { {0xff, 0x00, 0x00} };
                BouncingColoredBalls(1, onecolor, false);

                // multiple colored balls
                byte colors[3][3] = { {0xff, 0x00, 0x00},
                                      {0xff, 0xff, 0xff},
                                      {0x00, 0x00, 0xff} };
                BouncingColoredBalls(3, colors, false);

                // meteorRain - Color (red, green, blue), meteor size, trail decay, random trail decay (true/false), speed delay
                meteorRain(0xff,0xff,0xff,10, 64, true, 30);
}
I have not been able to test this, and it’s still early in the morning here (I need one more coffee I think haha).
If one of the effects is endless then it will get “stuck” with that effect and we’d need to tweak the effect to not be endless.
Each effect is ran only once, so you may want to to a “for-loop” around an effect to make it appear multiple times.
Hope this helps!
hans
Thanks Hans,
I’ll give it a try this evening.
Jerry Campbell
Keep us posted!
hans
Big Thank You, Hans
Worked perfectly, just what I was wanting.
Jerry Campbell
Hi Jerry, post a link to your modified code… Thanks
Daniel Fernandes
Thanks Jerry!
That’s good news
hans
I tried it but I did not find the effect (Fire) working or being missed,
Did I make a mistake?
Sorry I am a beginner who just wants to learn Arduino 🙏
Marunthol
Assuming you’re referring to the code in the threat, you’ll have to add this line:
The values passed to the Fire function (more details here) are :
You could, for example place it right after the meteor rain line:
Hans
I have done your advice but not get results
can you add the code so that I can see the difference?
Marunthol
From your code:
change it to:
(assuming your code gets to the MeteorRain, it will fire the Fire effect right after that)
Hans
Great stuff! Although I have not been able to get the ‘Meteor Rain’ effect to work with Fast LED.
Kevin
Hi Kevin!
Glad you like it!
Please start a new forum topic in the Arduino Forum, so you can post your code and I can maybe see what it is failing.
(please do not post code in here the comment section)
Also; please list the model Arduino you’re using.
Hans
Hi.
On the sample video you can see the led flicker when they get dimmed.
I quess this is to do with the PWM dimming. Can this be set to a higher frequency or is this preset in the led chips.
I would to use in video recordings
Emiel
Hi Emiel,
not sure what video you’re referring to, but I did notice that FastLED is much better at this than NeoPixel – so I’d start by using FastLED.
Another reason could be the method dimming is calculated. If the steps to the next level are too much, flickering may occur. I know FastLED has much better dimming techniques/functions available (NeoPixel not so much) which you may want to experiment with.
Hope this helps
hans
Thank you for all your work, it proves we all can do it as long as as we just give it a go.
You inspired me to do some Christmas lights.
I will try it out for my Christmas lights and add BLE or a button.,
I don’t mind if the script/sketch resets, I probably would prefer it.
Regards
Aaron
Thanks Aaron!
I very much appreciate your thank-you note! It’s much appreciated and it’s fun to hear that others get enthusiastic with this stuff as well!
hans
Tip: Your use of asm volatile (” jmp 0″); wont fly on a ESP8266 (Error: “unknown opcode or format name jmp”)
Mike Garber
Thanks Mike for the tip!
I read in a bug report that the ESP library has a reset/restart function.
and
There seems to be a bug with the first reset call, and I’m not sure if this still is the case (since I have done nothing with ESP yet).
One user suggest using this to reset:
I cannot (yet) test this though, but it would be cool if it would work.
hans
That doesn’t seem to work for me. At least not for the M5Stick-C. The IDE doesn’t know where to find wdt_reset, nor do I. I did try some various headers, such as “esp_system.h” but no joy. Any what ESP32 library I should be using?
Cheers, Peter
Peter Thompson
Hi Peter!
Happy New Year!
I do not have an ESP32 (yet) and haven’t been able to test the code.
I did find this article attempting to implement WDT for the ESP32 using the “esp_task_wdt.h” library.
I have not tried this code, but maybe it is helpful for you.
Hans
Thanks Hans,
I’ll check that out. I was able to get the neoPixel version working without the button – merely cycles through the various patterns.
If you want a fun device to play with that is ESP32, check out the M5Stick-C.
Cheers!
Peter Thompson
Hi Peter!
Thanks for the tip on the M5Stick-C – is it M5Stick-C or M5Stack-C? (tried Googling it)
Cheers
Hans
The product I’m using is the M5Stick-C, but this is from the M5Stack line.
I got mine through Adafruit, but I see that digikey.com also carries them.
M5Stack Atom: https://www.adafruit.com/product/4497
M5Stack M5Stick-C: https://www.adafruit.com/product/4290
Peter Thompson
Thanks Peter!
Hans
Hello,
I don’t speack English so it’s difficult for me to understand all your explications.
I try to use AllEffects LEDStrip Effect (NeoPixel) downloaded on this page.
But I have some problem when I check the code.
Could you help me please?
Arnaud
Hi Arnaud,
What hardware are you using? (Arduino Uno R3?)
If you’re using an Arduino Uno, then by the looks of the error messages you have a typo somewhere …
hans
Hello Hans,
Thank you for your answer.
I use an Arduino Uno R3.
I just found a solution. Not why it didn’t work but how to use your sketch.
The problem was not typo but software.
On my laptop I use Ubuntu and Arduino 2:1.0.5+dfsg2-4. Your sketch doesn’t work.
I tried with my Android smartphone, ArduinoDroid, the same sketch and the same libraries. Your sketch works perfectly.
Thank you Hans for your very good sketches and tutorials.
Arnaud
Hi Arnaud,
what you could try, if you use copy and paste: copy the sketch text to a plain text editor (you could try Atom – freely available for Windows, Mac and Linux). After having it copied there, select all and copy again, and now paste it into the Arduino IDE. I have seen a few users with goofy effects of characters being copied from their browser. So maybe this is the case in your situation as well.
hans
Hello Hans,
Thank you for your help.
I installed Atom, copied-pasted our code inside, just changed “PIN 5” to “PIN 6” and copied-pasted all from Atom into the Arduino IDE.
There is the same compilation error.
Perhaps there is a problem with my EEPROM library on Linux. I will try to remove it and install it at new.
But our code works fine when I use it from my phone with an Android OS. And for that I’m very happy.
Arnaud
Thanks for the feedback – there must be an issue with the Arduino IDE you’re using.
Your version number seems a little odd, maybe you’d want to try to download the latest version from the Arduino website: https://www.arduino.cc/en/Main/Software – which at this time would be version 1.8.5.
Would be nice to figure that one out, right?
hans
Hello Hans,
You’re right. I had a too old version.
I installed the latest version as you advised me and there no check problem.
The uploading is OK and your code works wonderfully.
Many thanks for all.
Arnaud
You’re most welcome!
Glad it got resolved and thanks for posting the confirmation!
hans
Hi Hans! First, thank you and congratulations for the “CHALLENGE!”
I
do not know if anyone here in the forum commented on it (I did not read
everything because my language is Portuguese) but, instead of using a
Button, like you did, I would not be able to sequence these codes with a
kind of “Delay”, or either, each time one code ends, the other starts, and so on?
See that they are words of a practically “layman” in the subject; hug from Brazil
Daniel Fernandes
Hi Daniel,
yes you most certainly can put them in sequence so it rotates automatically.
Probably the easiest to do this is by making a small change to the loop();
replace this:
void loop() {
  EEPROM.get(0,selectedEffect);

  if(selectedEffect>18) {
    selectedEffect=0;
    EEPROM.put(0,0);
  }
with this:
void loop() {selectedEffec++;
if(selectedEffect>18) {
selectedEffect=0;
delay(1000); // 1 second delay
}
... // the effects
Hope this helps.
hans
Hi Hans!
I did so, as you said:
void loop() {
selectedEffec++;
if(selectedEffect>18) {
selectedEffect=0;
delay(1000); // 1 second delay
}
switch(selectedEffect) {
case 0, 1, 2 …
And showed the following error:
‘selectedEffec’ was not declared in this scope
Hugs
Daniel Fernandes
Hi Daniel!
I see, typo on my end … it should have been selectedEffect – forgot the “t” at the end
Corrected:
void loop() {
  selectedEffect++;  // <--- I forgot the "t" in selectedEffect

  if(selectedEffect>18) {
    selectedEffect=0;
    delay(1000); // 1 second delay
  }
hans
Hi Hans! One more time, it did not work!
He performs some four sequences and stops at a set of red lights;
Daniel Fernandes
Hi Daniel,
oh man, we keep running into small problems
Can you verify that the numbers in the “case” statement are sequential (ie. there is no gap in the numbers).
  switch(selectedEffect) {

    case 0  : {
                // RGBLoop - no parameters
                RGBLoop();
                break;
              }
    case 1  : {
                // FadeInOut - Color (red, green. blue)
                FadeInOut(0xff, 0x00, 0x00); // red
                FadeInOut(0xff, 0xff, 0xff); // white
                FadeInOut(0x00, 0x00, 0xff); // blue
                break;
              }
    ...
You should see: case 0, case 1, case 2, …, case 18.
Are you using FastLED (better) or NeoPixel?
And is your powersupply powerful enough to have all LEDs powered?
So the 4th or 5th sequence fails? You could comment out an effect and see which one is failing, for example like so, see effect “case 4- CylonBounce” where I added “//” before the effect.
    case 3  : {
                // HalloweenEyes - Color (red, green, blue), Size of eye, space between eyes, fade (true/false), steps, fade delay, end pause
                HalloweenEyes(0xff, 0x00, 0x00,
                              1, 4,
                              true, random(5,50), random(50,150),
                              random(1000, 10000));
                HalloweenEyes(0xff, 0x00, 0x00,
                              1, 4,
                              true, random(5,50), random(50,150),
                              random(1000, 10000));
                break;
              }

    case 4  : {
                // CylonBounce - Color (red, green, blue), eye size, speed delay, end pause
                // CylonBounce(0xff, 0x00, 0x00, 4, 10, 50);  // <--- here, added "//" to comment out the effect
                break;
              }

    case 5  : {
                // NewKITT - Color (red, green, blue), eye size, speed delay, end pause
                NewKITT(0xff, 0x00, 0x00, 8, 10, 50);
                break;
              }
hans
Hi Hans, It worked! Very cool!
I think it was not enough to connect the Source Negative to Arduino’s GND;
I’ll always be looking on your site for a few more effects additions.
Now I have a few more questions:
1) Is there a Delay between each effect or is it a Delay for all?
2) Is this code supported by an ATtiny85 8MHz (by size and versatility)?
3) To cancel an effect, for example “HalloweenEyes”, do I only comment on the effect with “//” or exclude all “case 3”?
Once again, thank you very much and congratulations for the feat!
Daniel Fernandes
Hi Daniel,
Glad to hear it works!
Ill try to answer your questions:
1) Delay between effects can be accomplished by adding a delay at the end of loop(), like so (watch out for the accolade):
case 18 : {// meteorRain - Color (red, green, blue), meteor size, trail decay, random trail decay (true/false), speed delay
meteorRain(0xff,0xff,0xff,10, 64, true, 30);
break;
}
}
delay(1000); // <-- added a 1 second delay after an effect has been executed
}
2) I have no idea if the ATtiny can handle this – if it would be limited then it would be because of the size of the code. You could also consider an ESP8266, which I haven’t tested yet. They are very cheap and very capable.
3) Cancelling an effect;
The best way would be to remove the code and change the numbers of the “case x:” lines, for example:
becomes:
case 2 : {// Strobe - Color (red, green, blue), number of flashes, flash speed, end pause
Strobe(0xff, 0xff, 0xff, 10, 50, 1000);
break;
}
// case 3 removed
case 3 : { // case 4 has been renumbered to case 3, ditto for the following "case" numbers (ie. case 5 becomes case4 etc)
// CylonBounce - Color (red, green, blue), eye size, speed delay, end pause
CylonBounce(0xff, 0x00, 0x00, 4, 10, 50);
break;
}
Hope this helps.
hans
Hi
Thank you so much for your article and your explanation. I’m new to arduino and programming. I’ve by looking quite a long time for an answer to that problem of interrupt with Neopixel but didn’t fnd anything until I found your webpage.
I took your code structure (Neopixel) and replaced your animations by mine (I kept some of your animations…). It works quite well. But there are 2 minor problems.
1) Starting Case:
When I switch on the arduino (or reset), it starts at case 1 instead of case 0. I could fix this by changing the code at line 9: byte selectedEffect=0; to byte selectedEffect=18. If I choose selectedEffect= Max Nr of cases, then it starts at case 0. I don’t understand why but it works, so it’s fine for me. I’m just curious to know why it happens…
2) Switch debounce:
While toggling through the cases, it often starts again at case 0 before having reached the last case. I don’t know what the reason is but I guess it has something to do with switch bouncing. I don’t know how to fix this with an interrupt. Can somebody help me with this? I would prefer a software solution than a hardware solution but any solution is welcome.
Thanks a lot!
Jim
Jim
Hi Jim,
welcome at Tweaking4All and thank you very much for the very nice and motivating compliments!
1) Starting point
Theoretically the EEPROM should hold the value where you left off last time the Arduino ran – but I have found that not to be reliable, which makes me wonder a little about the EEPROM. I guess it needs to remain power to actually hold that value (and that’s why it survives a reset).
To force it to start at zero you could make this modification (untested);
2) Debouncing the switch
I do not have access to my gear at the moment (I’m on vacation for the next 4 weeks). Maybe try another switch (I did some testing with just 2 wires, which worked very well). Keep us in the loop for what you see or find on this topic – anything to improve the sketch is naturally very welcome.
When I get back home, I’ll try to make some time and look at this, but I can understand that 4 weeks is a rather long time to wait
hans
Hello Hans,
I wanted to say thank you for this awesome information and also ask a couple questions. I am a beginner with arduino but I am working on a project where I use a potentiometer to smoothly change the colors in the spectrum. My code ends up not working in the end and I think it is just because I don’t really know what I am doing. Do you have any ideas or know any websites that can show me how to do this? I also wanted to make it dimmer and brighter as it reacts to music so if you have any ideas on how I should go about that please let me know. I also have one more question about your code. The function setAll is not being recognized the arduino and it says it was not declared in this scope even though I have downloaded and included the fast led and adafruit library. Do you have any idea why this would not work? Thanks so much and if you don’t have the time to spend on this long question or part of the question I understand.
Brent Roberson
Hi Brent,
welcome to Tweaking4all and thank you very much for the kind compliments – it’s very much appreciated.
As for playing with potentiometers (watch the different kinds – linear vs non-linear) and reacting to music; I’ve not played much with potentiometers, but I have done some playing with a microphone and a line-in setup to “read” music volume and found that it’s not as straight forward as one would hope. With a microphone you will need to add a tiny amp (single chip, real cheap) and even then things are not as consistent as I wanted it to be (I wanted the fire effect to respond to music – like VU meters from back in the day). I’m on vacation right now, so I do not have all my stuff near me, you may end up consulting Google. Sorry …
As for the setAll() function; that’s kind a hard to determine without seeing the code, and posting the full code here is not desirable either (since comments then become huge over time). You could post you sketch in the forum and I can look at it and see what the issue may be.
hans
Okay, thanks for the suggestions I’ll try that out. And somehow the setAll function worked the next day I tried it lol
Brent Roberson
Awesome – glad it is working now
hans
Sorry if this comment already posted. Does anyone have the code for all the effects without a button function? Would be greatly appreciated.
Thanks!
Blake
Hi Blake,
yes this was posted before. To save you the search:
Change this piece of the code:
void loop() {
  EEPROM.get(0,selectedEffect);

  if(selectedEffect>18) {
    selectedEffect=0;
    EEPROM.put(0,0);
  }
to:
void loop() {
  selectedEffect++;

  if(selectedEffect>18) {
    selectedEffect=0;
    delay(1000); // 1 second delay
  }
(this is the quick an dirty method)
hans
Hey Hans,
You do amazing work. A question I have is that I want to power 1200 leds for a costume so I use an M0 board. Do you know what needs to be tweeked in your code? Right now its coming up with a fault about EEPROM. Ive read that you need to emulate EEPROM for M0 boards. Do you know how to do that?
Thank you for all your hard efforts
Nathan
Hi Nathan,
I’m not familiar with the MO board you’re referring to.
Having said that: 1200 LEDs is a lot … but that sounds pretty awesome to play with
To power 1200 LEDs, you’ll need a pretty good power-supply. Not just that, but you’d want to connect +5V and GND of the strips, in multiple places so power distribution works OK. I have seen with 300 LEDs that the last LEDs seem to be getting less power. For 300 LEDs, the trick is to connect +5V and GND to both ends of the strand(s). I’d carefully assume the same goes for 1200 LEDs. Maybe power each strip separately?
Since I’m not familiar with the board you’re using; I cannot help you with how to access EEPROM.
I did find these posts that may be helpful though:
Hope this is helpful …
hans
I’m talking about the Trinket MO or the itsy bitsy MO. They are just like Arduino boards but smaller and can power way more LEDs. But they do not have eeprom. I have all the power and wiring done and figured out. Online I’ve read that you need to replace the eeprom part of the code with an emulated eeprom instead. I don’t know how to code though. It seems like it wouldn’t be too hard if I had a little more knowledge. This guide from you is the closest thing I’ve seen so far to finding a code with a button to change effects. You’re very talented
Nathan
Hi Nathan,
I have no experience with either MO (even though they do sound interesting!).
As for working with the eeprom on either of these boards, from what I can see is that there is some sorts of nonvolatile memory, but working with it seems to need one of the AVR (low level) libraries.
This code at Github (eeprom-blink) may be useful, but it’s definitely not as easy looking as the functions that come with the standard EEPROM libraries for other Arduino models. AdaFruits shows there are two working functions, but I have to say that the explanation/documentation is pretty poor.
This flashstorage library may be helpful as well. I did see in a forum that a user confirmed this to work with the trinket.
Something like this:
Not sure how helpful this info is, since I cannot test any of it.
hans
Thank you for your research. I’ll attempt trying that. I’m going to enroll in a class for this soon. I hate that I don’t know how to write my own code. I have to rely on finding it at the moment. Seeing your work is very motivating too. You should be very proud of your skills. If you learn any more about this in the future I’m always interested to learn more about it. Thanks again
Nathan
Hi Nathan,
You’re most welcome and thank you very much for your compliments – it’s appreciated and motivating for myself as wel!
As for programming, I did write some articles for beginners but I’m not sure if this is what you’re looking for: Arduino Programming for Beginners. It starts with the basics, so it may or may not be what you’re looking for.
hans
Bonjour, votre code fonctionne très bien, c’est exactement ce que je cherchais.
Pourriez-vous juste me dire comment ajouter tous les led au début du programme s’il vous plaît?
Christophe Gonthier-Georges
Sorry, but he did not translate the French text.
I was saying:
“Hello, your code works fine, that’s exactly what I was looking for.
Could you just tell me how to add all the led off in the first sequence of the program please? “
Thank you in advance
Christophe Gonthier-Georges
Hi Christophe!
No worries…
You can add an effect in the case statements.
Something like:
case 19 : {// all off
setAll(0,0,0);
break;
}
You’ll need to modify line 23:
if(selectedEffect>19) { // increase the number 18 to 19selectedEffect=0;
EEPROM.put(0,0);
}
I can imagine that you’d like to start with this effect, in that case, swap it with the effect at “case 0:”.
Hope this helps
hans
I set up your code I have the effect in 19 but impossible to start on even putting it in box 0
J’ai mis en place votre code j’ai bien l’effet en 19 mais impossible à démarrer dessus même en le mettant en case 0
Christophe Gonthier-Georges
Easiest way to do it:
Add
case 0 : {// all off
setAll(0,0,0);
break;
}
before line 30 (where “case 0: {” currently is).
For all following case numbers, increase by one, so:
– the old “case 0: {” becomes, “case 1: {“,
– the old “case 1: {” becomes “case 2: {“,
… etc until your reach “case 18: {” which becomes “case 19: {“.
Make sure to modify the code at line 23 as well:
if(selectedEffect>19) { // increase the number 18 to 19selectedEffect=0;
EEPROM.put(0,0);
}
hans
J’ai fait ce que tu as mis mais ça commence toujours sur le premier effet et non sur la LED.
Je ne comprends pas :(
J’ai fait ce que vous avez mis mais ça commence toujours sur le premier effet et non les LED éteintes.
Je ne comprend pas :(
Christophe Gonthier-Georges
Hi Christophe,
pretty please post in English only … my French is very bad, and this may be the case for other visitors as well.
Your message (per Google Translate):
Always starting with a given effect will be tricky. We use the EEPROM to store the value of the selected effect to survive a reset and powering the Arduino down would result the same effect. The only thing I could find (Arduino forum post) is this:
void setup() {
 Serial.begin(38400);
 Serial.print("MCUSR: ");
 Serial.println(MCUSR);

 if (MCUSR & _BV(EXTRF)){
     // Reset button or otherwise some software reset
     Serial.println("Reset button was pressed.");
 }
 if (MCUSR & (_BV(BORF) | _BV(PORF))){
      // Brownout or Power On
      Serial.println("Power loss occured!");
 }
 if (MCUSR & _BV(WDRF)){
      //Watchdog Reset
      Serial.println("Watchdog Reset");
 }
 // Clear all MCUSR registers immediately for 'next use'
 MCUSR = 0;
}
So this would mean that we could change the “void setup()” code a little … (untested!!!!)
If this work appropriately, then please let us know, so I can update the code to accommodate for this.
hans
Hi Hans, I found the solution to my problem.
I deleted case 0 by case 1 and changed all the others and I can boot on any LED off.
Here is my code for those interested:
thank you very much
Christophe Gonthier-Georges
Hi Christophe!
Good to hear you’ve got it to work!
I did shorten your code a little, since it is quite long for the comment section. I left the case section in tacts so folks can see what you are referring to.
Thanks for posting!
hans
New to this, should I purchase a UNO for this sketch? Ebay ok?
JLPicard
Hi Star Trek Fan!
Yeah I’d start with an Uno, and preferably a genuine one from Arduino. You can find them at eBay and Amazon. Most clones work well, but it will remain a gamble since some have issue with their USB chip, where as the original does not. I always find a challenging to determine which one is genuine and which one is not, so at Amazon you can at least select the brand “Arduino”. I know it’s a little more than most clones … but when starting, it may be worth it. Also: there are some great started kits at Amazon (and I’m sure at eBay as well).
Hope this helps …
p.s. The Arduino Uno is also called the “Arduino Uno R3” – those are the same boards.
hans
I am impressed. I want to ask how I could slow some of these animations down. I know the basics of how it all works but everything after line 175 ish LEDEFFECT FUNCTIONS is mostly black magic to me.
tratzum
Hi Tratzum,
thank you very much for the compliment, it’s very much appreciated.
To delay effects, for most of the effects anyway, you can tinker a little with the “delay()” statement right before or after the “showStrip()” function calls in an effect. For example:
void RGBLoop(){for(int j = 0; j < 3; j++ ) {
// Fade IN
for(int k = 0; k < 256; k++) {
switch(j) {
case 0: setAll(k,0,0); break;
case 1: setAll(0,k,0); break;
case 2: setAll(0,0,k); break;
}
showStrip();
delay(3); // <--- increase this value will slow down the effect
}
// Fade OUT
for(int k = 255; k >= 0; k--) {
switch(j) {
case 0: setAll(k,0,0); break;
case 1: setAll(0,k,0); break;
case 2: setAll(0,0,k); break;
}
showStrip();
delay(3); // <--- increase this value will slow down the effect
}
}
}
In some functions you may have to add a delay, for example:
void FadeInOut(byte red, byte green, byte blue){
  float r, g, b;

  for(int k = 0; k < 256; k=k+1) {
    r = (k/256.0)*red;
    g = (k/256.0)*green;
    b = (k/256.0)*blue;
    setAll(r,g,b);
    showStrip();
    delay(10);  // <--- added a delay here
  }

  for(int k = 255; k >= 0; k=k-2) {
    r = (k/256.0)*red;
    g = (k/256.0)*green;
    b = (k/256.0)*blue;
    setAll(r,g,b);
    showStrip();
    delay(10);  // <--- added a delay here
  }
}
You may have to experiment a little with the delay values (values in milliseconds, so 1000 = 1 second).
Some of the effects already have a delay option build in; like
Strobe();
HalloweenEyes()
CylonBounce();
NewKITT();
Twinkle();
TwinkleRandom();
Sparkle();
SnowSparkle();
RunningLights();
colorWipe();
theaterChase();
Fire();
meteorRain();
Look for any delay or speed-delay parameters.
Maybe one of these days I’ll convert all of them to include a speed/delay option. Unfortunately, I’m still trying to get settled after moving to a new home, so I do not have my gear readily available.
Hope this helps …
hans
Hi Hans,
Brilliant sequence and explanation and I’m really impressed. Its also answered a future problem (for me), as I needed to add a button to 2 x 2.5m strips of 2812b to both my kids bedrooms (one per child) and wanted them to be able to switch between patterns. Thank you!
I took the plunge about 8 months ago and have installed strips round the outside of my house ready for Christmas (took it slow as the leds are cheap but the infrastructure to run the 500 leds I have installed is substantial. (PSUs, buck converters, conduit, cable etc)), I’ll definitely be looking to add a few of your sequences to my (ever extending) list .
.
I’ve tried to write a few (very unsuccessful) sequences myself but just don’t seem to be mathematically capable YET!
I have a question though. I really want to modify the code so that the fire and bouncing ball sequences will run within my 500led outside lights. Try as I might I cannot get the sequences to work as I need the first 75 leds to work then miss out the next 142 then run again (but upside down) in the next 75 leds (I do hope you can follow). Can you see a way of doing it as I’ve been scratching my head so much its starting to bleed. LOL
The leds are arranged (outside) in one continuous loop. A vertical strip (going up) up the side of the house (75leds), a horizonal strip under the guttering (142 leds), another 75leds going down the opposite side, then a final horizontal set (208) linking back around a porch.
I’ve set used the #define NUM_LEDS 500 and both look very silly when you try to run them round the house….
Hope you can help.
Philip
Philip King
Hi Philip!
Thank you very much for the compliments! It’s very much appreciated!
Wow you really are using LED strips a lot haha – I’m jealous! One of these days, when I own my own house, I’ll follow your approach!
I’ve started a forum topic, if you don’t mind, because I can see us talking about this for a bit to get things working …
Here is the link to the forum topic.
hans
Hey,
Great job on the code! I made a project with the led strip on a portable wooden stick and i use it for my photography. Quick question though:
I changed the code so that I could use a keypad matrix to switch between effects. But there’s a problem. The error comes up for every effect saying:
“‘theaterChaseRainbow’ was not declared in this scope” or “‘Fire’ was not declared in this scope”
Is there anyway you can help?
Jakob
Hi Jakob,
I’d be happy to help. I’d recommend making a topic in the Arduino forum so you can post your sketch.
hans
Hey nice work, but i keep getting the error:
Have i done something wrong?
C:/Users/user/Documents/PlatformIO/Projects/ESPFASTLED/src/main.ino: In function ‘void rainbowCycle(int)’:C:/Users/user/Documents/PlatformIO/Projects/ESPFASTLED/src/main.ino:955:47: error: ‘Wheel’ was not declared in this scope*** [.pioenvs\nodemcuv2\src\main.ino.cpp.o] Error 1
DropDatabase
Hi DropDatabase,
In the function “rainbowCycle”, a call is made to the function “wheel”.
You may want to verify if the function is there, and that there are no types.
void rainbowCycle(int SpeedDelay) {
  byte *c;
  uint16_t i, j;
  for(j=0; j<256*5; j++) { // 5 cycles of all colors on wheel
    for(i=0; i< NUM_LEDS; i++) {
      c=Wheel(((i * 256 / NUM_LEDS) + j) & 255);
      setPixel(i, *c, *(c+1), *(c+2));
    }
    showStrip();
    delay(SpeedDelay);
  }
}

// used by rainbowCycle and theaterChaseRainbow
byte * Wheel(byte WheelPos) {
  static byte c[3];

  if(WheelPos < 85) {
   c[0]=WheelPos * 3;
   c[1]=255 - WheelPos * 3;
   c[2]=0;
  } else if(WheelPos < 170) {
   WheelPos -= 85;
   c[0]=255 - WheelPos * 3;
   c[1]=0;
   c[2]=WheelPos * 3;
  } else {
   WheelPos -= 170;
   c[0]=0;
   c[1]=WheelPos * 3;
   c[2]=255 - WheelPos * 3;
  }
  return c;
}
hans
Hello Hans,
thanks for the great project! I’m a complete newbie to arduino and your beautifully-explained setup got me running my ledstrip from zero on a Saturday morning :-)
I am now trying to get each pattern to run for a set period of time AND jump to the next pattern when the pushbutton is pressed but so far without success.
Would you have any tips on how to go about it?
Dieter
deezee111
Hi Dieter!
Thank you for the compliments! It’s very much appreciated
I’m not entirely clear what you’d want the Arduino to do.
So when a button is pressed, the next effect is ran and ran only for a fixed time?
hans
yes, basically I want each effect to run (for 5 minutes) before calling the next effect.
BUT if the button is pressed, to start the next effect immediately.
deezee111
Hi Dieter,
that may be a little tricky on the timing part, but it’s not impossible. We’d have to adjust the “switch … case ..” loop a little (this would be my first attempt).
Define an interval;
Define a few global variables;
and then in each case statement (just one example, but it should be applied to all):
case 1 : {// FadeInOut - Color (red, green. blue)
startTime = millis(); // store start time
do {
FadeInOut(0xff, 0x00, 0x00); // red
FadeInOut(0xff, 0xff, 0xff); // white
FadeInOut(0x00, 0x00, 0xff); // blue currentTime=millis();
while (startTime+Interval>currentTime); // repeat this until we are at, or passed, 5 seconds
selectedEffect++; // select the next effect EEPROM.put(0, selectedEffect); // store in EEPROM
break;
}
Now a few things with this approach;
1) I haven’t tested this, but I’m sure it will work, or is at least very close to something that works
2) There may be a more elegant way of doing this
3) Repeatedly writing to the EEPROM may not be the best thing to do as it will limit the lifespan of the EEPROM
To improve this, you may want to try moving
to the “setup()”, and remove the line
Again, not tested … and when the Arduino resets it will most likely not continue where you left off.
Hope this helps.
hans
thanks so much Hans, I’ll give it a try & let you know…
deezee111
Hey Hans, thank you for sharing this project with us, I am using it to build a led display for our restaurant. When we were looking at options for our display, I tested it out and got it running well on my Uno with a 144led/1m led strip, but then switched to a 5m led strip with 600 leds using a Arduino Mega, and haven’t been able to get it working properly. The leds light up but don’t run the patterns, they just flicker randomly. The 5 pin on the Uno seems to be the same as the 5 pin on the Mega, do you have any advice on where I should start tweaking the code to get it to work properly? Thank you for your help.
Sean
Hi Sean,
my advise would be to test it on the Arduino Uno first – since you had a shorter strip already working on that one.
Second item to look at: your power supply. The flickering of the lights may indicate that you’re not having enough power.
You’ll need a pretty good power supply to power 600 LEDs. With an effect I’d ballpark it at at least 15A/5V. Not sure if you did accommodate for that as well. Having said that; I’d recommend connecting +5V and GND of the power supply to both ends of the 600 LEDs. I know it sounds funny, but it will counter power loss at the end of the 600 LEDs (which would dim the LEDs more and more as you get closer to the end of the strand).
You could also get 2x a 10A/5V power supply, each feeding half of the LEDs (they will all need to share GND).
If you get all this working on the Uno, then I’d start playing with the Mega.
As for the pins; have not played with the Mega either (never had a need for it).
I did find a few diagrams showing the pinout of Uno and Mega, but it sure can be confusing.
hans
Hi Hans,
Thank you so much for working all this out and sharing it with us.
I have a problem. Why when checking the code this error appears:
/
C:\Arduino\AllEffects_FastLED\AllEffects_FastLED.ino: In function ‘CenterToOutside.constprop’:
C:\Arduino\AllEffects_FastLED\AllEffects_FastLED.ino:735:23: warning: iteration 26 invokes undefined behavior [-Waggressive-loop-optimizations]
leds[Pixel].r = red;
^
C:\Arduino\AllEffects_FastLED\AllEffects_FastLED.ino:318:3: note: containing loop
for(int i =((NUM_LEDS-EyeSize)/2); i>=0; i–) {
^
Thank you for your help.
p.s. https://i.gyazo.com/101ec12922ecf66baa9aa6656861e223.png
dim
Hi Dim!
As far as I can see these are not errors, just notes and warnings – so not real problems.
While looking at the code, I cannot see why there even would be a warning, except that it’s related to the compiler directive “-Waggressive-loop-optimizations”.
You can disable this in the Preferences of the Arduino IDE; uncheck the option “Aggressively cache compiled core“.
One message may remain, but this is intended to be there (pragma message “FastLED version …”).
Hope this helps
hans
uncheck the option “Aggressively cache compiled core“
Thanks, Hans! Works!!!!
dim
Awesome!
For the record; I had never noticed that option before either … so I would have been wondering as well
hans
I’m new to this, I need both more practice and study, so I could be completely overlooking an obvious answer but considering the limited eeprom flash cycles why not EEPROM.write instead of EEPROM.put ? From what I have read, again limited, ‘write’ only writes data that differs from what is already there. I’m unsure if writing the same data counts as a cycle or how many unnecessary cycles this might prevent if any, but it does seem to work.
Roy
Hi Roy,
well, that’s actually a very good and important question.
As far as I know, the write function writes each and every time. Per the documentation at Arduino:
The put function on the other hand only writes when the value is different. Per documentation:
I’ll admit that I had to look it up myself as well, it’s been a while that I wrote this code. I even had to check my own code twice to make sure I had done it right
So; a very very good question! Put will less burden your EEPROM with wear and tear than write. (opposite of what you thought)
hans
Thanks! I’ll go back and reread it after I get rest, I know I’m getting tired when I start reading things backwards!
campfool
Haha, totally get that!
hans
Fantastic job with this tutorial and all this information included. I came across your page while looking for info on the WS2812B code for Arduino. I have created a small PCB and installed it in my car to control the LED strips under my dash and seats. I currently have only solid colors and chasers available, with an LCD screen and rotary encoder. I was looking to add more animations and have struck the motherlode with this site. Thank you so much for sharing! Great work!
farizno
Hi Farizno!
thank you very much for the compliments! It’s very much appreciated.
I think you’re the first one I know of that uses this in their car – never thought of it myself, but now I’m curious
hans
Can some one mod this to have no button and to change every 120 seconds plz.
(lengthy code removed)
beau
Hi Beau,
apologies that I had to remove the code – It would have taken up way too much space here.
For future reference; when posting large chunks of code, please start a topic in the Arduino Forum.
As for your question; I do not have an example ready for you, but the main loop() could be taken apart and place it in a loop using timer triggers. Here is some explanation on how timer triggers can be used. Unfortunately, I have no code available to demonstrate, or Arduino (at the moment – I’m traveling) at my disposal to test this.
hans
Hi Hans, I have modified this so that it doesn’t use the EEPROM for storage and it seems to work well, I have posted the code in the forum as it was quite long, hope this might be useful to someone.
Forum post
dai trying
Hi Dai!
Awesome! Thanks for doing this the right way!
I’ll go have a look – a solution without using the EEPROM would indeed be better.
hans
Just checked it out (I’m unable to test at the moment), and it looks really good!
Great (if not better) alternative to using the EEPROM.
hans
Thanks Hans, I’m going to edit the Forum post to include the check in the Fire routine, I’d like to say I was using programming etiquette and leaving a deliberate error but I just missed it
Dai Trying
I couldn’t edit the Forum post but users should see your comment and be able to add it, I am working on the IR capability which was another reason not to use EEPROM and will make sure I double check it before posting (If I find a viable solution that is).
dai trying
I’ve uploaded the corrected code.
Yeah I’ve disabled the editing in the forum, since it usually screws up the markup. Hopefully I’ll find a good alternative for this forum in the near future. Sorry about that
hans
No worries, I goof up every now and then as well

I was looking to see if we could glue that in the showStrip() function, but that would be a no-go (bad idea to break the loop from another function).
hans
I did think about that but thought it might just break out of that function but didn’t test it, I will try later and see if it works (just for kicks).
dai trying
Let me know if you run into a cool fix!
hans
I have finally managed an IR solution and have posted it (and source code) in the forum, it does require two arduino modules though, I tested it with two pro-minis (cheapest on ebay)
Forum Post
Any thoughts or suggestions would be most welcome.
dai trying
Thanks Dai for posting the code in the forum and sharing your solution – awesome!
hans
I have posted a sketch that creates a web interface (very basic) to control LED string effects in the forum, it was created for (and tested with) a Wemos D1R1 but should work with any ESP8266 variant, I hope it will be of use to others.
dai trying
Hi Dai Trying!
Awesome, very well done and thank you so much for posting the code!
hans
Sorry but I did not understand how I can change the effects and also adjust the colors / speed / fade speed, etc.
Do I have to use a Browser?
Thank you
Dancopy
Hi Dancopy,
are you referring to this article? In that case; press the button to toggle effects.
If you’re referring to Dai Trying’s Arduino Sketch: then yes you’ll need a browser to connect to the Arduino – for this particular topic, it would be best to comment in the forum, below Dai Trying’s code.
hans
Hi Hans,
just for entertainment: I used your effects and ported them to Mongoose-OS, used then a folded stripe of APA102 LEDs, controlled them via ESP32 over SPI and “pimped” the effects a little. So I created a “Versatile LED (Andon)Light” – see the video here. The video unfortunately is of poor color quality, as LEDs are hard to fiilm with digital sensors, but it gives an idea. The lamp has 320 LEDs, all separately addressable, so it’s really very versatile. I have a “serious” use case (first part of the video) as Andonlight and a “entertaining” part with the effects. If there are questions about this little project, feel free to ask. Enjoy!
Manfred
Hi Manfred,
that looks awesome!! Did you make a write up on how you’ve build this?
I love it, thanks for sharing!
p.s. would you mind posting a link to this page under your YouTube video? Not required of course, but it would help my website’s Google position a little
hans
Hi Hans,
… done! A description might follow (it’s easy to build – only the soldering of the dense stripes is tricky (I used stripes with 144 leds/m …), but for the moment it has to wait because of lack of time.
Manfred
Thanks Manfred!
You rock!

hans
Hi Manfred,
I’m higly interested in the effects you’ve shown in the video.
Is there there no way to post your code? Without commenting an wasting time for you?
I’d appreciate your code!
crewsing
Hi crewsing,
the code is found on Github, but unfortunately I broke the code doen to a master app and every effect as a single lib. And it’s based on Mongoose-OS – so you may not use the Arduino IDE. It’s completely timer driven and written in C. It works with APA102 LEDs in the first place, but should also work with WS2812, but I made no big tests. I improved my lamp as well and have now a column of 8×40 pixels in a frosted glas cylinder, every single LEDs is addressable. Not to mention that I have even added audio triggering … So give me some days and I will clear the repos and post the link here.
Manfred
[…] All Effects Sketch: https://www.tweaking4all.com/hardware/arduino/arduino-all-ledstrip-effects-in-one/ […]
Awesome article! :-)
hans
I’m trying to compile this on an adafruit trinket but it keeps erroring out on an include of nrf.h which library is that from, does anyone know?
johnny
Ho Johnny,
I actually had to Google what that nrf.h library might be.
Since you do not mention what Operating System, Arduino model, or Arduino IDE version you’re using, or what the error message actually is, I can only do a few guesses since this library is not used with regular Arduinos (as far as I know);
1) I have seen that users of the Web version of the Arduino IDE see this message. Fix: use the application of the Arduino IDE application instead of the web version (in browser).
2) You’re using an Arduino clone, seems there is are Nordic Semiconductor nRF5 based boards, which require nrf.h (link) and you’ll need to install that library because of that. The error message will be something like “fatal error: nrf.h: No such file or directory”. In the Arduino IDE go to “Sketch” – “Include Library” – “Manage Libraries”. In the filter type “nrf.h” and a few options will be listed. Since I do not know what Arduino board you’re using, you’ll have to run through the list and see which ones applies to your setup.
Hope this helps,
hans
Hello Hans, being new to Arduino this code has been a god send and also allowed me to analyse it to understand how it works.
What I want to do is have an option for sound activated patterns, I have already wired up the microphone, would you be able to advise at all what additional code I would need and how to apply it as one of the button options if that is possible?
Currently it is up and running using the button method.
Thanks for your great work, time and patience in replying to all the questions you get asked, a refreshing change.
Richard
Richard
Hi Richard,
Thank you for the compliments and I’m happy to hear you’re having fun with the it!
As for sound activation … well, the code that I use here depends on an interrupt to toggle effects – which probably cannot be triggered with a microphone. Maybe this forum topic can help in finding a fix for that – it may be a little complicated and you have to keep in mind that it’s based on an ESP8266.
As an alternative, since Arduino’s are cheap, you could use a second Arduino that responds to sound and then briefly flips a switch (for example a relay or transistor) connected to the Arduino that controls the LED effects.
hans
Hi Hans,
I’m trying to register on the website but unable too, it tells me it has sent me an email containing the password but I never receive it, I have tried this now with 3 different emails, nothin in Junk email. If I then go to forgotten password and ask request it I get a message saying that the host may have disabled emails?
Are you able to help with this
Richard
Richard
My apologies for the inconvenience.
please check your email – I’ve sent you an email a few seconds ago.
hans
Hi, I’m trying to compile the code for the web interface but am hitting errors, all libraries are installed but when compiling I get
missing terminating ” character
I can’t see an issue, there doesn’t appear to be a missing terminator
Any ideas welcome
Richard
Hi Richard,
I’d recommend pasting the code in a simple text editor first – for example Notepad (Windows) or BBEdit (macOS) – and then copy it from the text editor to the Arduino IDE. I suspect you’re working under Windows though, since I’ve had one report in the past (different article) – occasionally (may depend on the browser) “extra” characters come along, confusing the Arduino IDE.
Alternatively, there is indeed a double quote missing somewhere in the code. I have not yet tested it.
In that case (once you can login of course) you can ask the original programmer in the forum topic as well.
p.s. did it mention a line number or anything? This may help finding the issue.
hans
Thank you so much for posting this! This is extremely helpful on my current project. My question though is how do I go about changing the colors to these functions? I’m new to programming and i’m not sure I understand. For example FadeInOut(0xff, 0x00, 0x00); // red
Do you know where I could find a reference sheet for these values to change them as I see fit? Thanks again and sorry for the n00b question!
Troy
I’ve found out a little about the color, but I have another question. My current project has three buttons, one for modes/effects, one for color, and one for brightness. I’m currently using internal pin interrupts to stop the loop functions but this is proving difficult. Since internal pin interrupts do the same thing as external pin interrupts, would it be possible to change the code to accommodate these other two buttons?
If not I think I can continue down my current path and just incorporate some of these cool functions into my code. Although i’m at a loss for how to handle the color. For example, in my current code I’m define an array of colors like:
uint32_t LEDColor[] = {CRGB::Green, CRGB::Blue, CRGB::Purple, CRGB::Red, CRGB::Yellow, CRGB::White};
int NUM_COLOR = 0;
and then i’m calling it within functions in the following way:
case 8:
NUM_COLOR = 3; //red
fill_solid(leds, NUM_LEDS, LEDColor[NUM_COLOR]);
is it possible to do something similar using this hex color convention?
Troy
Hi Troy!
I’ll try to answer both your posts;
Colors
Colors, as you may already have figured out, are build up out of 3 base colors: red, green and blue.
Each color has a value 0…255, which means the values are a single byte.
Often these 3 numbers are combined in a single number notation (0xFF0000) or in separate numbers (0xff, 0x00, 0x00).
The “0x” in front of the number, means the number is in hexadecimal, which has historical background but also can be less confusing to read (once you know how to read it).
A byte has a value 0…255, which in hexadecimal (often abbreviated as “hex”) is 0x00 … 0xFF.
There are a lot of color tables and converters out there that help you select a color. In my previous article I have posted one as well (link).
This color picker/chart and this one both look very good as well.
Buttons and interrupts
The problem with interrupts, depending on your Arduino model, is that an Arduino typically has very few of these.
If I recall correctly, the Uno has only 2 pins that can be used for interrupts (Pin 2 and 3). See the Arduino documentation.
What you could do, is a potentiometer for brightness – which may not even need a pin, see this article.
Doing brightness in code would require interruption of an effect, which in turn would need an interrupt.
If you do it without code, then you’d have 2 pins available to toggle effects, and to toggle colors.
Color Toggling
Yes you can do this with the hex RGB codes as well. There is a function called “CRGB()” for FastLED (I’m assuming you;re using FastLED).
uint32_t LEDColor[] = {0xFF0000, 0x0000FF, 0xFF00FF, 0xFF0000, 0xFFFF00, 0x000000};int NUM_COLOR = 0;
...
case 8:
NUM_COLOR = 3; //red
fill_solid(leds, NUM_LEDS, CRGB(LEDColor[NUM_COLOR]) );
Hope this helps
hans
Thank you so much for the information. The color article explains it perfectly! Right now though I’m still stuck on the color issue. So now that I understand how its structured I’m trying to figure out how I could setup a color array like in the previous code I posted, but to pass the values in the hex format like this code uses. I’m unsure of the best way to do this though. Using the example in your other article an array could look like:
uint32_t MainColorArray[] = {0xB7, 0x00, 0xFE}; //purple color in arrayint SELECTED_COLOR; //global var to call the color
So each sequence of 3 values in the array is a different color, but i’m totally lost on what would be the best way to call those values. In my code I’d like have a switch setup for different color choices based on button presses and depending on the case, it would determine which array is set the global var SELECTED_COLOR however I don’t know if this will work.
So for example your strobe case:
Would I be able to set the color by changing the code to:
My other concern is the functions at the bottom of your code. I was wondering if you could shed some light on how they work exactly? At the moment I’m rather confused by them, I’m referring to the “** FastLed/NeoPixel Common Functions **” section of the code. Would this code have any effect on what I’m trying to do?
Thanks again for your time, I greatly appreciate the help you’ve given me!
Troy
Hi Troy!
Good to here the info was helpful.
There are a few options concerning your color problem.
If I’m not mistake, you can access the individual color elements of a CRGB like so:
uint32_t LEDColor[] = {0xFF0000, 0x0000FF, 0xFF00FF, 0xFF0000, 0xFFFF00, 0x000000};
You could use a multidimensional array like so
uint32_t MainColorArray[3,3] = { {0xFF, 0x00, 0xFE},
                                 {0xFF, 0xFF, 0xFE},
                                 {0xB7, 0x00, 0xFE} };
...
Strobe(MainColorArray[0][0], MainColorArray[0][1], MainColorArray[0][2], 10, 50, 1000);
...
There are more advanced techniques to do this, for example by shifting bits, using pointers, using union, or even define you own type.
But all these alternatives will take a little work on understanding the concepts they use.
Hope this helps!
hans
I’ve actually made a lot of progress tonight, and I’ve almost finished with my project. Here is the code below. I’m using internal interrupts which doesn’t limit the pins you can use. This code also allows you to change the color of any function as its running without any issues, other then the theaterChaseRainbow function. I think it has something to do with the setPixel function. For whatever reason it seems to get stuck in the loop. I’ll probably just remove it.
My only issue at the moment is how to use fill_solid with the hex system. fill_solid(leds, NUM_LEDS, Red, Green, Blue); doesn’t work, do you have any idea how to make this work by calling the byte variables?
The only thing I have left to do is to add a third button for the brightness.
Here is the working code at this moment:
Code moved to Forum: Troy’s Project Code
Troy
Awesome Troy!
Since we like to avoid long sections of code in the comments, I’ve moved your code to the forum.
See this forum post.
From what I’m reading in the FastLED documentation, this should do the trick:
hans
Sorry about that! I actually tried registering for the forum but it kept saying my username had invalid characters. Any idea how I can sign up to post there? I’d love to share the final project code in case anyone else could benefit from it.
I’d like to thank you again for all the help, I couldn’t have done this without this site and your help, i’m extremely grateful!
Troy
No worries, and you’re most welcome
I love it when folks share their work derived from my projects!
The username needs to be all lowercase characters and numbers. A limitation of WordPress.
Good that you reminded me of this – so I can update the form.
Shameless plug: share the link to this article on social media
hans
HELLO HANS, HOW CAN I MAKE THE EFFECTS APPEAR RANDOMLY? THANKS
NICOLAS
Hi Nicolas,
The random function in the Arduino isn’t the best random generator, but you can start by changing this code in the beginning of void loop():
to something like this:
and add this line to the void setup() function – it is said that it provides a more random seed, so random will not always be the same (theoretically);
hans
p.s.
Please do not write in all capital letters – it’s considered yelling/screaming, and not seen as polite.
I’m sure you just forgot your caps-lock.
hans
please! Thanks for the response and apologies for the oblivion!
nicolas
No worries – all good!
hans
Hey Hans, great write ups. I, like many on here, am new to neo pixels and arduino as well, but have a background in electronics. I was hoping you might get me pointed in the right direction on a project I am working on. I have read all of the write-ups you have on fastled but haven’t really been able to pinpoint the method for what I want. What I am working on involves three separate WS2812b strips (2 of equal length that should display the same effect, the 3rd is a 60 LED ring). I think I know how to run the three different (at least I have an idea from the research I have been doing) strips off of one arduino. What I was hoping you could assist me with is how I might go about using to separate N.O. momentary switches (technically one is a vibration sensor, and the other is a lever switch) to change the effect. I would have meteor running on the 2 strips, and fade running on the ring, one switch would trigger all three to strobe for 2 sec, then go back to the meteor and fade. The other would change the meteor to strobe, but set the ring to chase. I thought I was onto something with the way you triggered and reset to using “ASM volatile”, but I was wrong. I cant seem to find a great tutorial set that can walk me through fully understanding the code, but I wont give up. Thanks for any help you can provide.
Mike
Hi Mike,
sorry for the late reply – I’m traveling at the moment.
Your project is not impossible haha, but it will come with a few challenges.
The 2 strips that should be doing the same, can be connected in parallel, no extra code needed.
Concerning 2 switches, you can actually setup 2 interrupts, so that would not impossible.
For the lever I’d consider triggering a simple push switch, since an interrupt would need a brief signal and not a constant signal (goes for both switches).
It will take some tinkering in the code as well.
hans
The lever switch is actually a momentary and 1 of the 2, not a constant. Some times they are referred to as a Reed switch. So I would only need to set both up as interrupts?
I will spend some time working on my code, and then repost when I hit a hiccup. I was assuming I could wire the two identical strips in parallel, but wasnt sure due to lack of experience with arduino and digi LEDs thanks for the reply Hans.
Mike
Oh cool, reed switches, I haven’t used those in a while, but that would definitely work!
You can indeed add something like this for the 2nd button
Where “changeEffectSecondButton” should be a new function of course, to handle that button being “pressed”.
Per Arduino model, the pins you can used for that will be slightly different. Worse case scenario, your Arduino can handle only 2 of these interrupts, so it should always work for what you’re planning.
hans
Well, I have been at it for some time now, googling, researching, learning (attempting anyway), and here is where I am at. Hoping you can help me out. I am in wayyyyy over my head, but I am trying. I am having a hard time understanding how to write in those interrupts, what color bytes I need to change and how, and how to go about switching effects per pin as well as defining what pin runs what effect. I think I am doing ok. what do you think. this is way harder than what I am used to. Thanks HAN, Really.
if you are wondering why RunningLight and TheaterChase are both in there, its because I am not sure which one I want to use yet. I will remove the one I don’t want later and adjust as needed.
Mike
Hi Mike,
apologies that I had to remove the code.
Long code like yours should be placed in the forum – otherwise other people cannot oversee what’s going on here anymore.
Would you mind starting a forum topic (Arduino forum)?
hans
Sorry about that Hans, I was hoping it would add it into a condensed box. I will make a forum for it. Thanks again.
Mike
No worries – all good
hans
I cant start a forum at the moment because I cant access my email, but I was hoping you could help with something a little simpler. Im using a a Switch, case, Default loop to command the strings. Thats the idea anyway, the default is the main loop and case 1 and 2 are triggered with the 2 separate “attachInterrupt” command lines.
. that makes sense to me, but how do I command what effect goes to which pin. If I wanted the meteor effect to write to my defined
, and Fade in and out effect to write to my defined
I may be able to work it out from there. I cant see how to do that, but I’ll keep scouring the forums.
Mike
https://www.tweaking4all.com/forums/topic/multiple-ws2812b-strands-and-effects/
supramp
ALL working is nice color change push button better enjoy… thank you
Zen
Awesome
hans
Hi, thanks for the great work!
I noticed there is an index out of bounds crash in NewKITT line 327 and 350, “setPixel(NUM_LEDS-i, red/10, green/10, blue/10);” before the second loop in the OutsideToCenter and CenterToOutside functions.
When i==0, the index will be NUM_LEDS which is one after the end of the array.
I tried the sketch and it worked without the error trigging anything originally, but when I pulled in more libraries and code, it started crashing at the above statement until I changed it to “setPixel(NUM_LEDS-i-1, red/10, green/10, blue/10);”. I also subtracted 1 from the indices to the setPixel call inside and after the loop to keep the eye size.
Fred
Thanks Fred for catching that!
Since I’m traveling, I won’t be able to update the code just yet.
But once I get back, I most certainly will!
hans
Hi,
Thanks for providing such a thorough information and great collection showing possibilities with WS2812B etc.
I ran into issue, where animation would just stop just after a few minutes.
I was wondering if its possible to let it switch to next effect automatically after few minutes, this would certainly be very eye-catching for most.
manu
Hi manu,
Thank you for the compliment!
I’m not sure why the effects would stop – that doesn’t sound normal.
Having said that, if you want to automatically rotate through all effects, look at lines 19-24 in the source code;
This part, in the beginning of the loop(), will select the active effect.
A simplified way to rotate effects (you may want to fine tine this) could be done by replacing it with this:
This will go through one cycle of each effect, so you may want to do something there with a second counter, but this will get you started.
You’ll also need to add this to the “void setup()”, so the effect selection starts with zero:
so the setup will look something like this:
Note: this will disable the button.
Hope this helps getting you started.
hans
hi, it awesome..
i exactly looking like this,it for my home front yard n my front shop light decoration.. .. thank a lot n it work done and great..but i use 2 nano, 1 for home n another for shop.
i have question but iam sorry maybe is already asked in comments, i have amount 50 led (for my home) and 30 led (my shop), what code skecth in 1 nano with 2 output pin (i have 2 strip with different amount leds) but with effect moving on at same time with different amount of leds n different strip.
thank you very muchhhh
wahyu
hi ..
great. . and thanks for informaton.. this is i looking n its all work for me…
but what code to make 2 output because i will use 2 strip with different amount of leds.. example strip A 50 leds n strip B 30 leds n while power on will moving the your all effect at same time..
thank you
wahyu
Hi Wahyu!
Thanks for the compliment
Controlling 2 LED strands of a different length may be more tricky than you’d may expect, especially when both need to run simultaneously.
The first option is to place the strands in parallel on the same pin, the downside would be that either one strand misses some LEDs (the 30 LED strand), or may not use all LEDs (the 50 LED strand) – depending on what you set NUM_LEDS to (30 or 50). I assume you already considered this. Although a little sloppy, this is your best and easiest option.
The second option, what you may be looking for, is indeed using 2 separate pins. This however will be more difficult.
First you’ll need to define both strips, which would change the beginning of the code.
For example (untested):
Second, you’ll have to make the generic functions (showStrip, etc) to be able to work with 2 strips (typically: pass the strip variable).
And finally you’ll need to update all effects to accommodate 2 strips as well. You can’t just call the function for each strip. You’ll need to adapt (for example) the for-loop where the colors for each LED are being set. For each effect this will be a different challenge. On top of that; obviously setting both strips will slow down the effect, so with some effects this may work great, with others you’ll need to select a different delay, and with other effects they may become just too slow.
As you can see; not impossible, but a lot of work.
hans
thank you hans..
after read your answer it make my head full of stars haha.. still much lerning about codes..so i choose easy way.. use 1 hardware 1 strip.. haha.. but thanks a lot bro. you really help me. thank you..
wahyu
You’re welcome Wahyu

hans
halo again hans..
please help me make code effect like this video on minute 0.18 start from left then from right too..
https://youtu.be/b4pwLFa2EDU
and one more please create boinching balls effect from other side too.. i mean start bounching from left then from right too..
thank you.. iam sorry if i ask to much..
wahyu
Hi Wahyu,
that effect shouldn’t be too hard to implement.
However, at the moment I’m on vacation. Next week I’ll be back and hope to find some time to implement that.
hans
Hi,
Hope you can help I am using 4 rings 96 LEDs the odd thing I am getting is the 4th ring will normally be green for some of the code I.E the fire code will happy spin thew the red yellow orange on ring 123 but ring 4 it will show green as the affect. I was thinking a power issue but I am now running off a PC PSU and it is still doing it for some of the codes.
Bouncing ball red ball will spin on ring 123 and then go green on 4
Multi Bouncing ball is OK!
Meteor is OK on all 4 rings
RGB – when red is on rings 123 but on 4 it is green for Green rings 123 ok but ring 4 is red and blue rings 1234 all ok! “Odd”
Knight rider — 123 red 4 green
Random red dots 123 but 4 is green
Random dots of colours all OK
sparkles all ok
Twinkles all ok
Rainbow all ok.
Do you have any clue why this is happening for some of the code?
Thanks in advice.
David
David
Hi David,
First thing I’d try, is doing a LED test by setting ALL LEDs to WHITE, and then RED, GREEN and finally BLUE. Or follow the example in this article.
This will tell you if your PSU is keeping up, with that many LEDs, you’ll theoretically need 23A at 5V. Which is a lot.
From experience; quite often you can get away with a smaller PSU, say 15A or maybe even 10A.
With those kind of loads, you may need to watch the thickness of your power and GND cables (don’t use thin cables).
The test will also tell you if there is something wrong with one (or more) of the LEDs (see this article again).
Each LED block contains 3 LEDs (red,green,blue) and a simple controller (to read the data, pass on the rest of the data and control the individual LED colors).
Such a controller may be defective. But since you’re saying that bouncingballs and meteorrain work fine, I’m not quite sure if this would be the case.
hans
Hi Hans,
Thank you for the reply if I do white all is ok but colours the last ring will flip the colour I am using a PC power supply 5v 20A it says on the box. The wire is thin will try thicker wire.
Is it best to power off two PSU’s… I am looking to use this in a car so trying to keep it as small as possible.
In-fact can I power each ring of its own small PSU without issues?
David
Forgot to add when I power on the rings without Arduino powered up rings 1,2,3 will flash and go off and the 4th will stay lit up not go out..
David
Hello Me again,
Right it looks like the LEDs are the issue if I power up one led on all 4 rings RGB on low power I can see 123 rings are all are Blue Red Green on ring 4 the led it is B G R so the signal is getting sent to the incorrect colour I think. very odd. I will get some replacements and see what happens
David
The LEDs of Ring 4 could indeed be a problem. You could test swapping (for example) ring 1 and ring 4 and see what happens.
If the “new” ring 1 now works, then those LEDs are (seemingly) OK.
You can power the LEDs with more than 1 PSU, you’d just have to make sure they all share the same GND (Ground).
However, this may not be needed. You can run the +5V separate for each ring from the same PSU.
(disconnect the +5V from the end of each ring, but keep GND in tact)
Also note: Computer PSU’s can have some separate rails for each +5V connection. So look on the PSU, and it “should” list the Amps per +5V connection (typically less than what the entire PSU is suppose to provide).
hans
sir how do i remove button function? i want run these patterns automatically one after another. how i can do that? please explain?
jayanath
Hi Jayanath,
Please read this comment a few comments back.
It should give you an idea how to accomplish this.
hans
thanks i got it
jayanath
hans
hi..
it awesome hans.. thank n its work fine..
i want add more patters/effects for my led strip,i use demoreel in IDE before, so i want combine/adding your code with demoreel that already in IDE.. can you help me create (combined) the code.. thanks..
budd
Hi Budd,
adding effects is not too hard, it requires only minor changes to the code.
If you look at the “loop()”;
void loop() {
EEPROM.get(0,selectedEffect);
if(selectedEffect>19) { // 19 reflects the number of effects
selectedEffect=0;
EEPROM.put(0,0);
}
switch(selectedEffect) {
case 0 : {
// RGBLoop - no parameters
RGBLoop();
break;
}
case 1 : {
// FadeInOut - Color (red, green. blue)
FadeInOut(0xff, 0x00, 0x00); // red
FadeInOut(0xff, 0xff, 0xff); // white
FadeInOut(0x00, 0x00, 0xff); // blue
break;
}
...
case 18 : {
// meteorRain - Color (red, green, blue), meteor size, trail decay, random trail decay (true/false), speed delay
meteorRain(0xff,0xff,0xff,10, 64, true, 30);
break;
} case 19 : { // call your effect here }
}
}
You’ll see the last one being “case 18 : {“.
If you’d like to add an effect, simply add
case 19 : {// call your effect here
}
after “case 18”.
Do not forget to update “18” in the line “if(selectedEffect>18) {“.
This number should now become 19.
hans
i already add n do like your advice.. but when it run/on that your effects n demoreel100 effects run on at same time.. its like colours crash each other.. please create me sketch that already combined the effects.. its will great for chrismast light.. thanks a lot n sorry if i asking too much..
budd
Hi Budd, culd you add Demoreel effects to his code??
Could you explain to me how you did. Thank you
homer
Hi Budd,
in all fairness; I’m not sure what you’re asking …
hans
with Bluetooth it works
mircea
Can I ask how you got this to work with bluetooth?
Were you only sending a toggle signal via bluetooth or were you able to select which “case” you wanted by sending different ASCII characters from serial bluetooth?
I attempted below but am stuck. Any assistance would be greatly appreciated
[CODE DELETED]
Matt
I’d recommend looking in the forum. Some users have been tinkering with IR and Bluetooth for this as well.
For example this post may help you in the right direction.
I do not have a Bluetooth module available, so it will not be possible to provide assistance.
Hans
Hello Hans,
Thank you for pointing me in the right direction. I will work with it and see what I can come up with!
mlimbrick
My apologies,
I dont know why it didnt condense the code
Matt
No worries – I have removed the entire code, even condensed it would have been way too long to post here.
Hans
I love your work and the effects demo…it is helping me learn! Thanks! I tried adding an effect that I like and for some reason it screws up the others…it creates random problems, dimmed effects, getting “hung” and not advancing, or simply stopping two or three effects later after the new one is called! The new one I added works, it just screws up some of the others and I cannot pinpoint why.
I replaced my new effect for case 3 as follows…
case 3 : {
rainbow_march(200, 10);
break;
}
Here is the code for it…
void rainbow_march(uint8_t thisdelay, uint8_t deltahue) { // The fill_rainbow call doesn’t support brightness levels.
uint8_t thishue = millis()*(255-thisdelay)/255; // To change the rate, add a beat or something to the result. ‘thisdelay’ must be a fixed value.
thishue = beat8(50); // This uses a FastLED sawtooth generator. Again, the ’50’ should not change on the fly.
// thishue = beatsin8(50,0,255); // This can change speeds on the fly. You can also add these to each other.
fill_rainbow(leds, NUM_LEDS, thishue, deltahue); // Use FastLED’s fill_rainbow routine
showStrip();
} // rainbow_march()
Any thoughts or ideas how to make this work?
Thanks
Leslie
Leslie
Hi Leslie,
apologies for the late response – it’s been a crazy 2 weeks.
I suspect that the “beat8()” function may be triggering this issue. It may be using an interrupt.
As far as I could see in the FastLED documentation, you can disable the interrupt, by adding this at the beginning of your sketch:
Not sure if this will fix the issue, but worth a try.
hans
3 questions:
1.use fastLED.h , can set brightness,but can not run rainbow effect, other effects are running great, why is that?
2. use NEOPixle, can run rainbow, but can not set brightness.
3. how can i do both?
herenchao
Hi Herenchao!
I’d stick with FastLED, since NeoPixel is a little bit more limited.
I have not work with the SetBrightness function yet, but from what I understand from the documentation, it’s called like so:
I’m not sure how you implemented this.
hans
hi again hans..
please need help.. i want adding more effect, example with 10 led..i use from newkitt code left to right and right to left, i want the effect move like fill empty cup with water, so the effect is led blue/red/green color move from left to right but after reach led 10 it will stop and still lit up and move from start again and stop in led9 and start again and stop in led8 etc, until led lit up all led from right to left.
void LeftToRight(byte red, byte green, byte blue, int EyeSize, int SpeedDelay, int ReturnDelay) {
for(int i = 0; i < NUM_LEDS-EyeSize-2; i++) {
setAll(0,0,0);
setPixel(i, red/10, green/10, blue/10);
for(int j = 1; j <= EyeSize; j++) {
setPixel(i+j, red, green, blue);
}
setPixel(i+EyeSize+1, red/10, green/10, blue/10);
showStrip();
delay(SpeedDelay);
}
delay(ReturnDelay);
}
thanks you.. and i am sorry if i always ask your help.. but thanks alot..
wahyu
Hi Wahyu,
it is never a problem to ask for help!
I’m however not quite sure if I understand what effect you’re looking for.
Do you mean like a stacking effect?
A sequence like this:
1. move a LED from left to right, only one led on during the move (the LeftToRight effect), and when reaching the end (led 10), leave led 10 on.
2. Do the same thing, and at the end leave led 9 and 10 on.
3. And again, leaving led 8, 9 and 10 on.
4. And again, leaving led 7, 8, 9, 10 on.
We could do something like that with a modified LeftToRight function, by adding a “lastled” parameter.
An additional minor modification is needed now, since SetAll(0,0,0) would turn off ALL LEDs, which is something we don’t want (code below: the bold text was added/changed).
void NewLeftToRight(byte red, byte green, byte blue, int EyeSize, int SpeedDelay, int ReturnDelay, int LastLED) {for(int i = 0; i < LastLED-EyeSize-2; i++) { // this for loop replaces SetAll()
for(int ClearLeds; ClearLeds<=LastLED, ClearLeds++){
setPixel(ClearLeds,0,0,0);
}
showStrip();
setPixel(i, red/10, green/10, blue/10);
for(int j = 1; j <= EyeSize; j++) {
setPixel(i+j, red, green, blue);
}
setPixel(i+EyeSize+1, red/10, green/10, blue/10);
showStrip();
delay(SpeedDelay);
}
delay(ReturnDelay);
}
Now this function can be called indicating where to stop.
For example:
As you can see; this of course invites to use a “for-loop” like so:
for(int EndPosition=NUM_LEDS; EndPosition>=0; EndPosition--) {NewLeftToRight(0xff,0,0, 3, 100, 0, EndPosition);
}
I have not tested this code, so you may need to play with it a little, especially timing is something you may want to tweak a little.
Hope this is getting you started.
hans
[code]
for(int ClearLeds; ClearLeds<=LastLED, ClearLeds++){setPixel(ClearLeds,0,0,0);
[/code]
it show “expected ‘;’ before ‘)’ token”.
and if i edit “Clearleds;” with “Clearleds = 0;” or “Clearleds = NUM_LEDS;” or “Clearleds = LastLED” the effect run like you say “move a LED from left to right, only one led on during the move (the LeftToRight effect), but when reaching the end (led 10, 9, 8, 7)” the led not on.
wahyu
This is the code for that loop, corrected;
and I forgot the “=0” and typed a “,” instead of a “;” — sorry.
hans
it work great.. thank you alot hans…
wahyu
Awesome!
hans
hi again,
for this code :
[code]
[/code]
But hans, how if i use 50 or 100 led, how to get automate random color but without write very lots code like above..
example 1. slide red,
2. slide blue,
3. slide green ….. 4. yellow, 5. purple ……………………….
until all led light on..
wahyu
You can make a for-loop around the for-loop while having predefined colors (you’d probably want to define an array for that).
This would of course be a lot of work if you want to define 50 to 100 colors.
For loop see this article, and for arrays see this article.
Easier would be if the colors should really be random, you could try this:
for(int EndPosition=NUM_LEDS; EndPosition>=0; EndPosition--) {NewLeftToRight(random(255),random(255),random(255), 3, 100, 0, EndPosition);
}
random(255) will generate a random number between 0 and 255.
If you require a minimum value, then random(10,255) picks a random color between 10 and 255.
Since the Arduino is not that great with it’s randomness, you could add
to the void setup() function – this way it tries to be more random.
Now you could predefine a handful of colors in an array, for example defining 5 colors (each color has 3 values one for red, green and blue):
and in your code you could call those like so
Hope I didn’t screw up the array indexes, but I hope you get the idea.
hans
Dziekuje za Twoją cięzką pracą.
Efekt niesamowity. Wszystko w jednym i możesz sobie wybrać do tego, co aktualnie jest potrzebne.
Zrobiłem lampkę z 20LED i kilka działań już przenoszę i delkiatnie modyfikuje.
Super opisy i wszytko działa od pierszewo startu.
Translated
Thank you for your hard work.
The effect is amazing. All in one and you can choose for what is currently needed.
I made a lamp with 20LED and a few actions I am moving and delicately modifying.
Super descriptions and everything works from the first start.
De Wodzu
Hi De Wodzu!
Thank you for the compliment!
Unfortunately, I do not speak a word Polish …
… 
Google Translate made it readable
hans
Dear Hans,
this project is incredible and it is the perfect basis for one my own Halloween 2019 project’s problems.
My Halloween project will be three animatronic skulls singing the “Ghostbusters” song.
The last major step was the “disco lighting” illuminating the three skulls in the darkness of Haloween night.
A test setup is shown here: https://www.youtube.com/watch?v=9FpQztl9sac&t
Your work is very nicely documented and therefore easy to adapt for own projects. Thanks so much for sharing!
The full implementation of your work into my own project will be ready at Halloween, as I am still working on the project.
See my project on Thingiverse: https://www.thingiverse.com/thing:3658843
But, I have one less problem, thanks to you!
Cheers,
3D-Gurke
3D-Gurke
Hi 3D-Gruke,
that’s an awesome project! Very nicely done!
And thanks for sharing your project, I mean really very cool animatronic skulls.
This make me wish I still had my 3D printer (still looking for a good replacement).
Would you mind posting a link to the page on Thingiverse/Github/Youtube? …
…
Absolutely not required of course, just trying to promote my website a little
hans
Dear sir i want to combine following A and B routines for more patterns. so request instructions from you. (B routine is yours pattern combination)
Source removed
jayanath
Hi Jayanath.
Per comments rules, I have removed you very logn source codes (see a few lines above the text edit field: Friendly request to not post large files here).
Long source codes like this really should be posted in the Forum.
On that note; combining the two sources does not seem impossible – if you do not run out memory on your Arduino.
For adding new effects, please look at earlier posts (for example this one).
hans
extremely very sorry sir, i will never do that again. i have combined these two codes and Arduino is also done complying but when plays it will repeat only one code not both codes sir. i have tried several times


jayanath
No problem, just start a forum topic, and I’ll see where I can help.
hans
hi, thank you for this.
im new to arduino, i try to upload this code for my Aduino pro mini but it say
“exit status 1
Error compiling for board Arduino Pro or Pro Mini.”
i don’t know why. please help me. thank you!
chinh
Hi Chinh,
“Exit status 1” does not say much. It means that there was a problem compiling, linking, or uploading the code.
If you’re using the Arduino IDE, try setting “Show verbose output during:” on for “compilation” and “upload”. You may get more information on what is going wrong.
hans
Hi Hans,
Discovered this project a few weeks ago and it’s great, so thanks for that.
I was wondering if you experienced the same problem that I have here in my setup.
The problem I’m confronted with is that when a certain effect is selected and I plug in an electrical device near my arduino, the selectedEffect changes without pushing the button.
I think that plugging in an electrical device might give a spike in the power supply of the arduino which causes the change in effect. I’m using an older pc power supply for this project.
Don’t know if you could think of a good solution to prevent the unwanted effect switch?
Thanks in advance.
Gert
Hi Hans,
Well I experimented this morning with a combination of a rotary switch and the pushbutton and this seems to solve my problem. Now I first set the rotary switch to a certain selection and then I push the button. The rotary switch is connected to analog input A0. Now if there is some kind of disturbance on the power the selected effect doesn”t change as long as the rotary switch is in the same position.
The rotary switch is a 12 position switch, so ofcourse I’ll loose some options, but 12 is enough for me, so no problem.
The code that I use now to select the desired effect is:
void changeEffect(){
if (digitalRead (BUTTON) == HIGH) {
analog0 = analogRead(analogPin);
AnalogSelect();
EEPROM.put(0, selectedEffect);
asm volatile (" jmp 0");
}
delay(500);
}
void AnalogSelect(){
if (analog0 < 30) {
selectedEffect = 0;
}
else if (analog0 > 50 && analog0 < 140) {
selectedEffect = 1;
}
else if (analog0 > 155 && analog0 < 220) {
selectedEffect = 2;
}
else if (analog0 > 240 && analog0 < 310) {
selectedEffect = 3;
}
else if (analog0 > 330 && analog0 < 410) {
selectedEffect = 4;
}
else if (analog0 > 420 && analog0 < 510) {
selectedEffect = 5;
}
else if (analog0 > 520 && analog0 < 610) {
selectedEffect = 6;
}
else if (analog0 > 620 && analog0 < 700) {
selectedEffect = 7;
}
else if (analog0 > 710 && analog0 < 790) {
selectedEffect = 8;
}
else if (analog0 > 800 && analog0 < 890) {
selectedEffect = 9;
}
else if (analog0 > 900 && analog0 < 970) {
selectedEffect = 10;
}
else if (analog0 > 980) {
selectedEffect = 11;
}
else {
}
}
Gert
Hi Gert,
apologies for the late response.
Yes, a spike in power usage may cause a brief drop in power fed to your power supply – resulting in a possible reset of the Arduino.
I would assume you have a lot of other devices on the same power outlet, or the device you’re switching on pulls a lot of power to start up (eg. a device with a motor in it, since they potentially throw a power big spike when turning on).
The only thing I can think of to fix this is trying another outlet. Getting some sorts of backup power for the Arduino may be an option as well. For example a battery with a trickle charger. But that seems an expensive/complicated exercise for a project like this?
If the power drop is not the cause, then I’d try placing the Arduino further away from the other device – assuming the device is in no way connected to the Arduino (like the USB of your PC, while powering on the PC).
As for your rotary switch code: nicely done and very elegant – and thanks for posting the solution and code!
Just a thought to prevent the need to push a button after setting the rotary switch; try if a timer interrupt (another good article) could do the trick. Every second (or which every time works best) have it check the rotary value and apply the change then.
This way you would not need the push button (and it’s interrupt) anymore. Granted, it will be a little bit more work to implement.
hans
Hi Hans,
I was reading the comment and got interested because I’m having the same problem.
I have a Clock + Text Scroll project with 2 Led Array Modules (2x 8×32 = 8×64) with esp8266 Nodemcu + DS3231 and, I connected between the power terminals (+5 and Ground), a 1000uf 16V Capacitor;
Since this circuit is plugged into an outlet on the same wiring as another outlet, a Blender or other household appliance is sometimes connected.
And sometimes the characters on the clock show ghostly, and even some displays turn off completely or greatly reduce the intensity of the LEDs, but it doesn’t get to the Arduino reset.
Maybe the cause is different and not the use of appliances!
So I ask you: is there anything that can be done to solve this problem?
Thanks
Daniel Fernandes
Hi Daniel,
Well, there are a few tricks one could consider.
1) The obvious one: connect those appliances on a different power group in your house (different fuse in the fuse box for your household power).
2) Use a UPS unit, but that can be rather expensive for just this.
3) Use a surge protector – but as I understand, most of these only catch a peak in power instead of a drop in power.
4) Use a capacitor – but you’ve already done that, and a capacitor can catch a super short power drop, but that may not be enough.
5) Have the Arduino powered by a rechargeable battery, where the battery is hooked up to a charger. This may take some research to see how it’s done the right way.
Naturally, there could be other reasons for the power drops.
For example, if the power supply is not the best, not very stable, or not “strong” enough to keep up. From my own experience; some cheap Chinese power supplies may list a certain capacity (A), but in reality they can’t keep up with what they claim. I’ve had a few cheap 5V PSU’s claiming they could do 2A, to find out that even 1A was pushing it.
hans
Hi Hans,
It seems to be the Chinese power supply I’m using. I will try others; Thank you for your help!
Daniel Fernandes
Hi Daniel,
You’re welcome, and this could indeed be the source of your problems.
If you’d like; please keep us posted on your progress! I’m sure others will benefit from it as well
hans
Hello! Awesome codes. I discovered these while looking for a fire pattern, and yours is sweet! I’ve stumbled my way through creating a dozen variations (different colors, speeds, added more random sparks, etc.), but what I’m trying to do now is stumping me. Basically I want to use this code here, switching between patterns with a button press-but instead of your 17 patterns here, I want every pattern to be a variation of Fire. I run into issues when I try to add a second Fire effect to the code. I think I need to somehow differentiate a line in each Fire variation, so the arduino knows exactly which “Fire” to use? I notice that the “Fire” text appears as orange, but if I add a number to it (ie Fire1) it goes back to regular text. I am a noob so any help guidance is greatly appreciated!
Thanks!
David Jordan
Hi David,
Good to hear you like the code …
…
As for switching between Fire variants,…
Cycling through the desired effect is done in the switch-loop;
switch(selectedEffect) {case 0 : {
// do effect 1 here
break; // break is needed, otherwise it will potentially execute the next "case" statement
}
case 1 : {
// do effect 2 here
break; // break is needed, otherwise it will potentially execute the next "case" statement
}
... rinse and repeat ...
case n : {
// do effect n+1 here (where "n"=the number of the last effect)
break; // break is needed, otherwise it will potentially execute the next "case" statement
}
}
In line 21
if(selectedEffect>18) {the number 18 represents the max effect number, so if you have more or less effects, change this number.
As for you color variations; you could add an extra parameter to the Fire() function, which then in the Fire() function calls the variant you’re using.
I personally would add the parameters red, green and blue, and then use these color values in the Fire and/or the setPixelHeatColor() functions.
Since I’m not sure what lines you specifically modified, I can’t give you an example.
Or you could make variations in the sende by creating multiple Fire() functions (Fire1, Fire2, Fire3, ect) – which will work as well, even though it’s not a very clean or efficient (memory) way.
hans
Hi Hans, thanks for the reply. I was able to make some progress after your comment! I like the idea of having just one Fire function with certain parameters being changed with each button press. It’d be a hassle to have several copies of the fire code pasted in my master code. I realize that I don’t actually need all the other LED patterns for this current project, so I’ll be taking those out to save some memory/be more organized…anyways…
Below is a piece of your code that I changed to make the strip mostly blue with flickering white bits. We’ll just call it flamecolor BLUE for this example…
How would you recommend I go about naming each of those variations? Could I do something like listing all of my flame color codes, like- if flamecolor = BLUE then {code pasted above} , followed by flamecolor PINK = {pink flame code} , followed by the next color, etc etc, and then adding a parameter to the first line of the fire code like :
Then I could make each case of your all ledstrip code a different variant of fire.
case 0: {
// fire blue
Fire(30,120,3, BLUE);
break;
}
case 1 : {
// fire green
Fire(30,120,3, GREEN);
break;
}
and on and on. It that kinda what you meant in your suggestion?
Thanks a lot, I’m learning a lot every day!
David Jordan
Hi David,
Great to hear you’re making progress!
Yeah getting your code organized and clean up is recommended, even if it’s just for fixing issues, and reading the code in the future.
Yes, something like that is what I had in mind. However instead of passing “BLUE”, I’d rather pass color codes (RGB) so you can modify the colors to anything you want without having to redo the “if BLUE then” sequence.
I don’t have LEDs and Arduino handy, so I can’t test it, but I was thinking something like this (assuming you’re using FastLED):
void Fire(int Cooling, int Sparking, int SpeedDelay, uint16_t Color1, uint16_t Color2) { // Added Color1 and Color2
static byte heat[NUM_LEDS];
int cooldown;
// Step 1. Cool down every cell a little
for( int i = 0; i < NUM_LEDS; i++) {
cooldown = random(0, ((Cooling * 10) / NUM_LEDS) + 2);
if(cooldown>heat[i]) {
heat[i]=0;
} else {
heat[i]=heat[i]-cooldown;
}
}
// Step 2. Heat from each cell drifts 'up' and diffuses a little
for( int k= NUM_LEDS - 1; k >= 2; k--) {
heat[k] = (heat[k - 1] + heat[k - 2] + heat[k - 2]) / 3;
}
// Step 3. Randomly ignite new 'sparks' near the bottom
if( random(255) < Sparking ) {
int y = random(7);
heat[y] = heat[y] + random(160,255);
//heat[y] = random(160,255);
}
// Step 4. Convert heat to LED colors
for( int j = 0; j < NUM_LEDS; j++) {
setPixelHeatColor(j, heat[j], Color1, Color2 ); // Added Color1 and Color2
}
showStrip();
delay(SpeedDelay);
}
void setPixelHeatColor (int Pixel, byte temperature, uint16_t Color1, uint16_t Color2) { // Added Color1 and Color2
// Scale 'heat' down from 0-255 to 0-191
byte t192 = round((temperature/255.0)*191);
// calculate ramp up from
byte heatramp = t192 & 0x3F; // 0..63
heatramp <<= 2; // scale up to 0..252
// figure out which third of the spectrum we're in:
if( t192 > 0x80) { // hottest setPixel(Pixel, 255, 255, heatramp);
} else if( t192 > 0x40 ) { // middle leds[Pixel] = Color1;
// was: setPixel(Pixel, 255, heatramp, 0);
} else { // coolest leds[Pixel] = Color2;
// was: setPixel(Pixel, heatramp, 0, 0);
}
}
All this based on your example:
if( t192 > 0x80) { // hottestsetPixel(Pixel, 255, 255, 255);
} else if( t192 > 0xFF ) { // middle
setPixel(Pixel, 0, 255, 255);
} else { // coolest
setPixel(Pixel, 0, 0, 15);
}
Calling Fire would then be (if I didn’t make any mistakes – using your 2 color values):
So the basic format would be:
Note:
CRGB( red, green, blue ) returns a uint16_t (I had to look that up as well haha), which we can assign straight to a led (leds[Pixel]=Color) – note that this is FastLED specific, so for NeoPixel this will work a little different.
Also note that with 2 fixed colors color you will lose the color ramping – but if the effect works as you like: who cares, right?
hans
Nice Hans, that’s definitely looking like closer to the solution! I do use the FastLED library so I was able to implement your code. The code compiles just fine, but for some reason I couldn’t get the Color1 and Color2 to influence the LEDS at all. The LEDs were only be triggered by the “hottest” led section, and the rest of the pixels would be dark.
if( t192 > 0x80) { // hottest setPixel(Pixel, 255, 255, heatramp);I tried fiddling around with the line
and changed it to a setPixel function that includes Color1, and heatramp parameters, but it was pretty hard to get it to do what I wanted. Do you have any ideas as to why the Color1 and Color2 aren’t working for me?
Thanks friend!
David Jordan
The challenge will be to use the heatramp in the “setPixelHeatColor()” function.
As I said: with 2 fixed colors color you will lose the color ramping, and since I cannot test the code, I do not have a good idea how this works best. You could try passing the colors as RGB values, which makes it a little less efficient but easier to read.
I’ve used the values again, that you had used before:
Since I cannot test right now, I’m kind-a stuck with the colors you found
hans
Hans! Awesome!!!! One last question, what’s your paypal?
David Jordan
I assume it worked out? 😁
My PayPal is hans at luijten dot net. Donations are very much appreciated, but you can also donate by sharing the link on other websites, or shopping at Amazon (use this link – I get a small commission each time you shop there).
hans
UDPATE:
Source code has been updated to include Daniel’s suggestion to use
instead of
hans
Hi Hans,
About the comment I made (Sep 19, 2019 – 12:53 PM), oddly enough, but the whole point was that I installed the LED display just above a microwave, so when it was turned on, it produced the big energy field and affected the display, so I moved the microwave and everything is now normal. Thanks for your attention and tips.
Daniel Fernandes
Haha, that is actually quite funny!
Glad to hear everything now works as hoped for!
hans
Hi Hans,
I’m wondering why didn’t you use the goto function instead of the assembly jmp.
I’m not sure if this could save the eeprom use.
And btw, you did an awesome job, i’ll be able to save a lot of time thank you :)
Azroliak
Thanks Azroliak
Great question; well, the “goto” function is something most programmers frown upon and should never have to use.
Just my opinion, but I’m sure a lot of programmers will agree with me.
The description of the link says it all:
The biggest issue is that the program flow can become unpredictable (not in this case though) and would make debugging an issue hell.
This is why it’s ingrained in me to not use “goto”, but in this case you’re bringing up a valid point, and it may be a better choice.
So this doesn’t mean “goto” is evil. Theoretically you could do this:
void loop() {
jumphere:
// EEPROM.get(0,selectedEffect);
if(selectedEffect>18) {
selectedEffect=0;
EEPROM.put(0,0);
}
...
void changeEffect() {
if (digitalRead (BUTTON) == HIGH) {
selectedEffect++;
// EEPROM.put(0, selectedEffect);
// asm volatile (" jmp 0");
goto jumphere;
}
}
I haven’t tried it, so I do not know if it is OK to have the label located in a different function.
If this works, then the use of the EEPROM could be eliminated (a good argument to use “goto” in this case).
Unfortunately, I do not have an Arduino or LED strip handy to test this.
If you decide to test this; please let us know your findings!
hans
So I’m back after some experimentations
We can’t use the goto function since we’re not in the same function but, we can use the setjmp/longjmp couple. That way, I can comment the eeprom functions and that work pretty well.
I’ve also added a capacitor (100nF) in parallel with the button to avoid boucing effect which allow me to put the interruption on rising edge.
Azroliak
Awesome Azroliak!
What a great find – I would not have found that one, never heard of the setjmp.h.
Once I get my Arduino stuff handy, I’ll go play with that – it is a great way to avoid using the EEPROM!
hans
Anyway to add random colours instead of the usual RGB?
Tapomoy
Did you have a particular function in mind?
For example:
could be replaced with this, by using the random function:
or (if you want to have a certain minim brightness:
Add this line to the “setup()” for better random numbers:
You can apply this to any function calls that takes RGB numbers.
Some other examples:
Hope this helps
hans
First of all, many many thanks for replying me.
I actually googled the code for random colour option yesterday and applied it. I guess I made some mistake in it as I am completely new to this and got errors (random is not a type, red was not declared in this scope). Will try accordingly and let you know about the results.
Tapomoy
Trying to figure it out yourself is commendable – quite a lot of people do not even try that. Excellent!

…. but never shy away from asking
hans
Thanks a lot Hans
Tapomoy
You’re most welcome
hans
Hans, thanks a lot for solving my problem. I got exactly what I wanted. There’s one problem though. All effects are showing random colours except for SnowSparkle. There’s a problem in it if I make the colours random. What happens is, the colours become random and change don’t sparkle. And after a few seconds the arduino restarts by itself. I can hear disconnected sound in my computer and the effects restart from fade out. Apart from this, the later effects like bouncing balls, meteor showers also become absent.
If I keep the code of sparkle as it was before the everything works fine except that the sparkle colour is only white.
Tapomoy
Hi Tapomoy,
glad to hear you’ve made progress.
I see there is a little boo-boo in the SnowSparkle() code.
Replace it with this:
void SnowSparkle(byte red, byte green, byte blue, int SparkleDelay, int SpeedDelay) {
setAll(0,0,0); // was set to the color passed to the function
int Pixel = random(NUM_LEDS);
setPixel(Pixel,red,green,blue); // was set to white
showStrip();
delay(SparkleDelay);
setPixel(Pixel,red,green,blue);
showStrip();
delay(SpeedDelay);
}
Not sure why the Arduino would reset though …
hans
Thanks a lot for helping me out Hans. It is working the way I want it now. But there is a strange bug now. Previously when I pressed the button, all effects changed according to the sequence in the sketch. But now something like this is happening:
Fadeinout, strobe, halloween eyes
back to fade
after repeated presses the effects later in the sequences appear. the sequence previously is kind of broken now.
Tapomoy
Hi Tapomoy,
you’re welcome
Maybe it’s an idea to move this to the Arduino forum, so you can post your code and I can review what you have.
I’d start with adding some Serial.println calls to see how the “selectedEffect” variable changes (or not).
hans
Hello Hans!
First of all, I want to thank you for your amazing articles.
I recently bought my first Arduino, along with a string of LEDs, and your earlier article on using FastLED was a great reference for me!
I really enjoy your style of presentation, the level of detail that you explain for both the hardware and accompanying code, and the amazing engagement that you have with others that read and ask questions.
However, I have a couple of clarifications for some of your descriptions here.
For dealing with the button, you mentioned using the following code:
And noted:
But actually, that’s not correct.
The pull-up resistor “pulls” the signal to the high voltage state, so the normal, non-pushed state of this signal is HIGH. Pressing the button connects the pin to GND through the switch, and so to detect when the button is pushed, you should really be checking to see if the signal is LOW. It works for you in your code, because you are not directly checking the signal’s state, but instead are checking when it changes state, which is subtly different.
That leads me to the next section, which discusses the interrupt handling.
You mentioned:
I believe that the reason that you were having problems when using the mode set to LOW or HIGH mode, rather than CHANGE, is that you were causing the interrupt routine to be triggered continually when the button was pushed. As explained in the documentation for attachInterrupt, setting Mode to LOW will “trigger the interrupt whenever the pin is low”. With your configuration, pressing the button causes the pin’s signal to go low, and thus, for as long as you hold the button down, the interrupt routine would continue to get re-triggered! This is why you experienced the effect that was like you “pressed the button multiple times”.
With the changes that you made to get this to work, you are changing the logic to only increment selectedEffect when the signal CHANGEs state, AND the ending signal state is HIGH. As I mentioned above, because you are checking the HIGH state, you are actually incrementing selectedEffect on the button release, and not when the button is pushed (it doesn’t really make much difference for this application, but for some applications it might be critical to trigger on the correct event).
However, there is a more direct method of doing this exact same thing, which is slightly more efficient (only calls the interrupt routine when needed), and makes the code more explicit (and thus easier to read). The mode parameter to attachInterrupt also supports values of RISING (triggers when the pin changes state from low to high), or FALLING (triggers when the pin changes state from high to low).
If you changed your code to use RISING, it is essentially using the same logic of “signal CHANGEd state, and ended HIGH”, but you could do that without using the additional “if” statement inside the changeEffect function. Likewise, you could also choose FALLING, and have the effect change on the button press, rather than the release.
Thanks again for a wonderful article!
David
David
Hi David,
thank you very much for this insightful info, and your kind words.
I think it’s great that other users, like yourself, contribute to the article!
I see your point – very well explained! I may have moved a little too quick bringing in the PULLUP.
With your info in mind, I’ll go do some playing with my Arduino and LED strips.
Thanks again and pretty please, always feel free to post info like this – it truly is very much appreciated!
hans
Hi Hans,
Using a pull-up resistor (either internal, or external) is absolutely the correct thing to do.
If you don’t use a pull-up resistor, the input pin is essentially “floating” when the button is not pressed, and its state will be uncontrolled – it may read HIGH, or it may read LOW. Using a pull-up resistor is the widely accepted method of addressing that problem.
I’m sure that your code, as currently written, works correctly, but my point was that I think that it is working slightly differently than you may believe, and had described. Again, for this particular application, those differences probably don’t matter (it really doesn’t matter if the effect changes when you push the button, or release it).
I really like the way that you broke the article up into the individual challenges, with detailed descriptions of how you solved them. These same challenges could be faced in other applications, so it is really nice to break them out like this. However, for other applications, it may be more critical that the correct event is monitored, and so it would be helpful to understand the detail of what is happening.
I’d suggest playing around without changing your current code, and try and validate my statements around the “change on button press” or “change on button release”.
Of course, none of this considers switch-bounce, which could make the results harder to interpret if it is occurring.
David
David
Thanks again David!
You’re right, and that’s why I wanted to play with it so I can make a better description.
Now that PULLUP has been introduced, which is something I originally did not use, I should also describe the debounce schematics and how it works, and your info will be very helpful with that.
Thank you that you like the way I broke things down.
I will never claim to know everything (and I like to learn some new things as well), but when writing an article, I literally go through every step to make sure I provide useful info and an explanation on how I got there. This way folks can learn something from it, or (like you) provide corrections (which are most welcome).
As with all these articles, finding time to write, edit, test and respond, can be a challenge. I’m still looking for that billionaire that is willing to sponsor me so I do not need a daytime job .
.
So in short; I’ll go through your info, and play with it, and finally will revamp the article to reflect this info.
Thanks again! And by all means; keep the info coming
hans
Hi Hans
I making a lamp with 49 fastled for my Little daughter and I use the gradient palettes sketch by Mark Kriegsman
here:https://gist.github.com/kriegsman/8281905786e8b2632aeb
his sketch use a time delay to go one to another…from Playlist of color palettes
void setup() {
delay(3000); // 3 second delay for recovery
// tell FastLED about the LED strip configuration
FastLED.addLeds<LED_TYPE,DATA_PIN,COLOR_ORDER>(leds, NUM_LEDS)
//.setCorrection(TypicalLEDStrip) // cpt-city palettes have different color balance
.setDither(BRIGHTNESS < 255);
// set master brightness control
FastLED.setBrightness(BRIGHTNESS);
}
// Forward declarations of an array of cpt-city gradient palettes, and
// a count of how many there are. The actual color palette definitions
// are at the bottom of this file.
extern const TProgmemRGBGradientPalettePtr gGradientPalettes[];
extern const uint8_t gGradientPaletteCount;
// Current palette number from the 'playlist' of color palettes
uint8_t gCurrentPaletteNumber = 0;
CRGBPalette16 gCurrentPalette( CRGB::Black);
CRGBPalette16 gTargetPalette( gGradientPalettes[0] );
But I want to use a button to call the gradient palette color from the playlist instead like:
//******************************************************** DEFINE_GRADIENT_PALETTE( BlacK_Red_Magenta_Yellow_gp ) {0, 0, 0, 0,
42, 42, 0, 0,
84, 255, 0, 0,
127, 255, 0, 45,
170, 255, 0,255,
212, 255, 55, 45,
255, 255,255, 0}; // This list of color palettes acts as a "playlist"; you can
// add or delete, or re-arrange as you wish.
const TProgmemRGBGradientPalettePtr gGradientPalettes[] = { BlacK_Red_Magenta_Yellow_gp, //***********************************************************
I need help to setup the void loop()
can you help me please thank you
Chris
cprelot
Hi Chris,
I’m not familiar with the code, and it is a little off-topic.
So this should really be in the forum.
Having said that, and not knowing anything about Mark’s code, you could try using my code (remove my effects), merging it with Mark’s and replace all the “case” statements with a color palette change. Something like this:
void loop() {
EEPROM.get(0,selectedEffect);
if(selectedEffect>18) { // where "18" is the number of gradients you want to use
selectedEffect=0;
EEPROM.put(0,0);
}
switch(selectedEffect) {
case 0 : {
gCurrentPaletteNumber = addmod8( gCurrentPaletteNumber, 1, gGradientPaletteCount);
gTargetPalette = gGradientPalettes[ gCurrentPaletteNumber ];
break;
}
... (for all palettes)
EVERY_N_MILLISECONDS(40) {
nblendPaletteTowardPalette( gCurrentPalette, gTargetPalette, 16);
}
colorwaves( leds, NUM_LEDS, gCurrentPalette);
FastLED.show();
FastLED.delay(20);
}
Hope this helps you go into the right direction. If not: please place a post in the forum.
hans
Multiple libraries were found for “Adafruit_NeoPixel.h”
Used: C:\Users\beauh\OneDrive\Documents\Arduino\libraries\Adafruit_NeoPixel
Multiple libraries were found for “EEPROM.h”
Used: C:\Users\beauh\AppData\Local\Arduino15\packages\esp8266\hardware\esp8266\2.6.1\libraries\EEPROM
exit status 1
Error compiling for board WeMos D1 R1.
whats the problem?
beau
Hi Beau,
You seem to have multiple versions of the AdaFruit library on your system.
For example, I suspect you have one here:
and one here:
(I could be wrong about that second path, it was just an educated guess, I do not use Windows).
And probably something similar for the EEPROM library, and maybe even more than just these 2.
Ideally you maintain only one, in the default location the Arduino uses, otherwise the Arduino IDE doesn’t know which one to use.
Probably the easiest way to fix this is by closing the Arduino IDE, moving both versions to a temporary different location (just so you can restore in case things go haywire), opening the Arduino IDE again, and using the “Tools” – “Manage Libraries” to re-install the FastLED library.
Note: If you’d like to keep the library with your sketch (the one you have on OneDrive), which is never a bad idea, then may you should keep that one as a zipped file in some sub-directory, just for reference in the future, not for the IDE to be used.
hans
Hello,
How can I mkae the patterns alternate without having to push the button on pin 2 ?
Thnak you !
mattx38
Well, I used the random number function to make it done.
selectedEffect = random(0, 18);
Is it the right way to do it ?
It makes the job.
mattx38
That would most certainly work.
However, since the random function on the Arduino is not the best random generator, add this to the loop() function:
void setup() {...
// if analog input pin 0 is unconnected, random analog
// noise will cause the call to randomSeed() to generate
// different seed numbers each time the sketch runs.
// randomSeed() will then shuffle the random function.
randomSeed(analogRead(0));
}
Your random function should replace this
void loop() {
  EEPROM.get(0,selectedEffect);

  if(selectedEffect>18) {
    selectedEffect=0;
    EEPROM.put(0,0);
} ...
and make it something like this:
void loop() {selectedEffect = random(0, 18);
...
hans
Hi, Hans!
Thank You for sharing this wonderfule application! :)
When running “FastLED” -code, I was wondering: “What effect is currently running ?”
So I added this row to “setup()” -function:
Serial.begin(9600);
And these rows to “loop()” -function:
Serial.print(selectedEffect);
Serial.print(” “);
…
Serial.println(“RGBLoop”);
…
Serial.println(“NewKITT”);
…
Everything works well in my serial monitor (Arduino IDE: Ctrl+Shift+M) from “case 0” to “case 4”, I was able to see name of the effect currently running.
Strangely, after “case 5” ie. “NewKITT” -function was executed, it prevented to execute all methods from “case 6” to “case 18”. I found that there was two “indexOutOfBoundsException” (as we say in java world) happening in Your code. In both of these cases, “setPixel” led index reached prohibited value 60, even though 59 is maximum allowed value:
// CenterToOutside -function, row 327, original:
//setPixel(NUM_LEDS-i, red/10, green/10, blue/10);
//Fixed:
setPixel(NUM_LEDS-(i+1), red/10, green/10, blue/10);
// OutsideToCenter -function, row 350, original:
// originalsetPixel(NUM_LEDS-i, red/10, green/10, blue/10);
setPixel(NUM_LEDS-i-1, red/10, green/10, blue/10);
It seems that “Neopixel” -code contains these two bugs, too.
Veijo Ryhanen
Hi Veijo!
Thanks for catching that! I think it may be my code (so not Library related).
Under different circumstances I’d include a check ro make sure it doesn’t go below zero or beyond NUM_LEDS.
Silly me, since it just worked, assumed that the Libraries would take care of that and I didn’t want to slow down the effects by repeatedly checking the values.
Maybe in this particular function it may not be a bad idea to include such a check.
I’ll have to dig up my Arduino hardware and do some testing – which I hope to be able to do in the next weeks (working on another big project and the holidays tend to consume a lot of time as well).
Nice catch!
hans
Hello everybody,
The sketch is great. Thanks a lot! I want to add a new effect. Where do I have to insert it to be able to switch with the button?
Geuther
Hi Geuther,
Thanks for the compliment!
Adding an affect isn’t too complicated. Please read this earlier comment for some of the details.
Hans
Hello Hans, thanks for the quick reply. unfortunately i am new with arduino. I would like to have a color white on case 19. please give me an example. thank you and best regards from Dresden.
Geuther
If you want all LEDs to be white at max brightness, you could try this (not displaying all the other code – changes are displayed BOLD)
We have to make a few changes in the “void loop()”:
void loop() {
EEPROM.get(0,selectedEffect);
if(selectedEffect>19) { // <--- we have added an effect, so "19" reflects the number of effects
selectedEffect=0;
EEPROM.put(0,0);
}
We also need to change the “switch” section by adding our new effect at the end with a “case” statement and the code to set the LEDs to white:
switch(selectedEffect) {
case 0 : {
// RGBLoop - no parameters
RGBLoop();
break;
}
case 1 : {
// FadeInOut - Color (red, green. blue)
FadeInOut(0xff, 0x00, 0x00); // red
FadeInOut(0xff, 0xff, 0xff); // white
FadeInOut(0x00, 0x00, 0xff); // blue
break;
}
... // all the other "case" statements (removed to save space here)
case 18 : {
// meteorRain - Color (red, green, blue), meteor size, trail decay, random trail decay (true/false), speed delay
meteorRain(0xff,0xff,0xff,10, 64, true, 30);
break;
} // new effect starts here
case 19 : {
// setting all LEDs to white setAll(255,255,255); // all LEDs to white showStrip(); // Show the changes in the LED colors.
}
// new effect ends here }
}
Hope this will get you started.
Hans
Thank you! it works !!
have a beautiful Sunday
Geuther
Awesome!
Enjoy your Sunday as well
Hans
Hi, Hans!
Thank You for sharing this wonderfule application!
I have extended the application with an optical Led display in binary format. Plug a LED with pre-resistor into pins 8 to 12 of the ARDUINO and add the following code:
void setup() …. // declare LED pins as output pins pinMode(8,OUTPUT); pinMode(9,OUTPUT); pinMode(10,OUTPUT); pinMode(11,OUTPUT); pinMode(12,OUTPUT); void loop() … case2LED(); … void case2LED() { k = selectedEffect; int a=k%2; // calculate LSB entspricht high für ungerade Zahlen int b=k/2 %2; // entspricht high für ein vielfaches von 2 oder 3 int c=k/4 %2; // entspricht high für ein vielfaches von 4,5,6 oder 7 int d=k/8 %2; // entspricht high für ein vielfaches von 8,9,10 .. 15 int e=k/16 %2; // calculate MSB entspricht high für ein vielfaches von 16 ... digitalWrite(12,e); // write MSB digitalWrite(11,d); digitalWrite(10,c); digitalWrite(9,b); digitalWrite(8,a); // write LSB }Greetings Ronald.
Ronald
Awesome! Thanks for sharing Ronald!
Do you have a little video showing what this will look like?
Hans
Here is a short video. You can see the Arduino with power supply and the connectors for the LED strip. The potentiometers are for an additional step 19, which is for normal lighting and you can adjust the brightness and colors.
https://youtu.be/9vcvrNZCMVY
Greetings Ronald.
Ronald
Awesome! And thank for posting a video!
Hans
asm volatile (” jmp 0″) not working with any ESP8266 model
so i changed ESP.reset() and ESP.restart() but every time eeprom is not stored data and give same pattern.
is that any solution then help me.
Nikunj
The ESP8266 is still on my list of “things to play with” (I have 2 laying around, new in box).
From what I found:
In this StackExchange post I read that the EEPROM implementation in the ESP8266 is not the same as for a normal Arduino, and the post suggests using this particular EEPROM.h library (not the same as the one that comes with the Arduino software).
Of course, I haven’t tested this, and I have zero experience with the ESP8266 (if you don’t count “holding the box” as an experience ).
).
Hope this helps.
Hans
Hello,
nice code!!!
I played a little bit with it – meanwhile i can use a infrared-remote to change the different effects on an arduino nano and a ws2812b-strip
I use it together with the lego ISS as a wall-lamp.
If anybody is interested, i can provide the code here – the a.m. link https://www.tweaking4all.com/forums/ doesnt work….
Altiparmak
Hi Altiparmak!
Thanks for the nice compliment – it’s much appreciated!
I recently swapped the old forum for a better working forum.
The new link is https://www.tweaking4all.com/forum (minus the “s”).
I’d love to see the code!
Hans
Hello Hans,
i have to clean up the code a bit before posting :-)
The comments are in german right now – i don’t think that its helpful.
I put 466 Leds on the Lego ISS – 16*16 on the front and 16*13 on the back + 2 in the base = 466 in total
Controller: arduino mega 2560 – with two different control channels for the strips (back/front)
Features so far:
Features coming:
Unfortunately i can’t get the bouncingball to work
properly – it works with one strip – but not with fastled support for
separated strips :-(Because of the ugly timing-constraints of the ir-lib (without using IRQs) i changed the delay-function of the effects to receive ir-commands.Works quite well for short ir-values (4 Byte) and long delays :-)
Here is a video for the first half of the LEDs (the rest is stucked in china-post)
http://www.altiparmak.de/temp/20200412_041937.mp4
Kimd regardsNormen
normen
Hi Normen!
That looks awesome!
Yeah, I can imagine that finding an “interrupt” to catch IR (this goes for Bluetooth as well) can be quite tricky.
I’m not sure how helpful this will be, but I did find some code for handling IR and using interrupts.
Reading the code carefully will also show you how to connect the IR receiver.
Connections:
Seemingly allowing the use of a interrupt:
It’s a based on a different application, but I’m sure you’ll get the idea. The original article can be found here.
I haven’t tested any of this, and you may have to tinker a little with it to fit it into the code here.
Hans
Good morning My Idol.
instead of using buttons, why do not you use Processing to set effect and set RGB color?
Jensen
Hi Jensen,
I honestly have no idea what you’re trying to ask?
Could you elaborate?
Hans
Hi Hans.
My mean is we will control the Color and Effect of LED by “Processing” on PC.
We can select the effect and pick color easy than.
Jensen
Ah now I see what you mean, controlling the LEDs via a PC.
Well, this is not impossible of course, but the idea of this project is to create LED effects with an Arduino (it is afterall an Arduino project), so we can run the LED effects without the need for PC. This way, the entire setup can easily placed and used anywhere the user would like.
You could of course still use the Arduino to receive info from the PC to control the effects, or you could use (for example, I’m sure there are more out there) this Python library to run LED effects straight from a PC.
Hope this helps.
Hans
Thank you so much Hans.
because i’m not pro. So with your link I can control led with Windows PC?
Jensen
You’re welcome.
As for controlling the LED through your PC, you’ll have to do some reading up on the topic I’m afraid. I haven’t experimented with this at all and I’m not a Python user either.
Most use an Arduino though, even when they control the LEDs from their PC (for example this project).
The main reason for this is that the good old serial ports (RS232) and parallel ports used to be used for projects like this, but most PC’s no longer have these ports.
So in short: you’ll have to do a lot of homework – sorry
Hans
Hi Hans
I admire your work, best article for learning about FastLED.
I want to modify you code for party light system, it will be controler with 10 button (more or less) and each button needs to trigger only one effect, of course interupting previous one.
I`ve tried to make something like below. one buton makes effect goes up and second down, but down function didnt work :/
#include <FastLED.h> #include <EEPROM.h> #define NUM_LEDS 8 CRGB leds[NUM_LEDS]; #define PIN 5 #define BUTTON 2 #define BUTTONDUO 3 byte selectedEffect=0; void setup() { FastLED.addLeds<WS2811, PIN, GRB>(leds, NUM_LEDS).setCorrection( TypicalLEDStrip ); pinMode(2,INPUT_PULLUP); pinMode(3,INPUT_PULLUP);// internal pull-up resistor attachInterrupt (digitalPinToInterrupt (BUTTON), changeEffect, HIGH); attachInterrupt (digitalPinToInterrupt (BUTTONDUO), changeEffectDown, HIGH);// pressed } // *** REPLACE FROM HERE *** void loop() { EEPROM.get(0,selectedEffect); if(selectedEffect>18) { selectedEffect=0; EEPROM.put(0,0); } switch(selectedEffect) { case 0 : { // RGBLoop - no parameters RGBLoop(); break; } Cases ... void changeEffect() { if (digitalRead (BUTTON) == HIGH) { selectedEffect++; EEPROM.put(0, selectedEffect); asm volatile (" jmp 0"); } } void changeEffectDown() { if (digitalRead (BUTTONDUO) == HIGH) { selectedEffect--; EEPROM.put(0, selectedEffect); asm volatile (" jmp 0"); } }I hope theres a solution for this problem.
Thanks,
Bartek
Hi Bartek!
Thank you for the compliments!
This would have probably been better in the forum, … using 10 (or any different number) of buttons, will come with a few challenges.
The first option could be (untested) to use a separate PIN per button (like you started in your code), but would require a minor change:
void changeEffect() {if (digitalRead (BUTTON) == HIGH) {
selectedEffect = 1;
EEPROM.put(0, selectedEffect);
asm volatile (" jmp 0");
}
}
void changeEffectDown() {
if (digitalRead (BUTTONDUO) == HIGH) {
selectedEffect = 2;
EEPROM.put(0, selectedEffect);
asm volatile (" jmp 0");
}
}
So when BUTTON is pressed, the selected effect will be effect number 1.
If BUTTONDUO is pressed, the selected effect will be effect number 2.
And so on.
Note: you could also combine both functions into one function (also: untested):
void changeEffect() {int newEffect = -1;
if (digitalRead (BUTTON) == HIGH) {
newEffect = 1; }
else if (digitalRead (BUTTON) == HIGH) {
newEffect = 2; }
if( (newEffect!=selectedEffect) && (newEffect!=-1) ) { EEPROM.put(0, newEffect);
asm volatile (" jmp 0");
}
}
But …. with 10 buttons, you’ll run out of pins pretty quickly, and you’d need to resort to another solution. Something like a key matrix (often seen with keyboards, or numeric keypads). This will be a little bit more of a challenge though.
Hans
I’m sorry Hans
That’s the code from yesterday which I tried and didn’t work
I tried only using two effects
void loop () {
meteorRain (0xff, 0xff, 0xff, 10, 64, true, 30);
Fire (55, 120, 15);
}
also not getting good results
Marunthol
Hi Marunthol,
Maybe it is better to start a forum topic in the Arduino Forum section.
Your messages unfortunately are all over the place and without seeing the entire code, solving this becomes a challenge.
Please do NOT post the full code here, use the forum instead.
Hans
I am attempting to use your code for a community group theater production of Cinderella on stage. The framework of her carriage would have six states.
1. Off. While the prop is waiting in the wings.
2. A very slow ramping from off, to green, and eventually orange over 10 minutes. So slow that the audience barely notices.
3. Twinkle random. While the fairy godmother applies her magic.
4 Snow Sparkle. After the transformation is complete.
5 Meteor Rain. As the spell wears off.
6. Static Orange. Back to being a pumpkin.
Ideally, (and for simplicity) I would like to use a 6 position rotary switch to change modes – as it would be easy and logical for the actors to operate and giving them control over how long each lighting effect lasts.
We have always had a hard time staging a realistic campfire or shooting star and your code is (almost) perfect as-is! I really like this approach because the hardware could be used in other productions as well simply by choosing which effect is assigned to each position of the switch. Try as I might, I just can’t seem to come up with code that works. Can you possibly assist?
One other idea (or switch mode) I had would be to use the theater chase effect (just on the wheels) to convey they are rolling while in the woods – but I don’t think it’s possible to have the coach with one lighting effect (snow) and the wheels another (chase) without using a second Arduino just for the wheels.
Any support would be appreciated via support donation and due credit in the playbill! This project would really make the show special.
Stephen John Hysick
Hi Stephen!
This sounds like an exciting project, but maybe it is a little to big to talk about this in the comments here (maybe better to start a forum topic as it may involve a lot of code and such).
The use of a rotary switch is most certainly an option and in your situation probably more logical.
Mixing 2 effects (running them at the same time) is probably not the best idea, the use of 2 Arduino’s is probably better. Mostly because each effect “eats” some of the of the other effect away, which results in a slower effect (and more complex code). You can combine them though, it is not impossible. I recommend using 2 Arduinos though.
Hans
Hi, thanks for the program, it is awesome :)
I got an Issue with the button. When I press it, it will randomly send the program back to case 1 instead of going forward to the next case. i tought at first it was my button that was causing the issue but It behaved the same way using the wires directly. I also switched wires and breadboard to make sure. Anything you think that might help me with this issue^
Thank you!
Xavier
Xavier
Hi Xavier,
this could be caused by the so called “bounce” effect.
I have not experienced this issue myself, but it could be what you’re looking at.
On the official Arduino page I found this article that may be helpful.
2 other users reported the same issue, but I just haven’t had time yet to work on a solution (not being able to reproduce this in my setup makes it even harder to see if a potential solution actually works).
Hans
Thank you, I did some research this morning!
found this piece of code that I included in the Setup
void my_interrupt_handler()
{
static unsigned long last_interrupt_time = 0;
unsigned long interrupt_time = millis();
// If interrupts come faster than 200ms, assume it’s a bounce and ignore
if (interrupt_time – last_interrupt_time > 200)
{
}
last_interrupt_time = interrupt_time;
}
For a unknown reason, I had to increase the timing to 3000 ms to make reliable. But still the interrupt is working without any delay… Dont know exactly why but it is working.
I also implemented a second interrupt button on pin 3 to go backward in the reading of the cases. Thanks to all the informations you already responded to other users :)
There is still one thing I would like to add that I cant manage by myself…!
Going backwards, I would like the button to go from the first case to the last one (case 2, 1, 0, 18, 17, 16…) Right know it stops on case 0.
What do you think^
Xavier
Xavier
Hi Xavier,
Cool that this works, but a little weird as well
Both variables are local variables (last_interrupt_time and interrupt_time).
You set the first one to zero, and the second one to millis. Where millis = “Returns the number of milliseconds passed since the Arduino board began running the current program. This number will overflow (go back to zero), after approximately 50 days.”
The if block (if (interrupt_time – last_interrupt_time > 200) { } ) executes “nothing” when the Arduino has been running for more than 200 ms. There is nothing between the accolades, so it won’t be doing anything.
After that it sets the (local) variable last_interrupt_time to the current interrupt_time, but once this function is done, both variable will no longer exist.
Even if they would exist, the would be reset when the function”my_interrupt_handler” is being called.
You’d probably want something like this (assuming the original code, and leaving the “back” button out of it for now):
void changeEffect() {if ( (digitalRead (BUTTON) == HIGH) and (millis() > 200) {
selectedEffect++;
EEPROM.put(0, selectedEffect);
asm volatile (" jmp 0");
}
}
I haven’t tested this, but the button press will only do something if the Arduino has been reset more than 200 ms ago.
Now your second question, the “back” button, would need a little rewriting:
You’ll have to disable the code as indicated in the loop().
I hope this is helpful, and please keep in mind that I have not tested the code.
Hans
Hey thank you so much for your help.
I corrected the firs part as you explained to me, its working!
For the second button It was already pretty much my code, but it wouldnt go backward from case 0 to case 32 ( my last case)
if ((digitalRead (BUTTONdown) == HIGH) and (millis() > 200)) {
selectedEffect–;
if (selectedEffect 200)) {
selectedEffect–;
if (selectedEffect < 1) { selectedEffect = 32; }
EEPROM.put(0,selectedEffect );
asm volatile (" jmp 0");
}
I just switched all the numbers and the other related lines.
Its my first arduino/programming project and Ive been learning so much, thanks to you!.
Xavier
Xavier
Hi Xavier,
You’re most welcome, and awesome to hear it is working.
I am however a little confused about your code …
if ((digitalRead (BUTTONdown) == HIGH) and (millis() > 200)) {selectedEffect–;
if (selectedEffect 200)) {
selectedEffect–;
if (selectedEffect < 1) { selectedEffect = 32; }
EEPROM.put(0,selectedEffect );
asm volatile (" jmp 0");
}
It seems incomplete and I honestly would not know what “if (selectedEffect 200))” would do (I’d expect an error message when trying to compile this).
Hans
Thank you for the nice code! I first tested some individual effects. Now with this code I could not use the button.
It seemed to restart without saving to EEPROM.I guessed the saving is interupted by the hard reset. A delay(200); after saving to EEPROM solved the problem (in the function “changeEffect”).
Alex
Interesting, thanks for the delay tip. What kind of Arduino are you using?
Hans
Hello Hans,
Your dedication to this thread is amazing! I have used your code as my largest tool to learn FastLED. Going through the functions one by one and making changes to see what is effected has been invaluable to me, and I am sure hundreds more. You have a tremendous amount of patience while responding and helping everyone that posts in these comments. Keep up the great work.
Ken
True words. Keep up the good work 👍
David Vernon
Thanks Ken and David!
I very much appreciate your kind words, and it’s my pleasure to help
Hans
Hola Hans!!!
Muchas gracias por tu explicación y lo mejor, seguir en el tiempo respondiendo muchas preguntas.
Voy a comenzar a estudiar los códigos. Seguramente alguno se adapta a lo que necesito con alguna modificación. Primero trataré de modificarlo sino volvere para consultas.
El mejor blog de Arduino es este.
Gracias otra vez!!!!!!
German
Hi German,
I do not speak Spanish, so I had to use Google Translate;
—
Hello Hans !!!
Thank you very much for your explanation and the best, continue in time answering many questions.
I’m going to start studying the codes. Surely one adapts to what I need with some modification. I’ll try to modify it first, but I’ll come back for consultation.
The best Arduino blog is this.
—
Thank you very much for the compliments

Hans
Question: retrigger an effect based on tripping an IR sensor.
Post moved to this forum topic
German
Since the question is a little off topic and since I’d like to avoid posting code here (not entirely avoidable), I’ve moved your question to this Arduino forum topic.
Hans
p.s. I posted a reply there.
Hans
Hi Hans!!
Thank you for moved for a new topic.
I´m going to see now.
Best regards
German
Hans
Hello, Without button candition this code is work…. ?
Means – one by one change of effects automatic,Without button push.. Thank you..
Pritam
Hi Pritam,
yes this is possible. As mentioned in other comments, you could try changing this part of the code:
to this:
This should start the effect with “0” and each time it goes through the loop it will increase the selected Effect by one, until it reaches the max value and then starts over at 0 again.
You can also remove the “#include <EEPROM.h>” line in the beginning as it is no longer needed either.
Keep in mind though that the effects have been written to do individual steps for each loop() run.
So with some effects you may want to call the effect more than once in a “case” block.
Hans
Hi,
First of all, congratulations about this project. It’s very well done, but I’va a question. Is it possible to add a bluetooth module? To control the effects by using a smartphone. Thanks!
From Spain ;)
Aimar Romeo
Hi Aimar!
Thank you for the compliments
As for Bluetooth support: I do not (yet) have a Bluetooth module available, but I do know that several users here have done it.
You may have to look at (for example) this forum post, or look in the comments here.
They may help you get started.
I’m in the middle of working on a new project where all effects (and more) are done on an ESP8266 (super cheap, more capable than an Arduino, and WiFi included). I already have code where it works great with WiFi (use a simple “webpage” for the buttons).
Maybe in the near future I’ll be able to write an article on how to use the example here with Bluetooth.
I’d need some more info and some more testing though.
Hans
Thanks Hans!
Aimar Romeo
Hello Hans and I am interested in knowing what became of the ESP8266 conversion of this great sketch?
jlpicard
Cool to hear someone ask about it!
Unfortunately, due to all kinds of issues these days, this project went in a dormant state (just like a few other projects).
I do have code though with a lot of effects and the option to control it through a webbrowser – it does need some refinement though.
Taking not of it though, and moved it a little higher on my to-do list.
Hans
Sweet, I am going to purchase some those ESP8266. I had a couple ESP32’s left from a different project, but the WIFI capable ESP8266 sounded interesting. Thanks!
jlpicard
In case it takes too long, I’d be happy to share the current code – just cannot do that in the comments here.
Hans
Almost forgot to mention: This sketch can be copied pretty much 1:1 on an ESP8266. Naturally, it wouldn’t use extra capabilities like WiFi.
Hans
Hans, you are everyones hero for working on these codes. Since I posted a while ago about this topic I have been using WLED on a few ESP8266 boards and it works ok. I like your effects MUCH better than what WLED has to offer. I would be willing to give your current version of the ESP8266 code a try.
I tried to load the AllEffects_FastLED code to one of my ESP8266 boards and it gave me some errors,
I am able to load other code to the board fine that is basic (just changes led colors and brightness with buttons).
Also to combine topics from an earlier post when I asked about controlling lots of leds. You suggested that I test the strips to make sure they were in working order and they were. I am currently using 3 different ESP8266 boards running WLED to control a total of 1407 leds (558 leds one one strip, 558 on another , and 291 on the last strip). So I know the led strips themselves do work.
If you would like I could create a new forum post about this.
Charles
I’ve sent you an email 😉
Hans
Hello, I would like to add effects of demoreel100 to this code, how could I do it, thanks.
void rainbowWithGlitter() { // built-in FastLED rainbow, plus some random sparkly glitter rainbow(); addGlitter(80); }void addGlitter( fract8 chanceOfGlitter) { if( random8() < chanceOfGlitter) { leds[ random16(NUM_LEDS) ] += CRGB::White; } }
void confetti() { // random colored speckles that blink in and fade smoothly fadeToBlackBy( leds, NUM_LEDS, 10); int pos = random16(NUM_LEDS); leds[pos] += CHSV( gHue + random8(64), 200, 255); } .....
homer
Hi Homer,
easiest way to do this would be by changing just a few lines (assuming you pasted the functions somewhere at the end of your code, and assuming you’re using FastLED since these functions will not work with neoPixel);
1) Since we add an effect, we will need to update the effect counter:
void loop() {
EEPROM.get(0,selectedEffect);
if(selectedEffect>19) { // this was "18"
selectedEffect=0;
EEPROM.put(0,0);
}
2) We will need to catch this new function in the case statement, by adding a new case block.
case 18 : {// meteorRain - Color (red, green, blue), meteor size, trail decay, random trail decay (true/false), speed delay
meteorRain(0xff,0xff,0xff,10, 64, true, 30);
break;
}
to this (adding “case 19”):
case 18 : {// meteorRain - Color (red, green, blue), meteor size, trail decay, random trail decay (true/false), speed delay
meteorRain(0xff,0xff,0xff,10, 64, true, 30);
break;
}
case 19 : {
rainbowWithGlitter;
break;
}
Now you’re not quite done yet, since you may have to fine tune a few things.
As explained in this article, one of the challenges are the “endless” functions that never return to “void loop()” – and I’m not sure if this would affect your code (specifically the “rainbow” function).
The way it looks right now: rainbow is called (I assume it creates a rainbow) and only one (or zero) LEDs will be used for the glitter effect and I’d assume you’d probably want more “glitter”.
If you want to dive deeper in this, please start a forum topic, to avoid that we are posting large chunks of code here.
Hans
Thanks friend, I think I will try to open a new post, you are the man!!
homer
Hans
Hi, can anyone do a version to controll by using a smartphone? I’ve been doing one, but it didn’t work very well
Aimar Romeo
There are a few folks here (you’ll have to search the comments and/or the forum) who did a setup with cellphone using Bluetooth.
One of my next projects will be based on an ESP8266 which can be controlled through cellphone/tablet/PC/Mac based on a web interface.
(the ESP8266 can run a tiny webserver and so far my experiments are working great)
Hans
Thanks!
Aimar Romeo
Hans
For those interested, I have the code that works with the Effects (17 cases), automatically one after the other, as Hans taught me!
In fact, I would like to use the Blynk program (not Blink) to turn the strip On/Off but I still can’t.
Daniel Fernandes
Awesome Daniel!
Feel free to post it in the Arduino forum (you can email it to me as well, if you’d prefer not to sign up for the forum)!
I’m sure others would love to see that
I haven’t played with Blynk yet, but I presume it will not provide the option to trigger the interrupt to change effects.
I am however working on a new project where I use an ESP8266 as a replacement for the Arduino, allowing you to switch effects with a simple web interface.
That code should be relatively easy to adapt to Blynk or Bluetooth use as well.
Since it is a lot of work, it may take a few weeks before I post it though (sorry).
Hans
Thank you very much friend!
I admire your intelligence for the excellent project and your kindness in putting all your work here for free!
How can I send the file to you by email?
Daniel Fernandes
Hi Daniel,
ideally the best way would be in the forum (so others can learn something from it as well).
If you still prefer email, then you can email me at webmaster at tweaking4all dot com.
Hans
Good evening Hans,
First of all, sorry to bother again and thank you very much for the help you have offered us all and thank you for teaching us. I’ve been looking through a social network called TikTok effects for ws2812 strips. I have come across these 3 effects and I would like to know if you could do the programming. I’ve been trying for a couple of days but I don’t know how to do it. Any help is welcome. I have also asked the author of the video and he replied that since he puts the led strips up for sale with these effects, he cannot give or sell the programming. Thanks for everything!
Videos:
Storm effect: https://youtu.be/2GlTI3MUjJk
Twinkle effect: https://youtu.be/Jh7DD9XYIcc
Explosion effect: https://youtu.be/uyv2EnIU_m0
Aimar Romeomeo
No worries
By the looks of it, the 3rd effect may not even be his own.
Anyhoo …
The Storm effect
I like this effect and I may include something like this in my new ESP8266 projecy.
This one reminds me of the Strobe() effect, which can be adjusted something like this (untested) by breaking it up in two pieces (the flashing pattern can even be randomized).
void Strobe(byte red, byte green, byte blue, int StrobeCount, int FlashDelay, int EndPause){
for(int j = 0; j < StrobeCount; j++) {
// setAll(red,green,blue);
for(int counter=0; counter<NUM_LEDS/2; counter++) {
setPixel(counter, red, green, blue);
}
showStrip();
delay(FlashDelay);
setAll(0,0,0);
showStrip();
for(int counter=NUM_LEDS/2; counter<NUM_LEDS; counter++) {
setPixel(counter, red, green, blue);
}
showStrip();
delay(FlashDelay);
setAll(0,0,0);
showStrip();
delay(FlashDelay);
}
delay(EndPause);
}
You probably have to play a little with this to find the right settings (timings, number of LEDs, number of sections, sections with or without overlap).
The Twinkle effect
It looks like this one relies heavily on the FastLED library and I do not (yet) have a quick code for this. Maybe this effect may do the trick even though it does not seem to be exactly the same?
Explosion Effect
It looks like he may have taken the code from this project.
Note that this is not the simplest effect … you may run into some issues or challenges.
Hope this helps – I’ll try to make similar effect for my upcoming ESP8266 project.
Hans
WOW, that was amazing, thanks for all Hans, you’re so intelligent. I’ll try it. Thanks a lot!
Aimar Romeo
Thanks haha – I don’t consider myself intelligent but I’ll take that compliment!
Hans
Hi Hans.
Ignore this comment, only I want to recive the emails of the posts :)
Aimar Romeo
Hans
hello how can i change the button funktion
a press -switch profile hold the button vor 2 or more sek. than turn the stripe of ?
basti
Detecting that the button is pressed for a while may be tricky.
If you look at the debounce examples (here for example), you’ll have to add something to see if the button is still being pressed.
I do not have a good solution of the top of my head though (maybe because I’m on vacation haha).
To turn the effects OFF, you’d need to add an effect that blanks the strip and does nothing else, over and over again.
There are some examples in the comments here on how to add a new effect (for example this one).
The new effect could be something like (assuming this would the 19th effect):
case 19 : {setAll(0,0,0);
showStrip();
break;
}
Hope this helps …
Hans
thanks allot
another question .
can i divine in a sketch which leds should light up.
for example in the k.i.t.t. sketch that he starts with led 5 then 6.7.8 and then continues with led 15
basti
Hi Basti,
apologies for the late response.
You can change whatever you’d like when it comes to the effects. As you can see, the KITT effect calls a bunch of functions, each responsible for a certain action in the KITT effect.
In each of these functions you could change my code to do what you’re looking for.
Since you want to start at led #5 and skip leds 9-14, you may have to tinker a little bit with the for-loops in the code (the code assumes we use all leds, from #0 to NUM_LEDS).
Hans
Thank you Hans for your great project! It really helped me a lot.
But I still have a question:
In my project i want to have two buttons. One for switching through colours and one for switching through animatons.
For example: One button for switching between case 0-9
and one button for switching between case 10-18
But unfortunately I couldn’t figure out, how to do that.
Thank You
Jakob
Hi Jakob,
well, I’d probably introduce another interrupt for the second button.
Maybe the best approach is something like this:
1) Introduce a new global variable to identify what the last pressed button was, this could be an integer, or a boolean
2) Define a “define” for the second button (eg. BUTTON2)
3) Add an interrupt for the second button (in void setup), which calls (just as an example) a second changeEffect function
Now in your code you’ll need to catch what number sequence needs to be handle – 0-9 or 10-18, depending on the new variable “LastPressedButton2”, so that when using button one, selectedEffect only goes from 0-9, and when passing 9 it will reset to 0. However if you button 2 was being used, the selectedEffect should only use the numbers 10 to 18, and reset to 10 when passing 18.
Also: when for example button 2 is pressed, but the button pressed before that was button 1, then selectedEffect needs to be set to 10. And vice versa, selectedEffect needs to be set to 0.
There are several solutions I can think of – this was just a suggestion to get started.
If you’d like more help and dig deeper in this, then please start a new forum topic in the Arduino forum (just to avoid that an off topic project takes up a lot of space here).
Hans
There is an example in my code using 2 buttons connected to different interrupts
I use for the brightness – but it could be easily adapted
Feel free to contact me, of you have problems with it (code is posted on a comment here)
Normen
Hi folks,
i have taken the effecrs from this page to build a lego millenium falcon-led-lamp (with sleep-function, switch, brightness adjustment)
I modified the code – every effect runs endless until the switch is moved
The function schlaflicht dims the brightness over aprox. 2 h to a minimum…
The code + video + pictures are here: https://www.tweaking4all.com/forum/miscellaneous-software/lego-millenium-falcon-with-all-ledstrip-effects-in-one-fastled/
normen
Wow, that’s a super cool project! Thanks for posting the code in the forum and placing a link here.
Very well done!
Hans
Hi,
very fine thing – my strip work nearly great. But there is only one thing I didn’t figure out:
I am using your “all in one” script with a SK6812 RGBW strip (Adafruit_NeoPixel strip = Adafruit_NeoPixel(NUM_LEDS, PIN, NEO_GRBW + NEO_KHZ800); ) and it is not possible for me to set more than 300 pixels. Have you any idea why? My board is a ATMega328P with the old bootloader. If I try to set more pixels the board is loading but the strip is not working :(
kind regards, Georg
Georg
Hi George,
hmm, that is an interesting problem.
As far as I can think of (I never encountered such a limitation), this can be caused by a few things:
1) Most likely: Memory limitations. I would assume you’d see an error message when compiling the sketch.
The Arduino needs to keep track of the 3 colors for each LED, which can chew quite a bit of memory.
Possible fix: I’d consider getting an ESP8266 – which can be found for less than $5/each at Amazon.com or Amazon.de – which is tiny, faster, has more memory, and has build in WiFi which is super solid.
2) The capacity of your power supply. You’d see a fading effect or a maybe even a non-functional strip. Your code however would not give an error message.
Assuming 60mA per LED block (I’m not familiar with the SK6812, so I’m taking the WS2812 values) then with 300 LEDs at max brightness you’d need an 18 A power supply. 10 A would probably be enough, for the effects here.
Hans
Hi Hans,
you were right with your first answere, I also used my 2nd best friend Google and found an article where the memory limitation is described. One single LED needs up to 1byte of data -> 1 LED chip (R,G,B,W at the SK6812 strip) needs 4bytes of data -> 600 LED chips need 2,4kByte of data which is a bit more than the 2kByte the nano has onboard SRAM.
Now I tried yesterday an OrangePIP Mega 2560 with around 8kBytes of SRAM and the strip worked really fine (my power supply has got 35A at 5VDC :) ).
greetings,
Georg
Thanks for the confirmation!
I’ve been playing with the ESP8266 and can highly recommend that one as well, but always good to see alternatives like the Mega 250 you mentioned!
Hans
Hi Hans, hope you are well! Quick question…I am using an LED strip that supports warm light and is a BRGW addressable strip. However, when I try to change the strip type in the void setup from GRB to GRBW, it does not work. Does Fastled not support BRGW? If so, is there a workaround?
Thanks!
lakerice
Hi lakerice,
by the best of my knowledge, FastLED does not support RGBW/BRGW (yet).
I did find these 2 “hacks” to get it working, but since I do not have such a LED strip, I’m unable to test.
Hans
Hi Hans, thanks so much! I got it to work finally. It was hard, but I
had to add a lot of things at the beginning of the code as well as
mixing in Dave’s code in the void setup with yours. The main thing is to have
work correctly.
Here is a link to your All-Effects-In-One https://pastebin.com/rZjPGhe6
Here is a link to the FastLED_RGBW.h file that needs to be referenced for the hack (to anyone reading this, make sure you name the file FastLED_RGBW.h exactly, no extension just exactly as is written) https://pastebin.com/QWuHL0V6
Note: the meteor effect does not work as the CRGBW structure does not reference fadeToBlackBy. Unfortunate as it is a great effect!
Thanks again Hans, your help is tremendously appreciated as always!
Justin
lakerice
Hi Justin,
awesome to see that you’ve got it to work – and thank you for posting the fix!
Unfortunate that the meteor effect cannot be translated that easily.
Something to look at:
So in the code I make it that it would run for FastLED and the NeoPixel library.
You could try to modify the Neopixel part of the code, to work for FastLED, something like this:
Of course, I have not tested this and you’d still need to look at the W parameter of your colors (probably set it to zero?).
Hans
No problem Hans, I’m very glad it worked! Thanks for the fix too! Unfortunately, when I add your code, the IDE says meteorRain was not declared (it is highlighted in the case section at the beginning of the sketch). If you compile the sketch with the checkmark button, do you get the same error? Sorry I know you’re unable to test it.
lakerice
If you see an error like that, then the function meteorRain() cannot be found (obviously) which for example can be caused by a missing accolade in your code. Happens to the best of us – so please check your code.
Note: if I replace the fadeToBlack() function with the one I showed in the previous comment, it compiles on mine. However I did note a little mistake I had made (“strip” is not know in FastLED – so getting the old color would fail in FastLED), so try this instead:
Hans
Hi !!
i need to Run only 5effects
1)Bouncing Ball colored
2)Fire
3)Bouncing Ball
4)Snow Sparkcle
5)Bouncing Ball colored
How to I modified the code ? Please help me I’m new in ARDUINO PROJECTS
PLEASE HELP ME !!
sandy
Hi Sandy,
Removing effects is relatively easy.
You’ll see this piece of the code:
Since you want only 5 effects, we will need to modify the bold line (change “18” to “4“).
Since the count starts a zero (0), for 5 effects we end up with a max of 4 (0, 1, 2, 3, 4).
Next step is to remove all the “case x : { … } ” blocks for the effects that you do not want (for example the italic printed code above).
Final step is to renumber the “case x” statements so the are numbered in sequence without gaps.
So that the code will look something like this (I removed the code between accolades with the case statements to keep the code short in the comments here);
void loop() {
EEPROM.get(0,selectedEffect);
if(selectedEffect>4) {
selectedEffect=0;
EEPROM.put(0,0);
}
switch(selectedEffect) {
case 0 : {
...
}
case 1 : {
...
}
case 2 : {
...
}
case 3 : {
...
}
case 4 : {
...
}
}
Hope this helps – here you can find more about how the “case” statement works
Hans
Thank you so much ! You are very Nice !! its worked
sandy
Awesome! Good to hear it worked
Hans
Hi !! Hans
I need to Run same Effect in 3 Times. (Automatically running the Effect !! i’m Not use any BUTTON)
But, I’m tried a DELAY function. its only work DELAYED Effect(Effect Run slowly). It”s Not make effect in 3times . But i need to run same effect in 3times. What i do ?
sorry!! for my low English
sandy
Easiest way to run an effect 3 times (assuming you switch automatically to the next effect) si by doing something like this:
case 15 : {// Fire - Cooling rate, Sparking rate, speed delay
Fire(55,120,15);
break;
}
Change it to:
case 15 : {// Fire - Cooling rate, Sparking rate, speed delay
for(int fxCounter = 0; fxCounter < 3; fxCounter++) { // add this line
Fire(55,120,15);
} // and add this line
break;
}
The so called for-loop needs to encapsulate the effect lines (not including the “break” line, as this would exit the for-loop).
Two notes on that:
1) Explanation and details on how a for-loop works, can be found here.
2) I presume you have modified your sketch to automatically go through a few effects one at a time. If not, then this will of course keep repeating itself.
Hope this helps
Hans
I like you !! its work perfect . i appreciate for your SERVICE !!! Hats of you !!
sandy
Thanks Sandy and you’re most welcome
Hans
Hi !!! here is my DANIEL WILSON BOUNCING CODE !!
I need to combine this code to your code !!! Because , your Bouncing code is not same MOVEMENT and colors compare to DANIEL WILSON.
i again again say your Bouncing code(case 17 ) is not same DANIEL WILSON BOUNCING CODE .
i kindly request please help me !!
[CODE REMOVED – Code can be found here]
sandy
Hi Sandy,
Please start a forum topic for this – hopefully somebody here can chime in as well.
Also note: Integrating another effect like this one will take quite a bit of work, and at the moment I do not have time to make such time consuming modifications
Hans
Hi!! can i use Each effect Different DELAY TIME ??
and i’m not use any button.
Another problem Not blink the FIRE EFFECT . its just blink fraction of second (0.2ms)
Mike
I’m not sure what you mean with the delay time – I presume a delay after each effect has been completed 3 times?
In that case: add a delay statement just before the “break;” in each case statement block.
Something like this:
case 15 : {// Fire - Cooling rate, Sparking rate, speed delay
for(int fxCounter = 0; fxCounter < 3; fxCounter++) { // add this line
Fire(55,120,15);
} // and add this line
delay(1000); // delay of 1 second after this effect
break;
}
Hans
Hi !! i need to modified BOUNCING BALL EFFECT
” Still bouncing balls floating not settling down !!
continue floating (bouncing).
how to i modified ?
KELLY
I have not experienced that issue, but if you’d like to include a little delay at the end of the bouncing try this:
Hans
Sorry !! this code just make DELAY of the Effect. its not still floating. i think i need to remove ” boolean continuous” code.
But, i don’t know .its right or wrong !!!
KELLY
What is the difference Between DANIEL WILSON CODE and HANS LUIJTEN CODE ? for BOUCING LED . It’s working Different i’m checked it (Daniel code still bouncing long time…not a settle fast. But, Hans code Bouncing just 2seconds.After it will be start again beginning.
[ Code removed … again … as requested before: please use the forum for this ]
KELLY
Kelly/Sandy,
please adhere to the rule/request to not post large pieces of code in the comment.
(as stated in the form “Do not post large files here (like source codes, log files or config files)” and as requested before).
The difference is that the code for this project had to be broken down in steps (see one of the challenges).
See also my previous project, where you’ll see the code behaving like the one you’re referring to.
You could try pasting the code of the bouncing balls in the previous project into this one – if you use a button (otherwise there would not be an interruption of the effect).
Hans
Hi Hans,
So sorry for the late response regarding the meteorrain issue with using RGBW LEDs. I was away for a few days and wasn’t able to test your code. Also, apologies for sending this response not connected to my original question but it looks like I ran out of “reply” buttons :)
So I found out the problem…it looks like the issue was with the variable oldColor not being supported by the RGBW hack. After many hours of experimenting, I simply removed all the lines of code with oldColor, and it worked perfectly!
Thanks again Hans!
Justin
Here is the version I used that worked:
lakerice
Hi Lakerice!
No worries – there is more to life than just tinkering with LEDs
Thank you for confirming this now works for your setup. Which of the “hacks” did you use to get the RGBW to work?
Hans
Haha but LEDs bring so much joy to life…yep I used the reference file for RGBW by Dave Wilson that you recommended to me. Also, just to remind everyone that the file needs to be saved in the same folder as your sketch, and needs to be named exactly as FastLED_RGBW.h in a notepad file. And just for other’s easy reference, this is the code I used for the beginning of your All Effects sketch for RGBW (please let me know if I did not organize it properly for clean code rules):
Thanks again Hans!
Justin
lakerice
Yes, LEDs are so much fun to play with
Awesome Justin – thanks for posting the fix, I’m sure others will benefit from this!
Hans
Hey Hans
How many maximum WS2811 LED can i control using ESP8266 Node MCU?
and also which GPIO Pin i have to choose for controlling WS2811LED using ESP8266?
Nikunj
Hi Nikunj,
Good questions …
I use Pin4 on my ESP8266. I’m sure one or the other pin will work as well.
As for the number of controllable LEDS, well I do not have a straight answer to that. However I can tell yiou this, mabe it helps;
– Uno/Leonardo/micro/nano : Recommended to not exceed 512 LEDs,
– Mega/Due/Zero :Recommended to not exceed 1,000 LEDs
How this translates to the ESP8266, I honestly do not know. The ESP8266 has quite a bit of memory.
There are tricks to speed this up, for example by using multiple LED pins (FastLED), but I have never tested this (refresh could run in [almost] parallel).
Hans
Hey Hans,
Thanks for your reply,
Actually i have not worry about power because of every 60 LED of 25 feet wire i have a 5V/10A power supply inserted.
but can you give me more detail about refresh rate?
Nikunj
You’re welcome!
As for refresh rate: The LEDs will be fed their “data” sequentially.
So if each LED takes 500 μs to read, handle and pass the data on to the next LED, then a refresh of 1,000 LEDs would take half a second (if I did the math right and 500 μs is indeed the speed we should be calculating with). So your refresh rate for 1,000 LEDs would be about 2 fps.
Note: different LED models will have potentially different refresh timing. I do recall some older LED strips using 800 μs. You’d have to look it up for your strip and do the math.
I did read somewhere that you can attache (for example) 2 strips, each on their own pin. Since the ESP8266 (and most Arduinos) are faster than the time it takes to refresh a LED, you may be able to get better speeds by controlling 2 strips. This would require your code to be optimized for this of course.
Hans
Hi Hans
I built a lamp and used your code, really cool. I would like to add a CASE (19?) that does all the effects automatically. How should the code be changed? Thank you!
Lino
Hi Lino!
Adding something like this could be done by changing this part:
void loop() {
  EEPROM.get(0,selectedEffect);

  if(selectedEffect>18) {
    selectedEffect=0;
    EEPROM.put(0,0);
  }
To:
void loop() {
EEPROM.get(0,selectedEffect);
if(selectedEffect>19) { // <-- change 18 to 19
selectedEffect=0;
EEPROM.put(0,0);
}
So it adds the 19th effect.
Then after the “case 18” block, add this:
case 19 : {// all effects
... // add the code of each individual effect here
break;
}
For example:
case 19: {// All effects
// code from case 1
FadeInOut(0xff, 0x00, 0x00); // red
FadeInOut(0xff, 0xff, 0xff); // white
FadeInOut(0x00, 0x00, 0xff); // blue
// code from case 2
Strobe(0xff, 0xff, 0xff, 10, 50, 1000);
// code from case 3 HalloweenEyes(0xff, 0x00, 0x00,
1, 4,
true, random(5,50), random(50,150),
random(1000, 10000));
HalloweenEyes(0xff, 0x00, 0x00,
1, 4,
true, random(5,50), random(50,150),
random(1000, 10000));
// code from case 4 CylonBounce(0xff, 0x00, 0x00, 4, 10, 50);
// code case 5 NewKITT(0xff, 0x00, 0x00, 8, 10, 50); ... // etc, repeat for all cases you want to include ...
break;
}
Note some effects work better if they are repeated a few times. For those you can either copy the code several times, or add a for-loop around the effect code you wish to repeat.
Hope this helps.
Hans
Hi Hans
a friend of mine recommended this to me:
void case19(){case1();
case2();
case3();
case4();
case5();
case6();
case7();
case8();
case9();
case10();
case11();
case12();
case13();
case14();
case15();
case16();
case17();
case18();
}
It might work?
Lino
Hi Lino,
Sorry – but as far as I know this will not work. This is not how the case statement works .
.
This would work only if you would break up the case statements and you’d make separate function for each of them (not a bad option by the way).
To illustrate this, we have this right now:
switch(selectedEffect) {
case 0 : {
// RGBLoop - no parameters
RGBLoop();
break;
}
case 1 : {
// FadeInOut - Color (red, green. blue)
FadeInOut(0xff, 0x00, 0x00); // red
FadeInOut(0xff, 0xff, 0xff); // white
FadeInOut(0x00, 0x00, 0xff); // blue
break;
}
... // etc
}
Now we have to take the code of a “case” and make that a function, for example (repeat for all case statements, and do not copy the “break;” statement into the function):
void case0 () {// RGBLoop - no parameters
RGBLoop();
}
void case1() {
FadeInOut(0xff, 0x00, 0x00); // red
FadeInOut(0xff, 0xff, 0xff); // white
FadeInOut(0x00, 0x00, 0xff); // blue
}
Now the case statement “loop” would have to be changed to this:
switch(selectedEffect) {case 0 : {
case0();
break;
}
case 1 : {
case1();
break;
}
... // etc
}
If you do this for all 18, then you could indeed do this for case 19:
case 19: { case0(); case1(); ... /etc case18(); break; }Which is a more efficient and elegant way of course.
Hans
Ok thanks a lot for the explanation.
Anyway tonight I’ll try and then I’ll let you know.
I’m in the office now (Italy)
Lino
Sounds good
Hans
Hi Hans.
It work!
Thank you!
Lino
Awesome!
Hans
Hi Hans
Could you control the choice of the effect via bluetooth and an app written on android (with Thunkable)?
I have a HC06, but I would like some help with the arduino program. With the android app I think I can.
Lino
Hi Lino,
I haven’t played with Bluetooth yet, however quite a few users have been playing with it (search the comments for “bluetooth” with the search function in your browser).
I also do not have an Android device, but again: I have seen some posts about a generic Android app that seems to offer this kind of functionality.
On that note: I’m working on a little project with an ESP8266 ($5 Arduino code compatible device, just faster, more memory and integrated WiFi). With that project, I’ve managed to get the effects to work and control them through a webpage that runs on the ESP8266 – this may be the easier approach.
Hans
I would also be fine with the ESP8266. I await your developments. Thank you!
Lino
I think this Hans project is very interesting and beautiful, but, in particular, I think it is much better to run all the cases, one after the other, automatically, as I have done myself, using the Arduino Nano or any other Arduino.
Daniel Fernandes
Hi Daniel,
Thanks for the compliment
As for switching effects automatically, I can see this being of use to some users, others may prefer selecting one effect and keep that running.
With my next project (using the ESP8266) I will however try to include a “run all effects” option.
Hans
Hi everybody,
I have a problem with this code. I use a ProMini board and WS2811b (300) LED strip. There is no problem loading the sketch, the problem arises when the LED strip makes one fade-in-out in red, then one fade-in blue, then it’s over – it freezes. I have a button defined on pin 5, but it doesn’t respond.
Does anyone have any idea what could be wrong.
I’m not exactly an expert, but I like to learn something.
KR_edn
Solved the problem!
As always, human error (quick, quick, quick) is present. After connecting the power supply to the LED strip on both sides, the thing works. Thanks for sharing your knowledge.
KR_edn
Apologies for the late reply, but in the meanwhile happy to hear the issue got resolved
Thanks for posting the fix as well!
Hans
Hi Hans , i have modified your code just to change colors with button pressed . I have small problem that i cannot solve – after reset value is still stored in eeprom but after power loss board starts everytime with “case 1 ” and dont actually read last state from EEPROM . Any help ?
Regards Ivan
Ivan
Hi Ivan,
I have noticed the same issue, unfortunately I have not been able to pin-down why this is happening.
After all, the EEPROM is set on changing effect, so after power loss it should read the last effect.
I have not been able to test this, but maybe something happens in the setup() function that confuses the EEPROM?
Try adding this line, in the setup() function, before calling anything else:
Like I said: I have not tested this.
Hans
Hi Hans , i have tested this and it make some work but everytime after reset the board goes to the next effect ( can be usefull for someone ) i will try to figure this problem and post solution here
Ivan
Maybe add after these 2 lines:
Not sure why the selectedEffect is increased, may the call to the interrupt is executed on startup?
You may want to check if the effect that has been read isn’t “0”.
So maybe more elaborate (effect will be increased by one):
if(selectedEffect==0) {selectedEffect=17; // 18 is the last one
} else {
selectedEffect--;
}
Hans
Hans , adding this ” selectedEffect–; // reduce effect by 1 ” have do the trick Thanks a lot !
Ivan
Cool!
Don’t forget to catch the cases where the effect=0
Hans
Note: this would be a sloppy solution in my opinion, but worth a try
Hans
Hi Hans
I wanted to report this really interesting project on ESP8266. I was looking for something like this. I tried it and it works fine.
I would just like to add a button on the web page that performs all effects in sequence. can you help me?
the link is:
https://www.hackster.io/wirekraken/esp8266-websockets-and-ws2812b-leds-c2dee8
Lino
Hi Lino,
modifying code from others can take a lot of time an effort, and the original developer will be much quicker in modifying the code to what you need.
Not knowing the code, I’d probably introduce a global variable (boolean) that is default set to false.
If the option “do everything in sequence” is selected, then set the boolean to true.
When this variable is true, then before starting the case-statement, I’d automatically switch the selected effect to the next one.
Note: if you wish to explore this further, then I’d recommend starting a forum topic.
Keep in mind though, even though I always like to help where I can, extensively digging on code from others will take a lot of time, so it will not be high on my priority list. Sorry.
On that note, I’ve been working on a project with even more effects, web controlled, also using the ESP8266.
Unfortunately, I do not always have time to work on this (got to make a living somehow as well haha), so it may take a little before I can publish it.
Hans
Hans,
i have tried to subscrive to forum, but the confirmation email with the password did not reach me. Check it out thanks
Lino
I do see a confirmation email here with your email address – so the mail has been send out.
Please check your spam folder if you haven’t already.
Hans
p.s. if that still doesn’t work; contact me at webmaster at tweaking4all dot com and I’ll set a new password for you.
However; if you’d like to change the password in the future you still may need to be able to receive emails from tweaking4all.
Hans
Hello Hans :)
First of all, thanks for the time and effort you put into this. It’s a nice site with some very nice examples
I have one questions i hope that you can answer me, i searched the thread, i cant find an answer
and btw. i am not a pro programmer
If i want to put the framework and effect code into a “While loop” how do i do that?
Can i somehow change the piece of code to work inside a while loop? Works fine in a blank sheet, where i put in the VOID loop. But i have two conditions that i want to be HIGH / TRUE before initiation of the code.
Void Loop () {
code
code
While( cccc == HIGH){ RGBloop() }
void RGBloop() ect.
Thanks for your time
Jollae
Hi Jollae,
You could indeed use a while loop, something like you described. Eg:
void loop() {while ( cccc == HIGH ) {
RGBloop();
}
}
However … since “void loop()” keeps repeating itself, you could also do something like this:
void loop() {if( cccc == HIGH ){
RGBloop();
}
}
A while loop would not add anything if it would be just checking that condition.
Hope this helps.
Hans
Hi Hans! I’m here again…
I need a way to decrease bright of leds to keep more time on effects. I use lipo 3s 5200mAh 15c and a simple 5v 3A stepdown module. And thanks for all!
Junior
Hi Junior,
I’m not sure what you’re asking …
If you want to reduce overall brightness, and you’re using the FastLED library, then you can do this really quick with FastLED.setBrightness.
where x is a value 0 – 255. You can insert this line anywhere you’d want, but usually it is set as the last line of the void setup() function.
I’m not sure how time is related this – so my apologies for not quite understanding what you’re asking for.
Hans
hello my friend, how are you? in fact when i use my ledstrip with 60 leds everything works very well, i replaced it with another one with 144 leds and my power module provides only 3A, when i get effects with white leds, it loses intensity and locks everything. I used an example of the fastled code where I could reduce the brightness intensity and thus all the LEDs shine without losing any effect and without crashes. This is what I want to do and when I change my power adapter for another 5A I return to maximum brightness.
Junior
Doing good! Hope you’re doing good as well!
The setBrightness should be able to help you with that. Not sure how much you have to reduce brightness, you’d have to experiment with the values.
With 3A and 144 LEDs, you’d have about 20 mA per LED, which is indeed a little on the low end. Even 5A may not be sufficient to run all LEDs at white with max brightness (you’d need close to 9A … 144 x 60mA = 8.6A for ALL LEDs at mac brightness white).
Hans
sorry for not explaining it more clearly! my stepdown cannot feed the current needed to keep everything lit at the same time. when the flash effect goes into action it crashes … Thanks again Hans!
Junior
No worries 😊
Hans
Thanks friend!
I believe with 5A or more everything works fine cos my lipo battery provides 5.2 A and have power discharge 15 times.very high amps! I will try do as you wrote.. Later i’ll give a results! Thanks again.
Junior
Sounds good
Hans
Hi Hans, how are you, I hope all is well! I recently purchased an arduino pro mini with mcu 32u4, also known as arduino leonardo. haven’t tested it yet, but it works with the ws2812 leds project as well?
Happy new year!
Júnior
Hi Junior!
I hope you’re doing well as well
I would expect the Leonardo to work with WS2812’s as well – however … I have never used or owned a Leonardo.
I did see this write-up where a user describes his experiences with Arduino Uno vs Leonardo. Worth a look I’d say.
Happy New Year!
Hans
Thanks Hans, I’ll try more later with my newest board.
Thanks bro!
Júnior
Hans
I keep getting errors for the setPixel() and setAll(), it says that it is not declared in this scope.
M S
Hi M S,
you’re missing the last part of the sketch, which handles functions like setAll.
The “not in scope” message usually means one of two things:
1) The function is simply not defined in the Sketch,
2) One or the other accolade is missing (often the close-accolade ” } “) somewhere in the code.
Hope this helps
Hans
I was going to wire up some led lights that i currently own instead of buying more. But the ones i own have 4 pins on them.. 5v, R,G,B. How would i go about changing the code so that i can hook it up to an arduino nano?
Hunter
Hi Hunter,
I have not yet used strips like that.
They sounds like Analog LED strips though and I have no experience with those.
I couldn’t find much detail, especially since you mention 5V (most mention 12V or 24V).
Not sure if this is helpful, but maybe check out these link:
Hans
Good morning
first of all , thank you for this great tutorial.
And Hans , as you suggested , I changed my project from neopixel to fastled library . And I must say , you’re codes look stunning on my project.
I’m in the middle of tweaking some loops , and it’ surprisingly not that hard to understand.
i have2 questions for you .
How can I add a blank case at the end of the entire cycle ? I want all the lights to turn off before everything restarts.
Here’s my second question . Is there a way to install a second button to reverse to the previous effect ?
Greetings Bart
bartie1967
Hi Bartie1967!
Thank you very much for the nice compliments
Adding a case for an empty loop shouldn’t be too complicated.
You could add a “new” “case 0”, so that it starts with that, something like this:
case 0 : {// do nothing
break;
}
Now for all the other cases, simply increase each number by 1. So the original “case 0” becomes “case 1”, “case 1” becomes “case 2”, etc.
You’ll have to change the first steps in the “void loop()” as well, to correct for the number of available effects. For example
to (increase the bold number by 1)
Adding a second button is an option as well. As far as I recall, most Arduino’s support 2 interrupts, of which we used 1 for this project.
I haven’t tested this, but it should look something like this:
1) Add a definition for the reverse button (if I recall correctly pin 2 and 3 are usable for interrupts):
2) in “void setup()” we need to enable the second interrupt by adding this line:
3) We need to make a new function to handle the reverse move:
void changeEffectReverse() {if (digitalRead (BUTTON) == HIGH) {
selectedEffect--;
EEPROM.put(0, selectedEffect);
asm volatile (" jmp 0");
}
}
4) We also need to make sure the selected effet doesn’t go below zero, so we need to modify the beginning of the “void loop()” function:
I hope this helps, if you’d like to dig deeper into these changes, then I’d recommend starting a Arduino forum topic, so we don’t make the comment section too overwhelming for others.
Hans
Bonjour Hans
Beau travail et explication pour un novice comme moi
J’ai 20000 décorations extérieures de Noël menées en don de 1500 rgb sur un programmeur chinois
j’ai un arduino mega 2560 et votre script fonctionne à merveille
Mais je me demande si je peux programmer une chaîne de 96 leds RVB clignotant en 4 états
exemple 1-5-9-13 jusqu’à 96
2-6-10-14 “”
3-7-11-15 “”
4-8-12-16 “”
ceci comme de simples programmeurs de guirlande led
désolé je ne parle pas anglais donc traducteur google
Merci pour votre réponse
Translated:
Hello Hans
Nice work and explanation for a novice like me
I have 20,000 led Christmas exterior decorations donated 1500 rgb on Chinese programmer
i have an arduino mega 2560 and your script is working amazing
But I’m wondering if I can program a string of 96 rgb leds blinking in 4 state
example 1-5-9-13 until 96
2-6-10-14 “”
3-7-11-15 “”
4-8-12-16 “”
this like simple led garland programmers
sorry i don’t speak english hence google translator
thank you for your response desolé mauvais manipulation
andre
Hi Andre,
thank you for the compliments and thank you for taking the effort to translate the text – well done.
Note: I do not really speak French, so the translation is very helpful. In case you do speak Dutch (looks like you may be in Belgium), then you could consider posting under the Dutch article if that would be easier for you. Unfortunately, Tweaking4All is only available in English and Dutch.
Since answering your question will take some code and explaining, I started this forum topic to show how you can scroll a pattern forever.
Hans
This is an amazing resource thank you.
I am curious how would you add a potentiometer to control brightness?
A direct connection in the power line would cause a lot of heat. Coding one in seems possible but it is beyond me.
Matthew
Hi Matthew,
setting brightness programmatically is most certainly an option.
The FastLED library even has a nice function for that: FastLED.setBrightness().
This function sets a value (0-255) on how much to scale down new values for the individual LEDs.
However … turning the know of a potentiometer will not trigger an interrupt to update the overall brightness.
So we’d need to probe the potentiometer quite often to see if it changed.
Something to get started with:
1. Hookup a potentiometer
There is a great example on the official Arduino website where they show us that we can hookup the potentiometer to +5V and GND (use the left and right pins of the potentiometer – the fixed ends) and A0 (analog input, connected to the variable pin, usually the center pin). In the Arduino example a 10 KOhm potentiometer is mentioned.
For this we could define a few global variables:
2. We read the potentiometer value and convert it to a 0-255 scale, and if this changed we call the setBrightness function
Since we need to frequently check this (this may slow down the effects!), I’d start with doing this in the “showStrip()” function. Just so it doesn’t get called too often. You could consider putting this in the “setPixel” function as well, but I’m afraid it would be called way too often and slowdown things too much.
According to the analogRead() function most Arduinos return a value 0-1024, so we need to divide the result by 4 to scale it down to 0-155 (so the setBrightness function can work with it).
If the value changed (stored in “PotentiometerValue”), then we call the setBrightness function.
Something like this:
There is one problem with this though (you’ll have to do a few tests), btu as far as I recall, the setBrightness setting will only be applied to NEW LED values. When we call “showStrip()”, we already had set the values of the LEDs, so the change in brightness will only be visible when doing the next showStrip() call.
Note: it may not be bad to do a few tests to see what kind of values the potentiometer produces, just to make sure it works as expected.
Keep also in mind that half the brightness most likely will not look like half the brightness. Maybe a log (logarithmic) potentiometer can compensate for that, if you’re not satisfied with the way it works, or compensate in calculation we do when the value is read from the potentiometer (in this example we just divide by 4).
Note: this example is something I have not tested … so your mileage may vary.
Merry Christmas!
Hans
Thanks for the reply and this gave me something to play around with. I am pretty sure this is just a bit above me though. I get the concept if I were using a single LED that has only Pos Gnd but incorporating this into your all effects code with WS2812 that has Pos, Gnd and data gave me a bit of a head scratcher.
I am not proficient in coding at all I mainly try and see what I can figure out from other talented people’s work and try to learn what I can from that. I am curious of your use of:
int newPotentiometerValue = analogRead(PotentiometerPin) / 4; // read current pot value, and divide by 4
I read a few posts that people use a map function to scale the POT to the analogRead() function;
int brightness = map(analogValue, 0, 1023, 0, 255);
or
int mappedValue = map(analogRead(brightnessInPin), 0, 1023, 0, 255);
Is this just a case of there is more then way to to achieve a desire result?
Either way thanks for the original help and this at least give me something to try and over come.
Matthew
Hi Matthew,
using the map function is most certainly a good option as well – my bad, I didn’t think of this one as I rarely use it.
Somehow in my head I like to do it with the /4 method. I’m pretty sure internally the map function works in a comparable way, but allows more flexibility for more complex situations.
So all in all: “map” is a good find and is a very good alternative.
Hans
Hello Hans,
Thank you very much for all your work. It’s amazing and it’s what I was looking for.
I just have two questions :
1) For my current project, I am building an infinite mirror (with Arduino and FastLED) and a smart mirror (with a Raspberry Pi) in the same time. And I would like both to start with a PIR sensor (the same if possible). I copy the module for PIR sensor on the Raspberry Pi and it seems to work. Separately I try to program the PIR sensor on the Arduino, and it’s working well with one single LED, but I don’t know how to include all the librairies for the LED stripe. I tried many things, but nothing works. I would like also to keep the button for changing the effects. How can I do that?
I will handle the hardware issue later, for the splitting of the PIR signal wire for both cards.
2) For another project, I did vu meters (here it is : Vu meters) with a sparkfun spectrum shield. I found on Youtube the code for it, but is it possible to add your effects (like fire for example) for this purpose?
Thank you very much, your website is amazing for a noob like me.
PS : I tried to create an account in the forum to open a comment, but I never received the email for password…
Sébastien
Hi Sebastien,
Thank you for the compliments!
I do appreciated that you did an attempt to use the forum for these questions.
Apologies for the inconvenience, feel free to send me an email (webmaster at tweaking4all dot com) so I can help you get started with the forum.
As for your question;
1) I’m not very clear on how you’d like to use the PIR. Is it supposed to turn on the Arduino (and later the RPI)? Or should it toggle effects as well.
At first glance I’d probably look for a simple solution, using a relay – but I haven’t thought that one entirely through yet. There are options by using a transistor when hooking it up to both as well, but that would be a more advanced solution. Considering the price of a PIR (about $1), I’d probably grab 2 PIRs.
When the PIR sees a “person”, I’d assume you want things to turn ON. Should it stay ON for a certain time? Or turn OFF again when the “person” disappears?
2) I had to look for the VU Meters code and found it here. Too bad it uses the 3.5mm jack, as on most of my devices it then mutes the regular speakers .
.
Adding my effects to this may not be impossible, but it would take some work and quite a bit of code.
It would be a cool project though, so maybe we can continue in the forum?
Happy New Year
Hans
Hi and thank you for your quick answer.
1) For the PIR, I was thinking fisrt just to solder two wires to the PIR signal and to have them plugged to the Arduino and the RPI (or the signal wire go to a breadboard and from there 2 wires go the the Arduino and RPI). (Something easy and perhaps not working, but I am just a beginner in electronics.)
But this issue will be tested later. For the moment I am just looking for having the PIR sensor working on the two boards separately. Like if I have one sensor for each board.
My biggest issue was to put the PIR code into the FastLED code.
So I want the Arduino to turn ON when there is a movement. The effects will be changed by the button.
For the time that it stays ON, I don’t really know. I was thinking that it stays ON all the time when someone stays in front, and stays ON some minutes/seconds more when the person leaves before it turns OFF.
2) That will be a great project. I will post it in the forum as soon as I will be OK with the forum sign in issue. I was thinking to make the fire effect reacting to the music. But let’s see what we could do.
Best regards and happy new year too.
Sébastien
Hooking up one PIR to two devices (RPI/Arduino) is probably not the best idea. Doesn’t mean it will not work though, but I would recommend against it
I did run into this article which gives some good and to the point info on how to use a PIR with an Arduino.
Personally, I’d probably do something in the void loop() where an effect is selected only when the pin used for the PIR is HIGH. If the pin is not HIGH then show no effect (eg. all LEDs black).
You could do this (untested!) something like this (bold = added code):
So when the PIR is HIGH, handle the effects. If not HIGH then fill all LEDs with black and show it.
Hans
Hello,
I tried the add the code above using the FastLED library and all the effect with the button, but I had some error messages like “changeEffect’ was not declared in this scope”, but it was working before I added the PIR code…
You said that FastLED was better than Adafruit_Neopixel, so I would like to have the Fast_LED working, but I found a way to add the PIR in the Neopixel code and it seems to work.
(Code moved to this forum post)
At least with this method, it seems to works even if I don’t really know what I did.
I will still dig to make the FastLED working.
Just another question, how can I manage the time that the LEDs are ON? I have two types of PIR sensor, one with the delay and sensitivity screws like this (but to find the right time is quite annoying) and one without those screws like this but it stays ON only some seconds. I tried to add a delay(), like when I had only one LED, but now the delay was acting on the effect itself (like turning one LED ON every 10 seconds, which is not making the fire effect as cool as before).
Thank you
Sébastien
Hi Sébastien,
I took the liberty to move this topic to the forum – otherwise the comments here become just too long.
See my comments there
Hans
Forgot to reply on the VU meter idea …
I’ve done a few tests in the past;
One was using the 3.5mm jack of an audio source (tried the output of my laptop).
This did work very well, however … most of these jacks were designed for headphones and when inserting a connector, these mechanically switch off the audio output from the device. Effectively muting the device, and sending the audio signal through the 3.5mm jack.
Another option I tried was using a microphone instead, however surrounding sounds will interfere.
For example a person standing close to the microphone, and talking, would be picked up and influence the VU meter.
I haven’t found an “ideal” solution yet. A good amplifier or home theatre system, can have a monitor output, which would be an option.
These outputs (RCA or Tulip connectors) typically have a lower power level and a small amplifier would be needed (cheap single chip or transistor setup) – but at that point I had already given up for the day haha
Hans
For the Vu meter I tried once also the microphone, but it was not amplified so it didn’t work well.
For me the jack works fine. The youtube video on my first post is my final result. In my setup, the fact that the jack stops the sound is not an issue. However, the spectrum shield had an output jack so you can plug other speakers if needed.
The music come from my phone, through an airport express. So I plugged the jack from the airport express to the input jack of the spectrum shield, and an other jack from the output jack of the shield to the speakers (they only have a jack cable).
The Spectrum shield is inserted on an arduino uno, and all the LED are connected there. I will put pictures in the forum when I will create the post.
Sébastien
Cool! Yeah, in certain situations this will work.

It’s just hard to loop back when using a laptop or most other audio sources.
The mic solution wasn’t all that great in my tests either.
Hans
Thank-you so very much for your outstanding explanations and open-source contributions to the Arduino community! I especially appreciate your effort to implement similar effects using both the FastLED and the Adafruit Neopixel libraries. This is an invaluable resource.
You may have already explained this, and I apologize for my ignorance, but is it possible to have moving bars or stripes with three (or more) different colors? The effect I started with has two colors, red and white, for a moving ‘candy cane’ effect. My goal is red-white-blue stripes for a patriotic flag effect.
Thanks in advance for any advice you might have – or some other place to look.
Be well!
James
Hi James,
thank you very much for the very nice compliment!
As for the candy-cane effect you’re looking for, you could do something like this (this example only works for FastLED, I haven’t looked at an implementation for NeoPixel yet).
In the forum, I’ve posted one a while back, that may be exactly what you’re looking for: Forum topic link. It has a little fade between colors.
Since I couldn’t resist … I just wrote two examples for you in this forum topic as well.
Hans
https://wokwi.com/arduino/projects/287311734683730445
Hi there,
we have created an Arduino simulator link for your project described here. Please see whether this is okay. Kindly let me know if you need any updates. The link is permanent and the users can play with it online. :)
If this is interesting, kindly let us know. I can create simulation pages for other projects as well.
Thank you in advance
Puneeth
Puneeth
Hi Puneeth!
thank you for making an Arduino simulator! It looks really good.
For others: Go ahead and take a look at the simulator.
Hans
Thanks for this, great starting point for my project, I am wondering if anyone can advise on 2 points for me though,
1) I assume you have to set the effect on every boot,
2) How hard would it be to get the code to control multiple strips, all using the same effect, but different randomised starting point so for example they would all be on the fire effect but would look different, so it would look more like a fire when diffused, or when the are on the rainbow effect they would all be at a different stage of the rainbow
Francis
Hi Francis,
Thank you for the compliment
As for your questions;
Saving the last ran effect;
The idea is that the last used effect would be stored in EEPROM, but this does not always seem to be reliable. So it may happen with your setup that it reverts back to the first effect after unplugging the power.
I like you idea of having multiple strips running the same fire effect.
The issue here though is that this could become rather complex since the Arduino was not designed to multitask (for handling the effect).
You can connect multiple strips to your Arduino, and the FastLED library handles this very well.
However, say we run the fire effect twice (eg. using 2 strips), then each strip will get only half the computing time available to work on an effect. This would slowdown the effect – which can be significant, but also may be very acceptable. I haven’t tested this.
Note: I can see how we could try doing this for the fire effect, by adding a parameter to the fire() function (being: the selected strip).
Due to the random nature, each strand could potentially display a slightly different fire effect.
If you’d like to pursue this, then please start a forum topic our the Arduino Forum, so we can look at code without polluting the comments here.
Hans
Hey Hans I know you posted this a while Ago. Your work and code is amazing and i’m just learning FastLED in your code i have it running automatically straight thru but somewhere something is wrong and i can’t figure it out so was wondering if you could help with a little bit of teaching behind it. So each function runs but fire gets skipped and the SnowSparkle & Sparkle does not run as it should it just sits and pauses. Also the running light function i was wondering on how to get that to run Runninglights Rainbow instead thanks for your help.
[CODE REMOVED – Please use the Arduino Forum to post code]
beginnerled
Hi BeginnerLed,
Unfortunately, I had to move your code to the forum – posting large chunks of code should not be done here.
I’ve started a topic for this, you can find it here.
Hans
okay thank you for the fast response
beginnerled
You’re welcome!
Hans
Hi Hans. First of all thanks for all efforts, icluding sharing your knowledge but mostly answering questions in a calm way. I have read all the comments and see lots of same questions like, automatic changing mode, bluetooth trigerring, deleting a animation, 2 button etc. Also this tutorial is the only one in its class.I have made many researches.Thanks again.
My challenge is adding some functionality to button. I want to put the project on my diy electric scooter so 1 button is good for cable optimization .
1- I need to add a long press turn off/turn on functionality which starts from the last animation before turning off. Someone asked a question like that in the comments but i see this is not easy.
2- Double press the button to change and set the color of the effect.
So in summary the button,
1 short press change the effect
2 short press change and set the color
1 long press turn off /on
Is it possible?I am a very newbea and tried lots fo things before commenting, if you do not have time to write the code may be you can suggest some resources a way to do this,
Thanks
Anil
Hi Anil,
Thank you for the nice compliments – it is much appreciated
As for you button questions – I think all of this is possible but we’d need to change a few things in the button handling.
It may be best to start a forum topic for that since it may involve quite a bit of code changes.
In a nutshell, how I see it, we have to do some time checking in the changeEffect() function.
It will take some experimenting, especially since you’d like to use the button for 3 tasks.
For example the long press: If we see, that within a certain time span the button still remains HIGH, then we can assume a long press.
If we see a HIGH, ad LOW, and a HIGH again, in a certain time span, the we can assume a double click.
If we only see a short HIGH, then we assume a single click.
This does imply that the button press will be slowed down a little in responsiveness though.
And we’d need to implement something for the color change.
Not to mention: we need to consider possible button bounce issues as well.
As you can see, this will take some work and experimenting.
I do like the idea though, so please feel free to open a post in the Arduino Forum.
Hans
Just use the WDT to do an interrupt every 15ms. Then pool the buttons by setting a global flag within the interrupt. If it hasn’t been held down x amount of cycles, reset global flag. Boom, as many buttons as you need. ;)
Troy
Hi Troy,
Using the Watch Dog Timers for this could work … do you have a small example sketch?
Hans
It does work because I’ve done it.
void setup() {
setWDT(0b01000000); //set for interrupt
//setWDT(0b00001000); //set for reset
//setWDT(0b01001000); //set for interrupt and then reset
}
// this function sets up and starts the watchdog timer
void setWDT(byte sWDT) {
WDTCSR |= 0b01000000; // set for interrupt
WDTCSR = sWDT | WDTO_15MS; // set to 15ms interrupt cycle (fastest option, don’t change)
wdt_reset(); // starts the WDT from 0
}
ISR (WDT_vect) { // interrupt service routine for the WDT. Interrupts every 15ms
Button logic here
}
Troy
Again the main idea here is that the WDT time is triggered every 15ms no matter what. Just pool the state of the button under the ISR routine, if its being pressed down, then add to your global flag, something like effect_press++;
I’ve found 5 cycles of this to be the perfect amount to “debounce” the button. I also set some code that if its been released for 75ms then it resets the global flag, that way small little presses don’t add up to trigger the button at some random point. If you get creative with your logic you can easily do combos of buttons or long presses, there’s also no real limit to how many buttons you can add. My project has three, effect, color, and brightness. I’m able to do a long press, switch the leds to solid color, cycle through the brightness settings, and then let go of the button and have it return to its previously selected effect using this method.
Troy
Thanks Troy!
I’ll have to go play with that for a bit.
Sounds interesting and viable!
I assume this may only work on Arduino models (eg. not ESP8266/ESP32)?
Hans
This has only been tested using an ATmega328P.
Troy
Thanks Troy!
Yeah I read somewhere that there may be some board specific firmware/bootloader requirements. I could be very wrong though, as this is a “new” topic for me as well
Hans
Is there a way to set a timer to turn the nano off after 2 hours.
I have made a display to go in the kids bedroom, they use it at night but after four days the battery’s are dead as they leave it on all night.
I have heard you could use avr/sleep.h which i beleive is built in to the board.
I am running with a button to switch through the effects.
but i cannot work out how to code it to turn off after running for two hours.
Can anyone help??? Im new and lost!
essentialled
Hi Essentialled!
Well, I have to admit that I have never done anything with sleep.h (AVR library) or automatic shutdown/sleep.
My initial thought would be to use a relay, but since your setup is battery powered, this may not be the best option.
Note: the sleep.h library is written for AVR microcontrollers as found on the Arduino Uno. So this will not work with different microcontrollers like the ESP series for example.
Since I have no experience with this either, you may want to explore one of these libraries that are intended to make this easier:
Hans
p.s. an electronic solution that I found on YouTube: Arduino Auto Shutdown (and switch off)
Hans
Do you know how i could use millis instead of delay in the script below. I want to be able to add more effects and use a button but the delay takes out the button. so i have started again with a basic script but i have no idea how to have this run with millis, and can’t get my head around the millis documentation
Code remove – Please see this forum topic for the code
essentialled
Hi EssentialLED,
First off; please do not post long code sections here (see the red “Do not post large files here” warning) – the forum is intended for that.
No hard feelings though – I removed all your code and placed it in this forum topic – which is where I’ll write my response as well
Hans
Excellent set of effects here. Bravo! I am wanting to use a few in my ATMEGA328 Pro Trinket 5V. Im aware it is essentially an Arduino Uno. Your code works perfect, but I am wanting to splice in a single, double, and long press state into this. Ideally 2 separate buttons to have 3 states like this. I am only going to be using 5 animations and an off LED state, but I can not for the life of me, get a button library working with this. I sat and tried to figure out state machines, and I came up with this simple code, hoping to drop it into yours here, but I can’t get the state machine to work. Any suggestions on implementing these button states? Thanks for any advice at all, because I just keep hitting brick walls and nobody is giving me the time of day.
Code moved to this Arduino Forum topic!
Mogwai
Hi Mogwai!
Thank you for the compliment and nice to hear you like the effects
I unfortunately had to move your code to the forum (see this topic), just to minimize the amount of code we post here in the comments.
My first thought was that it may be tricky considering that I use a interrupt … but I’ll let it sink in for a minute and will try to respond at the forum topic.
Hans
Congratulations for the code friend!!!
You’re awesome.
I’m quite new to programming, arduino, argb, etc, but I’m trying to use an arduino to control my pc case rgb led fans based on your code, so, I’m wondering a few things:
1 – Would there be a way to control wich effect is being shown with a potentiometer?
2 – I’m actually using the Wokwi Arduino Simulator, and the effects do not change immediately when the button is pressed, would there be a way of change the effect right after the button press, or whenthe potentiometer analog read value has changed?
ps: sorry for my bad english
Gabriel José Ribeiro
Hi Gabriel!
Thank you for the compliments – it is always appreciated
Controlling which effect to use with a potentiometer isn’t impossible, but it would work quite differently.
In the example here, we use a pulse (the switch) to trigger an interrupt. With a potentiometer this would not work, as there is no “switch”.
This would mean that the code needs to be rewritten to frequently test the position of the potentiometer – a Timer Interrupt could potentially do this (every so many milliseconds check if the resistor value of the potentiometer has changed, if it changed, then based on the resistor value select an effect). For example with this TimerInterrupt library.
As an alternative, you could use a rotary switch, with a dual deck (one deck to select the option, the other one to trigger the “switch”).
As for the Wokwi simulator; I’m not sure how well the simulator will handle hard resets, since it may trigger a full restart of the simulator.
In my sketch here, the effect does get changed by changing the stored and selected effect and then resetting the Arduino, which goes faster on real hardware (my best guess).
Hans
HI!
This is the best source of all in one code i have found. I want to embed this in a car grille for show.
How can i add this effect but on a SINGLE STRIP (not 2 like in the video) at the start to run this and after to stay ON until i press the switch to toggle the rest of the code
Thanks in advance!
Mark Moga
Hi Mark,
thank you for the compliment!
As for the effect you’re looking at: I’d love to help if I can, however I’m not quite sure what effect you’re looking for in the video.
Since this is a little off topic, please start a topic in the Arduino Forum. This way we can post codes examples, etc.
Hans
HELLO,
i did this project and i had lot of fun but also lot of headache with
1. first i used a button, but the animations just skipped and not in sequence (even knocking the wire is changing the animation. next i used a small wire connector for breadboard, NOT CONNECTED TO GROUND, only putting the connector in the PIN 2, result = same thing, just skipping through. what i think because of the noise created or something, is resetting the program because jumps too easy and too many times to the first animation. i tried some solution from the comments (delay change effect after push button etc.) also on uno and nano, still no luck
did anyone fixed this out?
2. How do i eliminate the eeprom thing, i want it to start from the first animation every time i turn on the arduino (i tried myself to modify the code and get it off but since i am new i got some errors)
m_mayday
Hey there!
1) I’m not quite understanding the first issue, apologies for that.
I suspect you may be referring to button bounce (see for example this comment) which depends a little on the type of switch you’re using.
2) Your second question is a tricky one, since for an Arduino there is no difference between powering up and doing a hard reset. In both cases the Arduino would act the same way, and we wouldn’t know when to switch to the first effect. So in that case we’d better use a different approach. One option would be to use the interrupt to set a global variable (and do not have it execute the reset). In all functions, we’d need to check if this global variable has changed, and if it changed the effect should be exited.
Something like this (if you’d like to dig into this one a little deeper, please start a forum topic).
Define a new global variable, which we will need only for a few effects:
Next we change setup() a little:
Next we remove these lines from the loop()
And at the beginning of the loop() we add this:
Modify the the changeEffect() function:
void changeEffect() {
if (digitalRead (BUTTON) == HIGH) {
ButtonPressed = true;
  selectedEffect++;
  if(selectedEffect>18) {
    selectedEffect=0;
  }
}
}
Now in some functions you will not need to do anything, and in some effect functions you may want to add:
if(ButtonPressed) { return; }That last line may have to be placed in several locations. The only thing it does is to leave a function when the variable ButtonPressed is TRUE.
Effectively exiting an effect function and jumping back to the loop() function.
For example:
void RGBLoop(){for(int j = 0; j < 3; j++ ) {
// Fade IN
for(int k = 0; k < 256; k++) {
switch(j) {
case 0: setAll(k,0,0); break;
case 1: setAll(0,k,0); break;
case 2: setAll(0,0,k); break;
} if(ButtonPressed) { return; } // <--- here
showStrip();
delay(3);
}
// Fade OUT
for(int k = 255; k >= 0; k--) {
switch(j) {
case 0: setAll(k,0,0); break;
case 1: setAll(0,k,0); break;
case 2: setAll(0,0,k); break;
} if(ButtonPressed) { return; } // <--- here
showStrip();
delay(3);
}
}
}
This is just a rough example, and may need some fine tuning.
Hope this helps
Hans
Thanks for your help. i will used your code and modifications this weekend
And yes, problem no 1 was about the bouncing effect (“I suspect you may be referring to button bounce (see for example this comment) which depends a little on the type of switch you’re using.”) and i did used the solution from that comment, even increased to a higher debouncing time. i used 2 types of buttons, in the end i used this jumpers, the shortest length i had to get as less noise it can, even thinking of using some type of thin coax cable, used for microphones, in case the noise is the problem.
i will try again and i will post a link to a video, if the problem still there
Thanks again!
m_mayday
There may be several reasons why buttons may show the bounce effect.
I think it originally may be caused by how an actual switch works – but I think you’ve got that covered by using wires.
If it still happens, even with a 1000 millisecond “delay”, then something else must be going wrong.
–> if you’d like, start a forum topic – which gives us a little more freedom in responding and posting things.
Hans
Hi Hans,
Happy New Year and hope you are doing well! I have been trying to blend your fire code with the code used for fastled Palette Knife to get long gradients but also with the dynamic effects you have used. However, when I try to incorporate them, it seems to glitch when I press the button to get to the fire effect (almost like a flashing strobe). I wasn’t able to post the code on your forum because it won’t open for me, but you can find what I did on Arduino’s forum: Case in Fastled combining with previous case
Also, for reference this is video I used to find Palette Knife effects: Palette Knife Fastled video
Hope you can help,
Thanks!
Justin
Justin
Hi Justin!
Happy new year to you as well, hope you’re doing well!
Unfortunately, the Fire effect is based on hardcoded base colors (white; 255,255,X, yellow; 255,X,0, and red; X,0,0) and not on a palette … so this would be a different challenge to modify code to work with palette’s. Since it is a little off-topic, this should probably be discussed in the forum. What is going wrong in the forum?
Hans
Ahh I see. Maybe that’s why I haven’t found a tutorial or github sketch for that. Too bad though because the palettes give really unique colour patterns and the ability to fade into as many as you like. Even Mark Kriegsman hasn’t incorporated them into the other functions he has invented. Hm, strange when I posted my previous message the forum page wouldn’t load but it does now.
Justin
As soon as I find some time, I wouldn’t mind looking into this – but this would still be an interesting forum topic.
Did you post the question in the forum?
Hans
Hey Hans, actually I managed to make it work! I’ve been trying to post it on the forum but every time I try to add topic, it keeps making me log in again. I’ve tried on Chrome, Firefox and IE, and they all keep asking me to log in again every time I try to post. Have you had this problem with the forum before? As soon as I can post it I will respond here. I’m excited to share!
Justin
Hi Justin,
I think you just found a bug in one of the addons of my website that just got updated.
Please try again
Hans
It works now! Awesome. Here’s the code where people can make Fire work with Color Palettes. Also, this is a good tutorial on how to add unique Color Palettes from Palette Knife, specifically made for FastLED (FastLED Palette Knife Demo)
lakerice
Awesome that you got this to work and even better that you’re sharing it! Nice
Hans
Hi Hans, this is amazing work you did here (along with all the others who contributed). I am an absolute noob at all of this and am having a blast digging into this stuff. I have one question I hope is a really easy fix. How do I use this code to run on a lot more led strips? Ultimately I would like to have this run across as many strips as I can (like 5 total strips so a total of 1500 leds). Would this even be possible?
Thanks for everything you do. These forums are amazing.
Charles
Hi Charles!
Thank you for the compliments!
You can, in theory, control quite a few LED strips.
Limitations can be found in:
Hans
Hans, thanks for the reply I really appreciate it. I have been playing with multiple strips for a bit and have a few power supplies to inject the power into the strips. My concern was how to modify the code to work with more. I actually have an ESP8266 I can try this with. When I modify your code to be NUM_LEDS 600 (two strips) nothing happens, even when injecting power to the second strip. If I shorten the number of leds to NUM_LEDS 400 it works. It seems like just telling the arduino to do more makes it freeze up. I will try with the ESP8266 and see if that works.
Thanks again for your time. I love how responsive you are.
Charles
Hi Charles!
Meaning: replacing the last working strip when you had 400, with another one?
Just to make sure the last strip of those 400 is not faulty when it comes to passing on power.
The only 2 factors that limit the number of LEDs is the memory available in the MicroController, and the power provided to light them up.
Hans
I overlooked that you wrote “2 strips” to get to 600 LEDs.
If you did strip A -> stript B and it fails beyond 400, then try swapping the strips: strip B -> strip A, to see if strip B doesn’t have an issue.
Hans
Hello Hans and thanks much for this code! I have this working just fine on my UNO, but seem to have a problem with the button push. I can cycle through the functions, but I cannot reach the end. Pushing the button does advance and I can at times get as far as the bouncing ball, but I haven’t managed to get any further. Sometimes it resets after three or any random point back to the beginning. Do you think this could be a crappy switch, or is there some change to the code I should try?
jlpicard
Hi jlpicard,
sounds like you’re struggling with what they call “bouncing” of the button.
You’ll find a few examples in the comments here, for example: this one.
Things are a little hectic these past months, so I may not have much time available to assist with this.
Short version: your Arduino registers at times more than one button press due to the so called bounce effect.
So in the comment here we use a little time-out, so it requires a tiny pauze in between button pressed (50 ms is nothing the user would notice).
There are other methods, so feel free to ask, and forgive me if I cannot respond right away.
Hans
Thanks so much for the reply. I read through this entire monster of a thread and found this snippet that I added to my sketch, changed the Button to LOW instead of High, added the millis >200. At first I got an error but then found I didn’t have enough “)” The second one after 200 was missing.
This change worked great, I am making some Christmas gifts for my grandkids, used a couple Nano’s I had lying around and a UNO that I had. It’s going to be a 13″ tall, 48 strip of lights in a channel with a built in diffuser. I also ordered a bunch of capacitance switches to change the modes instead of a push button all on top of a hollow wooden base which will have the Arduino inside. I’ll do a video when it’s done. I love this sketch, it’s so fun and even for old folks like me that don’t know anything about programming.
jlpicard
Glad to hear that worked!
Oh man that sounds like a great project! Can’t wait to see!
Hans
I tried using the sketch on and ESP32 I had but it won’t work I guess. I had thought that Arduino code would cross over to ESP32 but I guess not?
jlpicard
I haven’t tested anything with the ESp32 yet … but I assume they are pretty similar to the ESP8266.
So the only differences between the ESP8266 and Arduino, is the pins you’d want to use. Some pins on an ESP are already assigned to (for example) the WiFi.
For the rest, I’d have to see the error message (if any).
Hans
For those experiencing bounce from their pushbutton switch, I added a touch capacitance switch and it solved my problem (the code I added worked too). The little touch pad switches can be configured four different ways and the have built in debounce.
jlpicard
Nice! Would you mind sharing the details?
(either email or forum?)
Hans
Posted.
jlpicard
Awesome – thank you very much
(sorry for the late response – yesterday we had a family event / holiday)
Hans
Is it possible to encode an arduino to auto-shut off on a timer with only code, no circuit? If that’s possible to add to this sketch would be great!
jlpicard
You’ll always need some additional hardware to really shut off your Arduino (ie. cut the power somehow).
For example a relay. Sorry.
Hans
Vielen Dank für diese tolle Sammlung und Arbeit!Die Umsetzung mit dem Webinterface ist schon toll, aber mir viel zu groß, da verstehe ich garnichts mehr.Ich versuche die ganze Nacht schon, das ganze über websocket und Twitch-Chat steuerbar zu machen, allerdings ohne Erfolg.
Meine Versuche die Sammlung hier mit dem Sketch aus youtube, von acrobotik sind bisher alle gescheitert.Den Herrn scheint es auch nicht mehr aktiv zu geben…
Hat jemand Ideen dazu, oder vielleicht sogar schon fertig in betrieb und könnte mir etwas Hilfe geben?
Vielen Dank!
RonXTCdaBass
Hi RonXTCdaBass,
I’m not sure if anyone here experience with Twitch-Chat to control an Arduino-like microcontroller.
I’m a little confused what you’re looking for, since this project doesn’t use a web-interface.
Can you share what you have in mind?
p.s. since most users here are from all over the world, the English language is preferred.
Hans
Comment moved to forum due to length/source code posting
RonXTCdaBass
Sorry – due to the length of the post, I’ve moved the comment to the forum.
Hans
Im very thankful to you work.
Can u tell me how to make this code run in a sequence. I dont want a button.
Plzz help me in reframe this code
Shyam
Hi Shyam,
To run these effects in sequence you’ll have to dismantle the “case” section. For example:
    case 0  : {
                // RGBLoop - no parameters
                RGBLoop();
                break;
              }
    case 1  : {
                // FadeInOut - Color (red, green. blue)
                FadeInOut(0xff, 0x00, 0x00); // red
                FadeInOut(0xff, 0xff, 0xff); // white
                FadeInOut(0x00, 0x00, 0xff); // blue
                break;
              }

    case 2  : {
                // Strobe - Color (red, green, blue), number of flashes, flash speed, end pause
                Strobe(0xff, 0xff, 0xff, 10, 50, 1000);
                break;
              }
like so:
(remove the “case x:” lines, the “{” and “}” characters and the “break;” line)
This will however cause issues with some effects that rely on being ran a few times in sequence.
In that case, after doing some testing, you can simply call an effect a few times.
For example:
As another alternative, you could use the effect as they have been used in the previous LED effects project, which has most of the same effects.
In case you’d like to go into more details, or wish to post code, then please start a topic in our Arduino forum.
Please do not post code here in the comments.
Hans
cane you give me the link for this discussion in forum
shyamk
The link to the forum is in my previous message: our Arduino forum.
Hans
Hello Hans, may I ask if it’s okay to add 3 buttons to your cool code? The first button is for on/off lighting, the second button is for effect mode, and the third button is for monochrome lighting mode. Can you give me some help? How to do it?
monikois
Hi Monikois
I have not tested this, but I’m sure we can add one or two extra interrupt buttons. (see Challenge 2 and Challenge 3).
Note that some Arduino boards, like the very common Arduino Uno, cannot support more than 2 interrupts! (see the table in Challenged 2, or this Arduino document).
In short, we need to add an interrupt for on/off and for mono-color mode. For on/off we can of course just set the brightness to zero (or power ON/OFF if you do not have enough interrupts available – probably better anyway to save on power).
Caution: setting brightness only works for the FastLED library! There may be a function for NeoPixel, I’m just not aware of it.
For monochrome mode you may need to change quite a few effects or the setPixel function to convert a color to monochrome if needed. Something like one of the other formula’s mentioned in this Stackoverflow post. For example:
Short version combining this, something like this should get you started:
Hope this helps.
Hans
Hi Hans,
I know that is an Old thread but I just wanted to Thank You so Much for incredible work and sharing it with us.
It is all way above my ability, my skills and knowledge, which explains why I never managed to get it to work :-)
I’ve made some small arduino nano projects but with just one light at the time using some libraries
Now I have the Courage to start with such a complex project …
Thank You again and I wish You All The Best …
Regards MARIUS
MARIUS Petcu
Hi Marius,
thank you very much for the kind words, and … never be afraid to try 😉
Feel free to post questions in the forum – I will try to answer when I can and when I’m available. 😊
Thank you again and wishing you all the best as well ….
Hans
I Thank You for the Effort and to Share with us …
Best Wishes
MARIUS
MARIUS
this not work attiny85 please help me
Gayan
Hi Gayan
I do not own an attiny85, and honestly do not even have an idea how to use it.
Maybe other users that use an attiny85 can chime in and assist?
Hans
Hi Hans,
Although it’s been a while since your posted, I’m just starting to work with Arduino now and I’ve already uploaded this sketch and it worked perfectly. I’d like to thank you for what you shared and for the tips. I wish you luck and health in your challenges.
Regards.
Carlos.
Carlos Almeida
Hi Carlos!
I very much appreciate you taking the time to sent a thank you and best wishes – best wishes to yo as well.
Glad to hear it still makes people have fun
Hans
SORRY TO RESSURECT A LONG DEAD POST!
I cannot seem to get this to work. I’m going the NEOPIXEL Framework route and All of the other individual led effects work perfectly, but as soon I plug in the button and power it up, nothing happens. Should I have that ground on my common ground? I kept it separate bc the schematic didn’t show commonality. I’m using an arduino mega. I’ve checked my wiring, which doesn’t change from when I run a single effect, which works, with the exception of the button. I also used the suggested pins.
Any suggestions? I doubt anyone will even reply but it’s worth a shot….
MGMGTech
As Mat already suggested: GND should be common.
Figure 2 shows this (GND connected to Arduino and Strip). I would think both GND pins on the Arduino (on the PCB of the Arduino) are connect as well.
It’s been a while I tinkered with this – again thanks Mat for the quick chiming in
Hans
yes, ground button to common ground
mat
Thank you Mat for chiming in
Hans