What is Put.io?
I would like to refer to an article I previous posted, but the short version is:
Put.io is DropBox with an enormous amount of storage space and torrent capabilities so you can have them download your torrents to your storage space.
Once a file is in your Put.io storage space, it can be downloaded like any other ordinary file on the Internet.
Downloading the Files …
In desktop scenario’s you’d be using a Download Manager to get your file.
Some great download managers can be found in the list below:
Most download managers split a download up in multiple parts and so do the ones listed above.
pyLoad and QNAP for Put.io
Now when using your QNAP as the “server” that handles our downloads, we will find ourself limited towards the tools you can use.
I’ve tried “Download Station“, which is free and can be installed without any complications. However, either Download Station really sucks or it simply does not support multiple chunks.
pyLoad on the other hand works great and is also freely available in the “App Center” of your QNAP.
Basic settings
The setting I’ve tested are done under “Config” “General” “Menu” “Download“.
I’ve set the “Max Parallel Downloads” to 1 and “Max connections for one download” to 10.
This all depends on the equipment and the type/speed of Internet connection you have, so you might want to experiment with this.
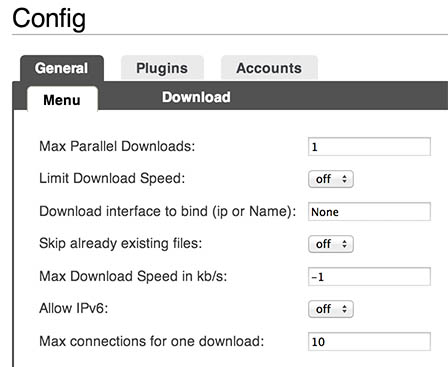
QNAP – pyLoad – Settings for Put.io
Under normal circumstances this should work just fine since other download managers (like FlashGet for Windows, Maxel for Mac OS X) seem to work just fine, even with more extreme settings.
Getting the Download Link(s) for pyLoad
Let’s first grab the link from Put.io. Open your Put.io dashboard/webinterface by going to http://put.io and login.
Next, click the “Files” tab and locate and check the file or directory you’d like to download.
Option 1: Download file by file …
After checking file(s) or folder(s), click the “Get Download Links” button. A window will open presenting the links you need, as you can see in the example below …
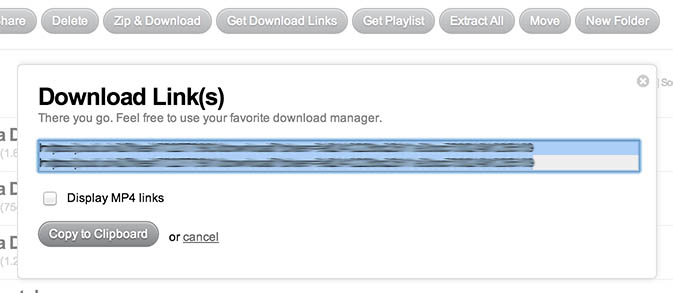
Put.io – Get Download Links
Option 2: ZIP and download as one file …
After checking file(s) or folder(s), click the “Zip & Download” button and Put.io will nog (very fast) zip all files and present the link to this zip file in a tiny window.
Now … Right click the “Download as zip (…)” link and choose the “Copy Link Address” option from your browsers popup menu (each browser will call this slightly different, but you get the idea).
Now we have in our clipboard the link we need for pyLoad.
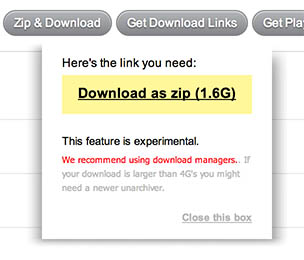
Put.io – Zip and Download
Adding the Download Link(s) to pyLoad
Adding a link to pyLoad is relatively easy.
Open your pyLoad webinterface (typically http://<ip-of-your-nas>:8100) and login.
Next, click the “+ Add” button and window will open.
Paste you link(s) in the “Links” field and click “Add Package” … (yes, you can enter multiple links ere)
You can optionally enter a name, but that would be mostly only for your own reference and it will be the name of the sub-directory in your downloads directory.
I have found comments online that state that you should enter your login credentials for Put.io in the “Password” field (format: username:password ), but I have never had a need for that.

pyLoad – Add a Download Link
Using a browser plugin to make it easier
Adding a link to pyLoad is not all that complicated, but can be quite a tedious task and this is where PyLCEX for Chrome comes in very handy.
It takes only a few clicks to configure but it helps you monitor pyLoad and easily add new links (click links with right mouse button).
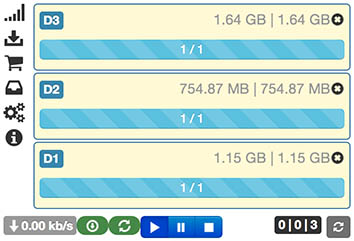
pyLCEX allows monitoring of pyLoad progress
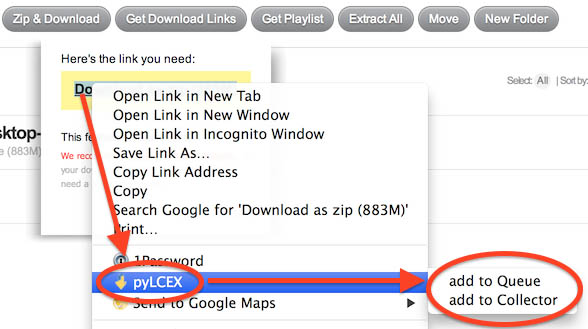
pyLCEX – Right click a link to add it to pyLoad
pyLoad Clients for Mobile use
Now, personally I don’t have many things that I want to download when I’m on the road, but there are client apps for pyload available for both Android and iPhone. They do offer the ability to track progress of your downloads.
Where can I find my completed downloads?
Once a download is completed (ie. it’s no longer listed on the “Home” page of the pyLoad webinterface), your download on a QNAP can be found in the “Download” share in the directory called “pyload“.
Your file(s) will be placed under a subdirectory, either matching the name you provide earlier, or the name of the server it was downloaded from.
Tweaking pyLoad
pyLoad, in the version that I used, did show some little issues …
At your own Risk and pyLoad Updates …
– The following modifications are done at your own risk
– After a pyLoad update, you might have to redo these changes
When downloading large files, with connections that seem not always running 100% stable, it reverts to single file download mode when one or the other chunk has not downloaded beyond a certain speed for 30 seconds. This setting cannot be modified and is hardcoded in the application – bummer!
The following error message is something you might run into every now and then, which dramatically slows down your download for no real good reason:
Download chunks failed, fallback to single connection | (28, 'Operation too slow. Less than 5 bytes/sec transferred the last 30 seconds')
Since the intention was to have the download run on our QNAP, unattended, maybe even at night, we would not notice this horrible slowdown until it’s too late. This bothered me big time … so I went digging on the Internet and in the Python code of pyLoad until I found a relatively simple fix to this problem (and I’m sure someone will disagree with me on how I did this).
Please keep in mind that I’m very far from a Python expert, so my modifications might not be the best, but it most certainly works well for my setup.
First we will need connect to our QNAP through SSH (read our SSH Article for more details).
The next step is to locate a file called “HTTPRequest.py” in the pyLoad QPKG package which is relatively easy from the command line as shown below.
Note : the “/share/MD0_DATA” part of the path, might be different for your QNAP.
cd /share/MD0_DATA/.qpkg/pyload/module/network
If you do a “ls” in this directory you should see something like this:
1
2
3
4
5
6
7
| Browser.py* HTTPChunk.py* RequestFactory.py*
Browser.pyc HTTPChunk.pyc RequestFactory.pyc
Bucket.py* HTTPDownload.py* XDCCRequest.py*
Bucket.pyc HTTPDownload.pyc XDCCRequest.pyc
CookieJar.py* HTTPRequest.py* __init__.py*
CookieJar.pyc HTTPRequest.py.org* __init__.pyc
FTPBase.py* HTTPRequest.pyc |
Now open “HTTPRequest.py” with nano by typing: nano HTTPRequest.py
Scroll down to the part where you see this part of the code:
1
2
3
4
5
6
7
8
9
10
11
12
| def initHandle(self):
""" sets common options to curl handle """
self.c.setopt(pycurl.FOLLOWLOCATION, 1)
self.c.setopt(pycurl.MAXREDIRS, 5)
self.c.setopt(pycurl.CONNECTTIMEOUT, 30)
self.c.setopt(pycurl.NOSIGNAL, 1)
self.c.setopt(pycurl.NOPROGRESS, 1)
if hasattr(pycurl, "AUTOREFERER"):
self.c.setopt(pycurl.AUTOREFERER, 1)
self.c.setopt(pycurl.SSL_VERIFYPEER, 0)
self.c.setopt(pycurl.LOW_SPEED_TIME, 30)
self.c.setopt(pycurl.LOW_SPEED_LIMIT, 5) |
We will be modifying 3 lines, lines: 5, 11 and 12 in the code above ( self.c.setopt(pycurl.CONNECTTIMEOUT, 30) , self.c.setopt(pycurl.LOW_SPEED_TIME, 30) and self.c.setopt(pycurl.LOW_SPEED_LIMIT, 5) ).
These lines basically define the time-out value for a “slow” connection and defines what a “slow” connection would be.
In my testing I’ve found that a connection time-out value of 300, low-speed time-out to 300 and a less than 0 byte/sec definition for a slow speed work pretty well, so we changes these last 3 lines to:
1
2
3
4
5
6
7
8
9
10
| ...
self.c.setopt(pycurl.CONNECTTIMEOUT, 300)
...
self.c.setopt(pycurl.LOW_SPEED_TIME, 600)
self.c.setopt(pycurl.LOW_SPEED_LIMIT, 0)
... |
Once the modifications have been made, press CTRL + X to close Nano, where it will ask if you want to save the changes (press the “Y” key) and what the filename should be (press the ENTER key).
The next step is to restart pyLoad, which can be done in the pyLoad webinterface. Click in the webinterface the “Administrate” button in the upper right corner, and in the upcoming window click the “Restart pyLoad” (on the left). As of this point forward you will not likely run into the time-out problem.
Note : The changed values might have a negative impact on you regular downloads, specially when these downloads do not support multiple download chunks.
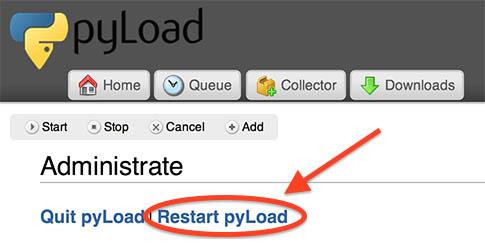
Restart pyLoad through the webinterface


Comments
There are 2 comments. You can read them below.
You can post your own comments by using the form below, or reply to existing comments by using the "Reply" button.
Nice guide, i love all these QNAP-automation threads you have written
Can i ask is there any way to have sickrage upload torrents to put.io automatically? Or does pyLoad do that? Its difficult to understand if that feature is available in the guide above.
I’ve seen a VBS script knocking around to auto upload a torrent from a watched folder but nothing similar for a QNAP
Cheers
sadsack5000
Hi Sadsack5000 …
PyLoad is only used to download torrents from Put.io.
So you’ve already downloaded a torrent with Put.io, and then download that file with PyLoad to your computer.
Sorry if that was confusing.
PyLoad works pretty OK, but I’d loved it to be more reliable – it occasionally stops without reason.
Put.io on the other hand works great.
Ideally we’d want SickRage to tell Put.io which torrents to go fetch, and when Put.io is done downloading, have a download manager bring it to the QNAP. I have not seen such a script/application, although it might not be too complicated to do.
Downloading can also be done by FTP (Just connect to ftp://ftp.put.io with your put.io credentials.).
hans