Overview
VR is Awesome …
Before starting with my tips:
I really like VR, VR is fun. Keep in mind though that I’m most certainly not a fanatic or expert (suggestions, tips and tricks are most welcome!).

VR is Fun!
VR games can be played wired, or wireless, all depending on yoru headset, PC etc.
Playing Wired
Playing wired comes with some challenges (for me anyway).
Cables tends to entangle around my legs, sometimes the cable pulls on my HMD, and sometimes my laptop/PC gets a yank as well – not what anyone would want of course.
However, this is the most common way to play VR these days, as most HMDs do not support playing wireless.
Playing wired with the Oculus Quest is also an option, when using Oculus Link (either with a special cable, or the cables that comes with your Quest), where it makes the Quest appear as an Oculus Rift-S device.
This allows playing SteamVR and Oculus Desktop (intended for the Rift models) games as well.
This is the most compatible way of playing non-Oculus Quest games.
Playing Wirelessly
I play most of my VR games wirelessly (including games on SteamVR and most games on Oculus Desktop).
If you have an Oculus Quest, and a powerful enough PC and WiFi router, then I’d recommend giving wireless playing a try.
Playing wireless gives you the freedom to move around, without being hindered by an annoying cable – it is truly an amazing experience.
On the Oculus Quest you have a few options for this. You can simply play Oculus Quest native games (no PC needed) – this works out of the box.
Alternatively you can go wireless with all SteamVR games (and some Oculus Desktop games) with tools like ALVR (free) or Virtual Desktop (commercial).
If there is a downside to playing wirelessly, then I’d say it would be the fact that you will potentially wander off… a LOT …
At the moment my favorite game is hands down Half-Life: Alyx.
You may have gotten that idea already by some of the previous articles I wrote – it’s an awesome experience.
When adding playing this game wirelessly, it just becomes truly amazing and I would recommend anyone to give it a try!
Playing VR games in General
The tips and trick below are based my personal experiences, playing both wirelessly and wired. I’ve split it up in sections:
- Tips for those experiencing VR for the first time
(useful when you want to introduce VR to a friend of family member)
- Tips While Playing in VR in General
(rules I follow myself when playing in VR)
- Taking Care of your VR Headset (HMD)
(this is how I maintain my HMD)
- Recommended Accessories
(mostly geared towards the Oculus Quest, but may apply to other HMDs as well)
Ad Blocking Detected Please consider disabling your ad blocker for our website.
We rely on these ads to be able to run our website.
You can of course support us in other ways (see Support Us on the left).
Tips for those experiencing VR for the first time
I found it very important to give those without VR experience, good advice and guidance before they start and during their first experiences.
This includes the items listed below, but also the list in the next chapter (Tips While Playing in VR in General).
Especially for new players, it is critical to immediately stop when a player gets nauseous or tends to feel nauseous.
When loosing control and/or feeling nauseous: have them immediately close their eyes, take off the VR headset (HMD), and take a break.
The nauseous feeling may take a while to pass, so really have them take some time to recover, before jumping in again.
Players can get nauseous, mostly because motion happens not quite in sync with what the mind expects.
This can be because the game isn’t handling motion all that well, or because your setup is not keeping up (dropping frames, too low refresh rate, freezing screens, etc).
Obviously a lot also depends on the player personally – one has to get used to VR motion, and a person adapts quicker or slower than others.
Start with Simple Experiences and/or Games
I used to throw people straight into roller coasters and such, which is quite an experience (screaming included).
But I’ve become aware that this is not the best way to do a first experience with VR, and may destroy any potential enthusiasm for VR.
I always start with something simple like the “Home” environments, which you’ll find with every VR headset.
Some allow you to move around, grab things or draw shapes in the air (SteamVR does a really nice job with that).
After that, do one of the introductions offered with most HMDs.
For example “First Steps” for the Oculus Quest, or “First Contact” on the Oculus Rift.
I’ve seen first time user really enjoy this.

Oculus Rift – First Contact to get familiar to VR
After a while, you can try some of the easier games.
On the Oculus Quest I’d recommend something like Sport Scramble Demo (free demo), or maybe the Beat Saber (free demo).
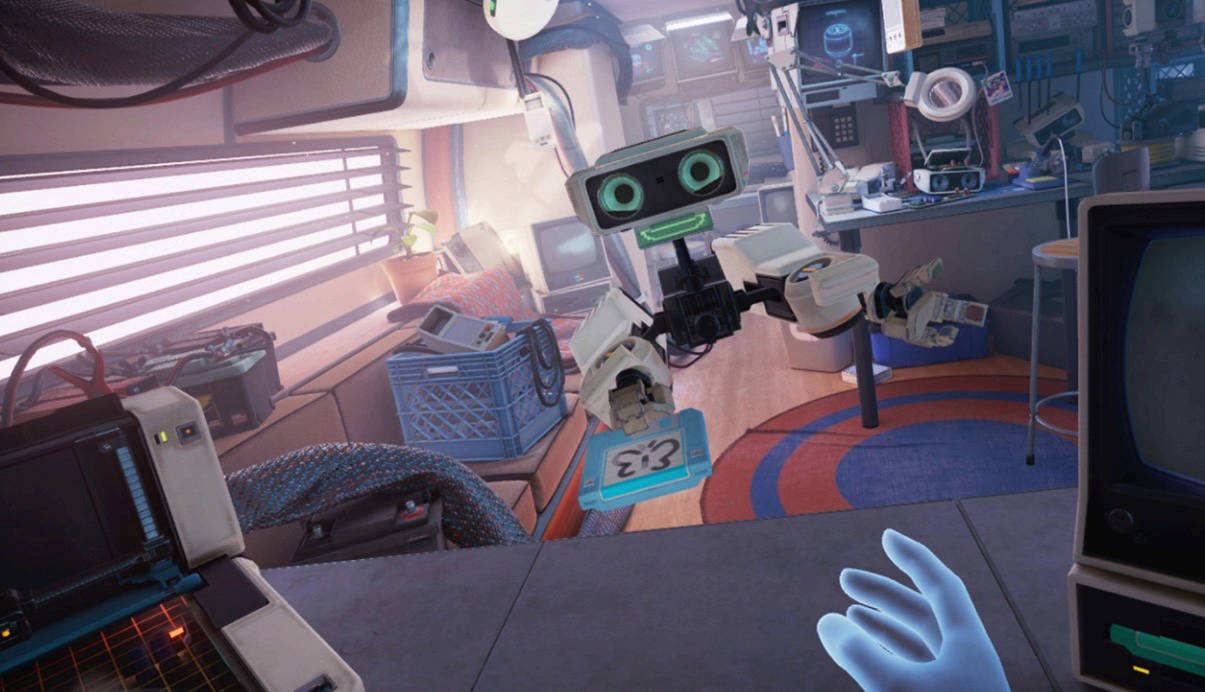
If the player is ready for more, the can give the SuperHot Demo (free demo) a try, or Robo Recall Unplugged (not free).
On SteamVR, “The Lab” may also be a nice one to start with, once the player is familiar with some basic movements.
On that note; Valve has done a truly amazing job with Half-Life: Alyx (not free) even for newbies.
Even for beginners, this game starts easy going. It really lets the player to explore the new environment, and get familiar with the things they can do, like grabbing and throwing stuff, or walking, without having to deal with enemies right in the first scenes.
Review Games, before Exposing New VR users to it …
There are plenty free Games or Experiences out there, no matter what VR headset platform you’re on.
If you are the more experienced player, I’d strongly suggest you try them yourself first.
You’ll be able to judge if the game handles motion correctly, and if the experience is mellow enough for a beginner.
I’ve seen some awesome freebies – I still love the “Face your Fears” for the Oculus Rift, not sure why they ruined that one for the Quest and others.
However there are also free games that are just a very bad experience for beginners (“Pavlov ” and “Mission: International Space Station ” are not good for beginners at all).
Start with a Stable Environment
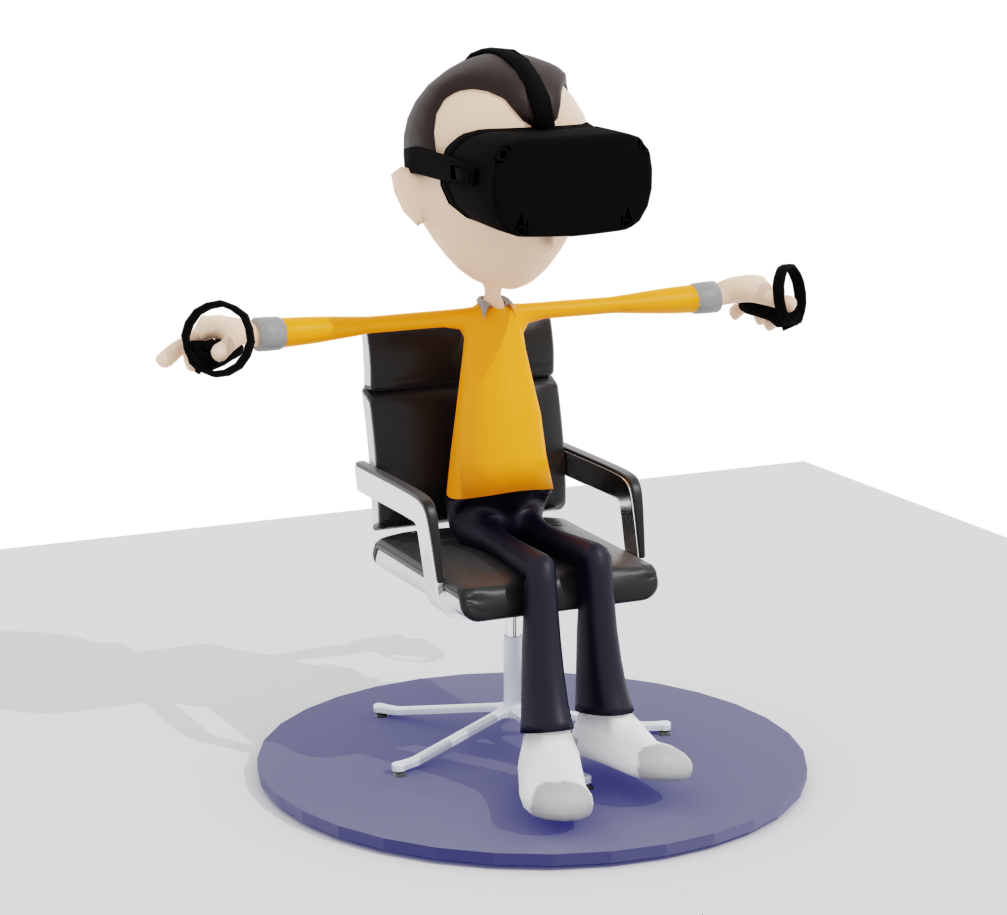
Sitting Down while Playing
For beginners, the best start with VR would probably be by starting the first experience by simply sitting down on a chair.
This gives them a better “grounded” feeling as things feel more stable for the player, so the chances of them getting nauseous is significantly less than when standing up.
Note: When sitting down, the Guardian (or Chaperone) needs to be set to “Stationary“.
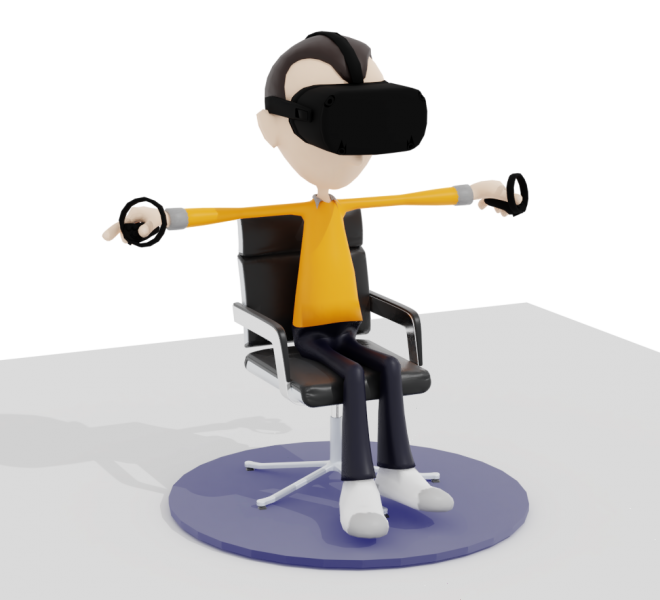
Start by playing VR while sitting down
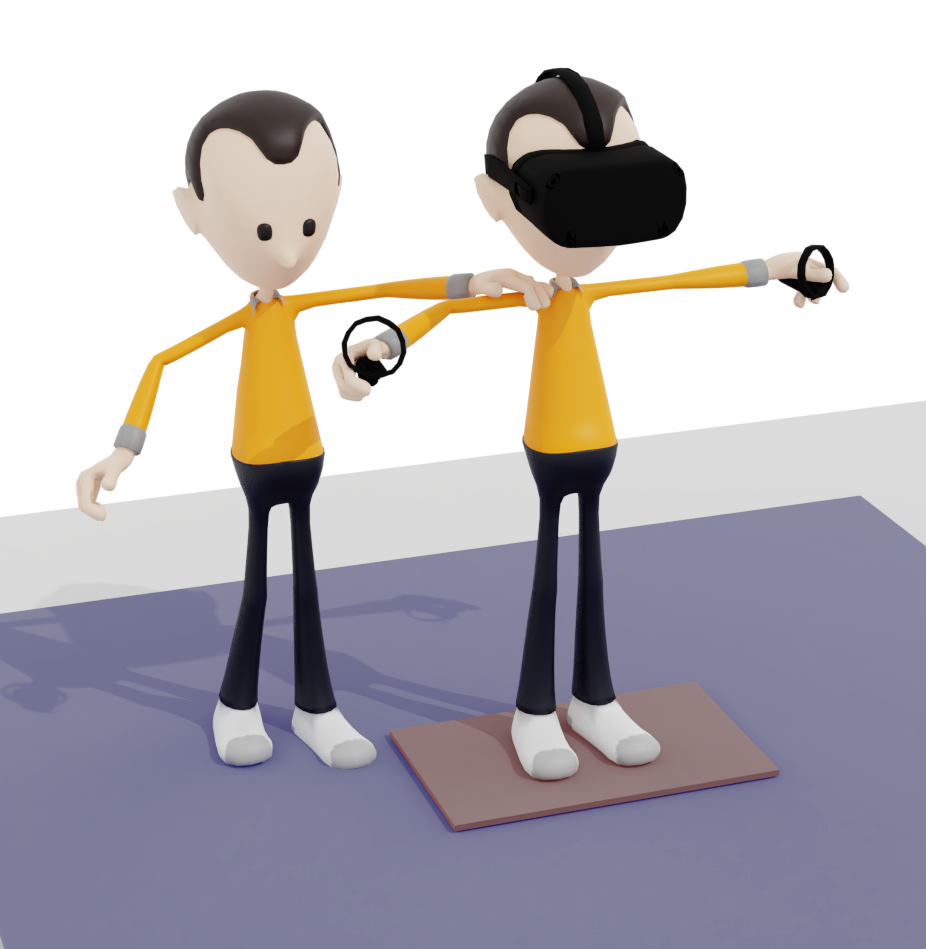
Standing Up with a Little Help from a Friend
If the new player wants to start playing VR standing up, then make sure that you (initially) stand next to them.
Whenever they feel uncomfortable, simply put your hand on their shoulder (announce this before you do so!). You’ll be surprised how well this works.
Here again, it gives the player suddenly a more stable feeling.
Note: Better not rely on friends that think they are “funny” … 
Note: The guardian would ideally be set to “roomscale” when playing standing up.
As an alternative, for more passive games like a rollercoaster, one could place a chair in front of the player, so the player can hold on to the chair if things get a little hairy.
Note though that the chair trick obviously is a bad idea for games that require moving around.
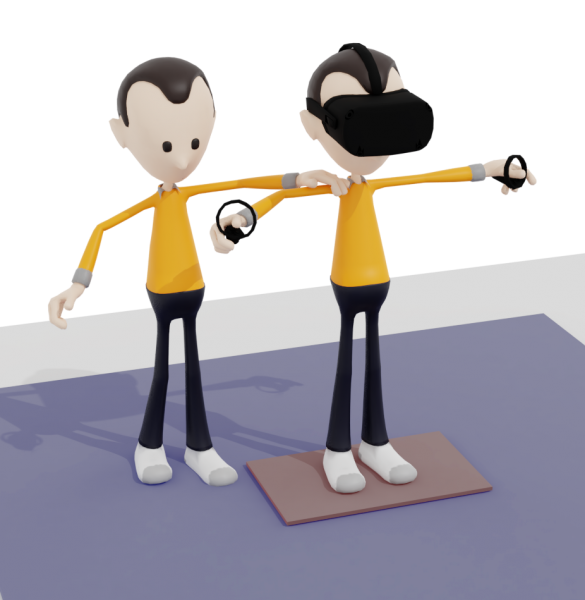
Standing in VR with a helping hand
Walking in VR – Start with the “Blink” method
One the things that makes player nauseous, besides lag and frame drops, is the option to continuously move.
I’ll admit: it took me quite a while before to get used to this continuous move as well.
With the “continuous” method, you control where you’re going, typically with the thumb-sticks on the controller, like in a regular game.
Your mind and eyes however, are not quite yet anticipating the move yet, which results in getting nauseous – it takes getting used to.
However, most games allow you to use the “blink” method to move around.
You simply point to where you want to go and you’ll see your feet displayed on the target location. Once you release the button, you instantly go there.
This is definitely a better way to move around for new VR players, and can actually be a benefit in a game (moving faster – but the opposite is most certainly true as well).
After a while the player can slowly start experimenting with continuous moving, just a few minutes at a time, until they get more comfortable with it.
Tips While Playing in VR in General
Verbiage – Guardian vs Chaperone vs Play Area …
The “Guardian” is what Oculus calls the safe play area.
On SteamVR this is called “Chaperone“, and I’m sure other brands may use different names, all for the same thing.
All indicate the same thing: the area that is safe to move around in, while in VR.
I will mostly use the word “Guardian” in this article to indicate this safe area.
Make sure you have Plenty of Space to Play in
Make sure you have enough space around you. You will be surprised how much you wander off. Especially when playing wirelessly!
It is important that during VR game play, you do not hit objects, pets or people.
Not just to avoid damaging items, or hurting people or pets, but also to make sure you do not hurt yourself, or damage your VR equipment like your controllers.
I’ll admit it: I’ve hit the wall and my TV a few times, I’ve damaged one of my controllers, and scraped of some skin of my hand while hitting the wall.
My nephew even slammed through the hood of a lamp once.
So … you have been warned!
Your VR software will warn you as well – do not underestimate these warnings!
My house is rather limited when it comes to space, so I do not have the recommended 6.5 feet x 6.5 feet space (or: 2 x 2 meters).
I’d actually recommend even more space than the recommended space.
With space limitations, the Guardian (in SteamVR: Chaperone) is a great help of course, but when quickly tossing a grenade around the corner, it won’t keep up.
Maybe better said: you will see and realize the Guardian warning too late …
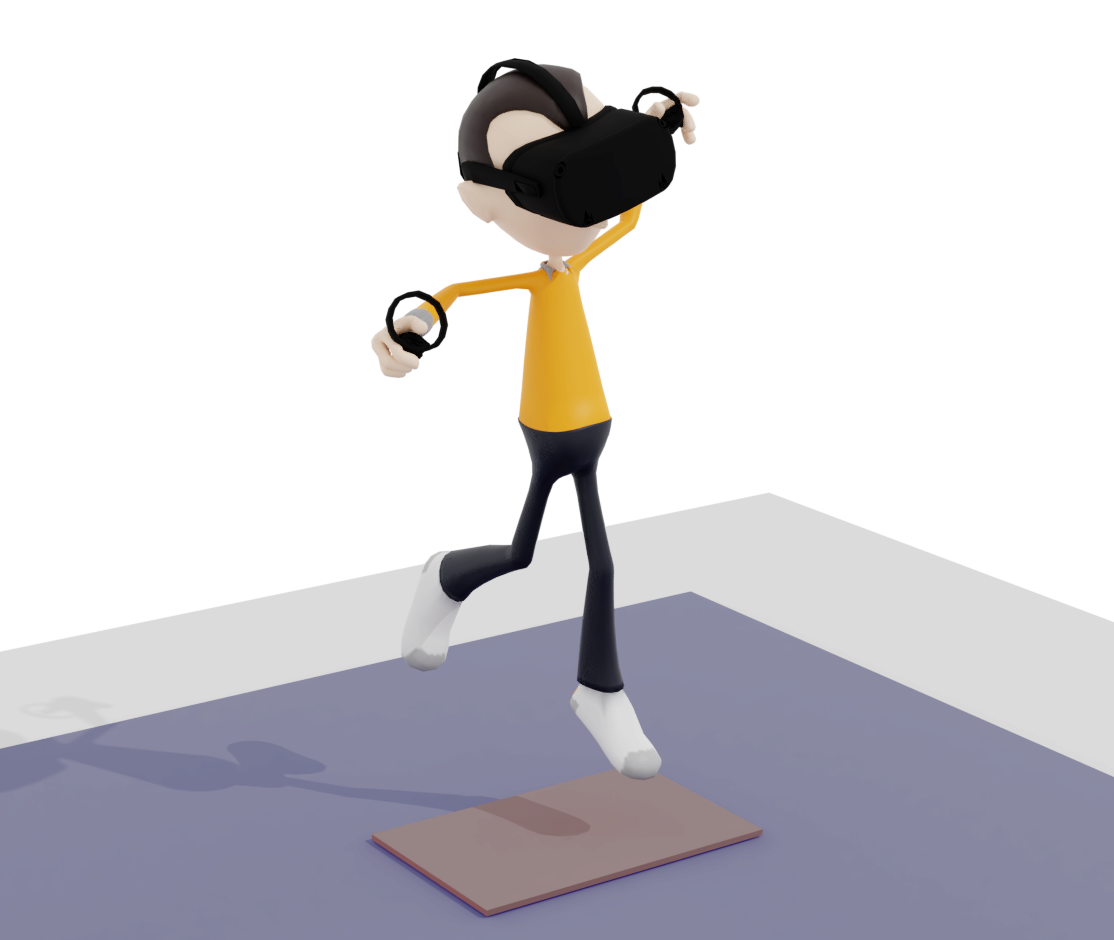
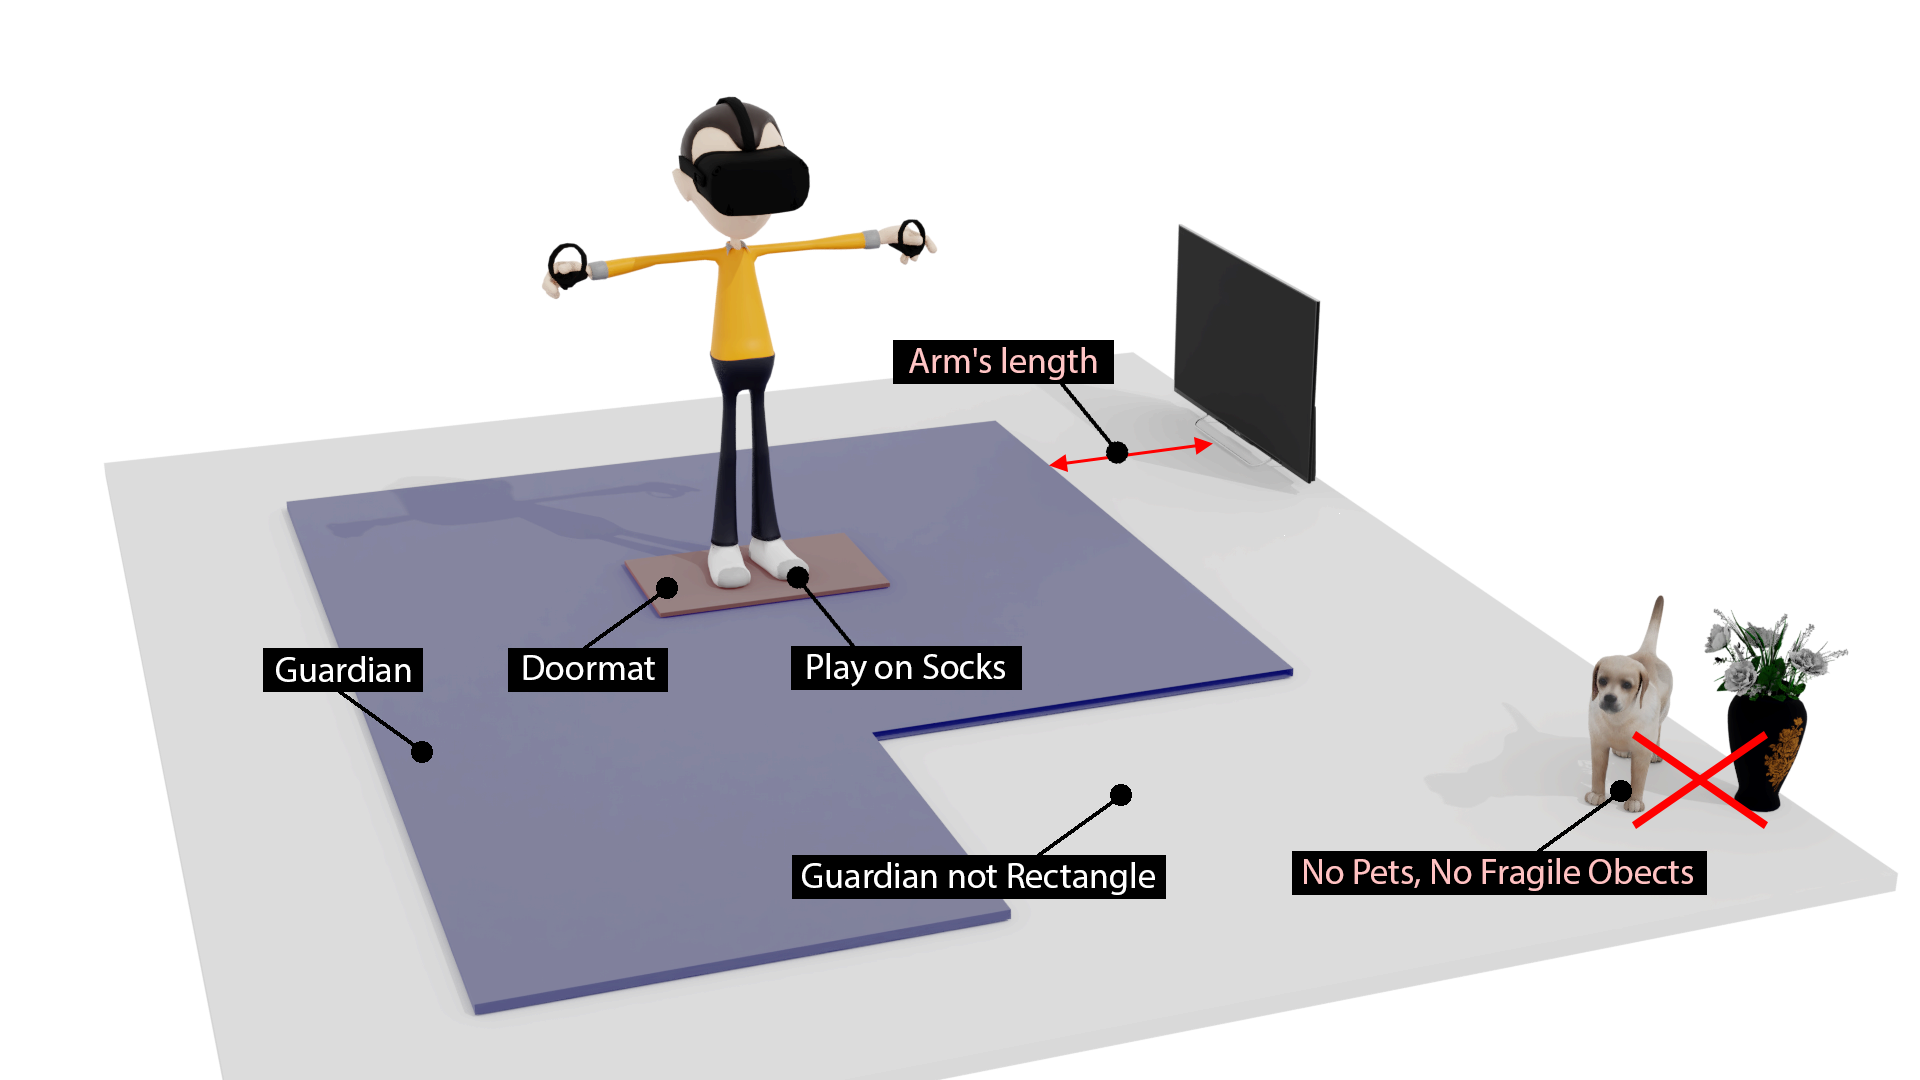
So in the sketch below: a summary of the precautions I take, which I’ll discuss below.
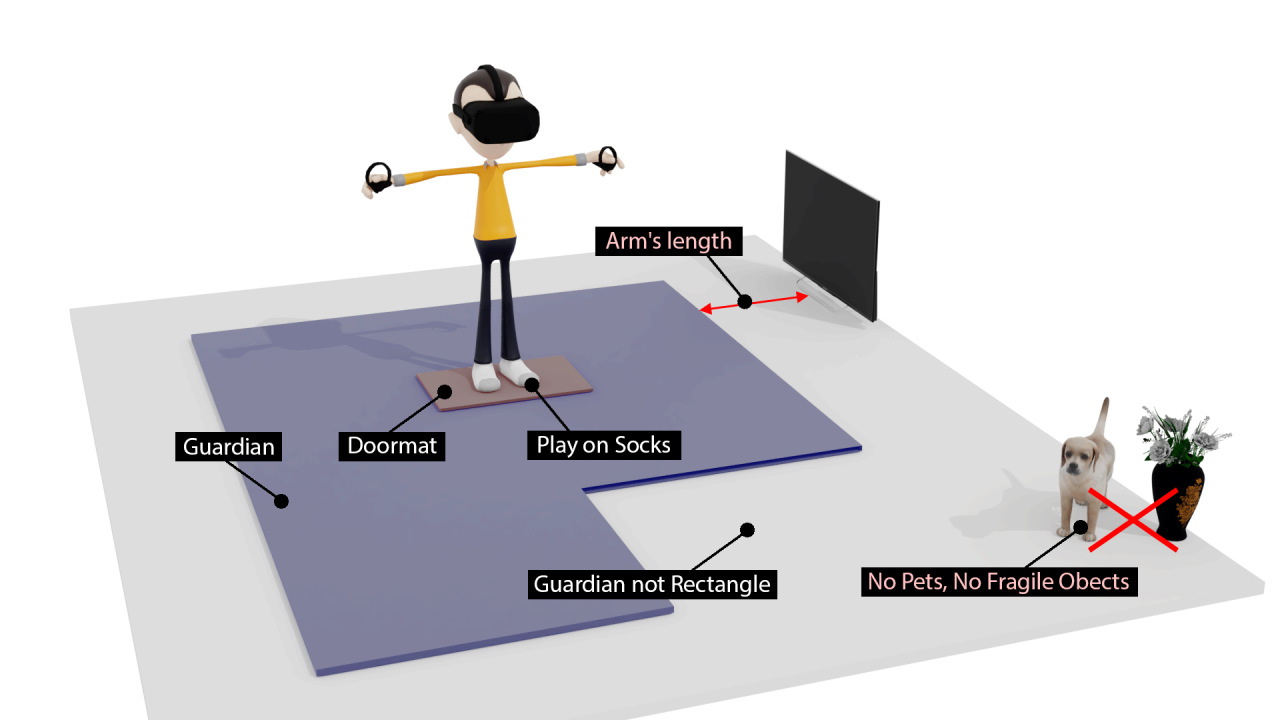
VR – Setting up a safe place to play
First and foremost: Take care of your Pets!
I really love my dog, but it is a good idea to keep your pet(s) away from your VR play area.
Not only because you could hurt you pet unintentionally, but also because they can startle the shit out of you in the middle of a game.
For example: My dog keeps thinking I want to play with her, so she starts moving around me.
The result: She scares the bejesus out of me when I suddenly feel her against my leg, especially scenes when dealing with headcrabs in Half-Life: Alyx, or in areas where you think you may be attacked by something.
Great VR experience, maybe, but probably safer for your pet, to be elsewhere.
Keep your Distance from Certain Objects
Before setting up your Guardian (the “safe space” is called the Guardian with Oculus HMDs, SteamVR calls it a Chaperone);
If possible, start by moving some of the fragile (that antique Chinese vase from the Da Ming dynasty, your TV) or dangerous objects (objects that are hard or sharp) far out of the play area.
Naturally, this is not always an option (like moving an 80″ TV).
So when I setup the Guardian, I make sure that the guardian is at least arm’s-length away from the objects you do not wish to hit.
I’d even recommend a little more than an arms length, because when you swing you may very well go way beyond that.
Where a Cooling Fan can be helpful
So this is a tip I picked up from Tyriel Wood’s “Hack” YouTube video, after I had published this article.
Placing a larger cooling fan, aimed at you (the player), may give you a better sense of direction.
Some users experience this to help reduce motion sickness and possible fog build-up in your HMD.
It’s all about Location – Where the Heck am I?
You’d be amazed where you wander off to, especially when playing wirelessly.
It is not only an issue where I wander off to, but also the direction I’m facing, or what you may be hitting in the heat of a game.
So here some trick that may help orient yourself when not seeing your environment …
Do not wear Shoes
I always play on my socks.
The main reason is that I can now feel much better on what surface I’m standing, and better determine where I may be standing in the room.
In my case, the edge of the big rug in my living-room, and the wood floor exposed next to it, keeps me grounded. It indicates where I am physically standing in my living room.
With shoes on I would not feel that of course, so I always play on my socks.
Small Rug, or Doormat, under your Feet
Something that may prove very helpful as well:
Place some kind of small rug (or a doormat/floor-mat) on the floor (and take off your shoes).
You’ll feel the edges, or surface of the mat or rug with your feet.
This will give you a good idea where you are in your “space”, and it can function as a “home” position.
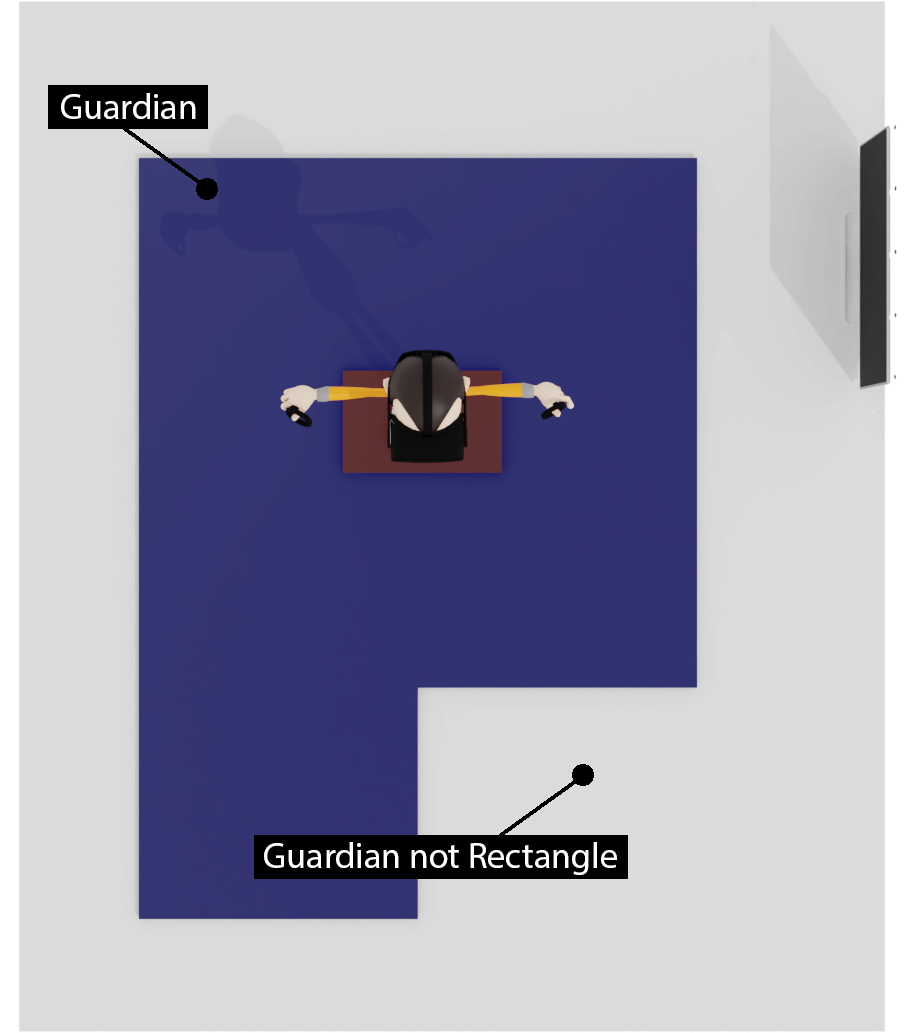
Not a Square Guardian / Chaperone
Another thing to help with orientation is your Guardian. Besides of course, its obvious indication that you’ve reaching the edge of your available space.
I always make sure that the guardian I’m setting up is NOT square, but rather something like the shape below.
When stretching my arms, I can see the guardian, and I know where I am and what side I am facing (good to avoid hitting my TV).

Set your Guardian to be NOT rectangle
Looking into the Real World
Now a comparable feature may exist for your HMD, or not …
However, the current Oculus Quest firmware allows you to see what is happening around you.
Passthrough for the Oculus Quest
One way is by carefully sticking your head through the Guardian.
The Quest will then show you what the build-in camera’s are seeing – this is called “Passthrough“.
Great when you hear your pet doing something suspicious (my dog does that for sure!).
Another way is by triggering the Passthrough option with the new Passthrough Shortcut feature.
At the moment this is an experimental feature and, when enabled, a double-tap on your HMD will show you what is happening around you.
There is no physical switch or button, so I’m guessing it is using motion sensors.
At the moment you’ll find it in your “Settings” under “Experimental”.
On that note, at the moment I do not use the Passthrough Shortcut.
It just did work well for me, but would occasionally get triggered when moving my head too fast (dodge that headcrab!).
So at unexpected moments, I’d be seeing my living room and not the game.
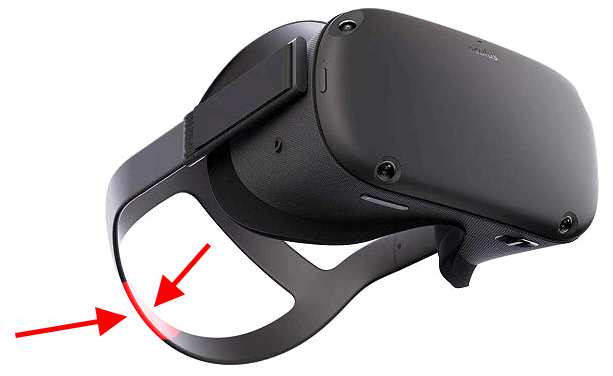
Use the Lanyards!
As far as I know, all controllers come with Lanyards, and those are included for a VERY good reason. Use them!
Mid game, in all the excitement, you may accidentally let go of the controller, and you may damage the controller.
Not just that: you may damage something in your environment, or even hurt a person or pet with it.
If you don’t like them; there are alternatives available (see below under recommended accessories).
Close your Eyes when needed
When getting nauseous, it is very helpful to close your eyes immediately and after that, calmly take off your HMD.
Getting nauseous isn’t fun, so take a break and do not continue playing until you’re ready.
VR can cause nausea when the refresh rate is too low – probably refresh rates below 70 Hz (fps) should be avoided. Some people even seem to be OK with 60 Hz, but I’m most certainly not one of them.
Nausea may also be triggered by dropped frames, which contributes to a bad VR experience and indicates that your setup either cannot keep up, or is in need for an upgrade.
You’ll know this is the case when it feels like the screen freezes every now and then, even if it is just a super short freeze.
ALVR, or Virtual Desktop, due to its complexity, may cause this when your hardware cannot keep up! In that case: check your setup.
I’ve also noticed that some games are more prone to this than other. Half-Life:Alyx works beautifully, and on the other hand Pavlov can be a disaster.
Take Frequent Breaks
Playing in VR can be exhausting, so to not spoil it too much, I take frequent breaks.
I usually play for about an hour before I take a short break. Depends a little on the game and the person of course, as I have seen people manage to play 5 hours straight.
This is a good moment to charge your Oculus Quest, do a bathroom visit, get a snack and stay hydrated (VR will make you sweat!).
Or on my case: make sure my dog is not doing anything naughty, or to walk her so there will be no “accidents” 
Fog build up
Some people experience “fog” build up because of the sweating, breathing and a poorly ventilated HMD.
I had this more with the Oculus Rift, with the Oculus Quest I haven’t experienced it as much.
If you run into this: NEVER CLEAN THE LENSES WITH YOUR SHIRT OR FINGERS !
If you feel the need to clean the lenses: use a clean microfiber cloth.
You’ll regret damaging the lenses of your HMD.
To prevent fog build up, or to at least reduce this, consider positioning the HDM a little different.
In my experience, most of the fog actually comes from breathing through your nose, so make sure your nose vents well outside of the HMD.
On that note: The silicone Face Cover I have, has little flaps that sit on top of your nose.
These little flaps prevent your breath from coming in and therefore helps prevents fog build up as well.
Do NOT put your HMD on your hair
Talking about fog build up …. I’ve seen some users lift their HMD and position it on top of their hair.
This is NOT a good idea and the reason for that is that hair is typically a little fatty, and this will end up on your lenses giving it a foggy view.
Additionally you may find hairs in your HMD which will itch like crazy when playing a game (besides the gross-factor of course).
Learn how to mount your HMD correctly
The fog build up brings me to the next thing that will improve your VR experience.
The correct way to mount your headset is a little different per person (shape of your head), and per different HMD (different construction of the straps).
For the Oculus Quest however, it is even more critical to do it the right way, since it is typically heavier than most other HMDs.
After all: it has a “computer” and a battery pack inside.
So this is my personal approach for the Oculus Quest (suggestions and tips, also for other HMDs, are most welcome!);
- Turn on your Oculus Quest.
- Expand the top strap (center) and let it sit loose.
- Set the left and right strap quite loose as well. You’ll see the velcro tends to right away grab again, but you’d want a little wiggle room.
- Place the HMD on your face, where you’d expect it to be when playing a game.
- Grab the back of the rubbery head-strap and make sure it seats under the base of your skull (the “bump” on the back up your head).
- Now move the headset on your face in a reasonably comfortable position and set the top strap.
- Next, grab both the left and right strap, and tighten the headset on your face – not too tight though!
- Finally, tilt the headset a little to find the most comfortable position.
- If you feel the headset to be leaning forward: tighten the top strap a little more (optionally place a counter-weight on the back of the strap).
Make sure the headset feels comfortable on your face, and that it feels balanced (eg. not leaning forward, and not excessive pressure on your forehead).
It is important that you can still see everything correctly, so tilt or shift the headset if needed.
Now I have to say though that I’ve seen this work great for some, and horrible for others. It all depends on how our skull is shaped.
So if anyone has a one-fits-all approach: please post it in the comments below!
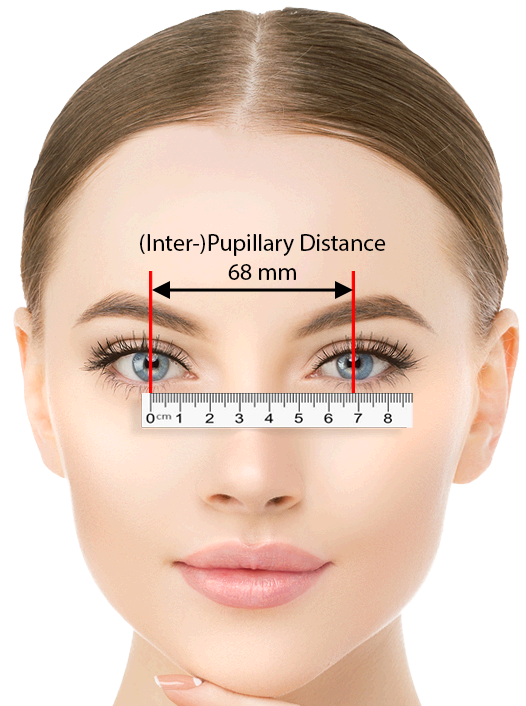
Set the proper Pupillary Distance (if your HMD supports it)
This is important as well, and if overlooked can contribute a poor experience as well.
Pupillary Distance (PD) or Inter-Pupillary Distance (IPD) are the same things (as far as I understand).
IPD is the distance measured in millimeters between the centers of the pupils of your eyes, and affects how clear you will see the imagine in front of you.
When using the wrong IPD, your image may look less focussed, or even nauseating.
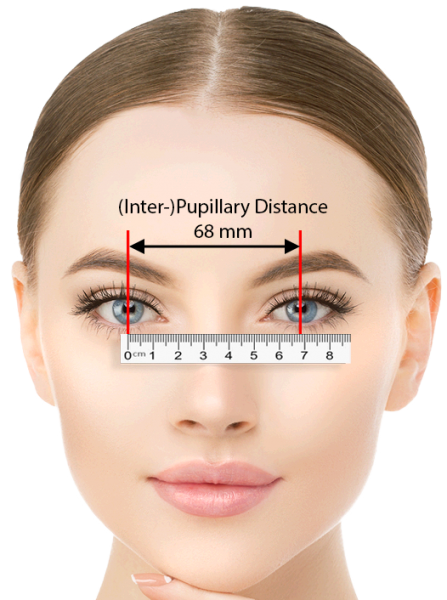
Inter-pupillary-distance
The (I)PD or (Inter)Pupillary Distance, can be set on the Oculus Quest with the slider at the bottom left of your HMD (when wearing it).
Other headsets may have this option as well.
How to Determine the IPD of your eyes
Tip: if you wear glasses, the “PD” value may be printed on your prescription.
Sometimes it can be tricky to determine the proper distance.
You could use a ruler and a mirror, and this may work well for you.
However, there is an app for that haha!
I found an awesome little free iOS app, called EyeMeasure, which did the trick for me in seconds.
It is free and you can find EyeMeasure in the Apple App Store which doesn’t require anything else.
Just look into the camera of your phone and there is your answer – it’s done in seconds.
Unfortunately, I was not able to find the same app for Android (maybe because it uses Apple’s AR kit?), but maybe the free app “GlassesUSA.com Prescription Scanner” for Android could do the same trick.
Please let me know if you know of a better alternative for Android. I did see a few other apps for $5 and even more, but that seems a little much for a one time PD/IPD check.
Those pesky wires
When playing wired, and you value your equipment, those wires to your HMD can become a real problem, especially when they are not all that long (3 meter works, but is still a little short).
Go wireless – It’s the best!
Well, without a doubt, this is the BEST option, if you can handle the small imperfections.
Even when using a more complicated setup, it’s still a breeze to get started.
At the time of writing this article, I am only aware of a few options, but I do expect more to surface in the next year (2021).
The new 802.11ax standard will probably play a role in this (versus dedicated PCIe card offered by Intel and HTC, which won’t work on laptops – booo!).
– Oculus Quest – Playing Native Quest Games
When playing games that are intended for the Quest, then this is probably the best option.
Absolutely fun to play, super easy to get started, however the graphics are a little “less” than what a powerful PC would produce. The “lesser” graphics do not bother me at all, and most certainly does not take away from the fun. However, you’ll need to get the game specifically for the Quest, either in the Oculus Quest store, or through SideQuest.
– Oculus Quest – SteamVR or Oculus Desktop Games
With the use of ALVR or Virtual Desktop, playing SteamVR games work surprisingly well.
Most Oculus Desktop games will work as well, but just not all of them.
Please note: If you want to play the Oculus Desktop (Rift and Rift-S) games with ALVR, then you’ll need to add LibreVR/Revive … and that works very well as well.
Just note that both will come with little imperfections, which does not bother me, a sacrifice I’m willing to make for the awesome freedom, but they may bother you.
– HTC Vive Wireless – Not recommended
The HTC Vive will offer a better picture quality compared to the Oculus Quest.
However, the HTC controllers are not great (this is me being polite), so you’d want the Valve Index Controllers instead (app. $275).
To go wireless, you’ll also need to add the $350 to $450 wireless option – which will not work with a laptop, as it needs a free PCIe slot.
For HTC Cosmos uses, you’ll need to shell out an additional (ridiculous!) $60 for the “wireless adapter mount”.
All-in-all I really cannot recommend this setup, unless you have money to burn of course but not all of us are that lucky …
Playing Wired – Consider using Pulleys on the ceiling
I’ve seen people using pulley systems and such, for their more permanent setup, and that works great, if your setup allows cables long enough for this (eg. USB/HDMI/etc).
If you are bound to using wires, and your VR environment takes place in a dedicated space, then this could be quite good.
In such a scenario, the base stations can also be mounted on the wall as well, so the setup will be minimal when you want to start a VR game.
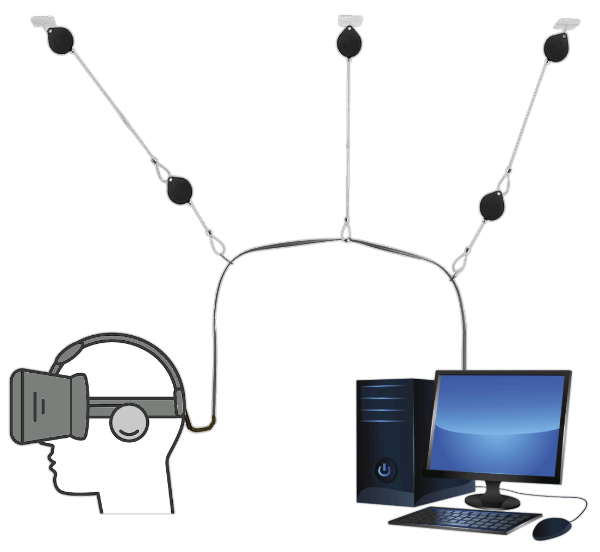
VR – Gain some freedom with pulleys
Paying Wired – When Pulleys are not an option
For those “traveling” often with their setups, the use of pulleys will of course not be an option.
I doubt friends and family would appreciate me drilling holes in their ceiling for my pulleys .
With my Oculus Rift I used the following method to prevent accidents and damage because of the wires:
- The wires from my HMD go over my shoulder.
- A clip on the back of my pants would hold them in place – make sure to keep enough slack so you can still tilt your head sufficiently up and down!
- At the PC end: make sure the cables tied to a table leg.
- It is also recommended to have a person keep an eye on you.
Not perfect, but it helped. So now you realize why I prefer playing wireless these days … it really is liberating.
Tip … looping or folding the wire into your pants pocket …
(thanks to AuzWorld for mentioning this!)
In step 2, I use a clip to attach the wired to my pants. Obviously there are alternative methods like looping the wire around the belt of you pant, or using a velcro strap to tie it to your pants.
However,… looping/folding the wire in your pants (pocket) will work as well, and it saves you the hassle of finding a clip or velcro strip and a place to attach it to. Just make sure that you leave enough slack so that you can move your head without janking the wire.
This will also take a little of the weight of the cable.
Thanks for the tip Auzworld!
Casting the Game to Mobile Device or TV
Since its is often that only one person in the room is playing VR, and the rest of us cannot see what is going on, you could consider casting the video feed to a mobile device or a TV. This allows other to see what the player is doing and/or experiencing (albeit not in VR).
SteamVR already displays the feed on your monitor, and in a way Oculus Desktop as well, so this is only of interest when playing native Oculus Quest games.
Oculus Quest specifics
Did you know that the Oculus Quest can cast the video feed as well – even when playing standalone, native Oculus Quest apps?
You can cast the video feed to a Chromecast enabled device, like a smart TV, a Chromecast dongle (requires a v2 dongle, or newer), or an Android device like the nVidia Shield.
However, you can also follow the video feed through the Oculus App on yoru phone (Android and iOS).
Note: Casting a video feed is not recommended when using ALVR or Virtual Desktop.
You may experience extra lag and/or frame drops, since the video feed will also consume bandwidth on your WiFi!
At the moment I have found 2 options for the Quest (see also the related Oculus Support page).
I found initiating from your mobile device easiest, for those watching you playing a game. However when redirecting to another device (TV) I did find the quality rather poor.
Less convenient (it takes a few steps in VR), but when initiation from within VR I see a picture improvement on my TV.
This could be just me of course, so your mileage may vary.
– Casting Initiated from a Mobile Device
The mobile device that has the Oculus Quest companion app installed on it, can be used to watch the game that is being played.
You simply go into the Oculus App on your mobile device, select the Oculus Quest you’re using, and enable the feed.
The player will see a red dot in the upper right corner of his or her screen, so he or she will be aware that you’re watching as well.
This feed can even be redirected to another Chromecast capable device (didn’t work that great for me though – poor quality).
– Casting Initiated in VR (recommended)
From the Oculus Menu (in VR), select “Sharing” where you can select the option to share video (cast). This option will then allow you to select a capable device on the same WiFi connection your Quest is connected to. Here again, the user will see that you’re watching what they are doing by means of a red indicator in the upper right corner.
How to do a “Squeeze” on an Oculus Controller
I wasn’t sure where to place this tip, as it is Oculus Quest/Rift specific, and I have only seen a use for it in Half-Life: Alyx – “squeezing” an object (it is needed for an achievement).
The Valve Index controllers have an excellent finger tracking and allow you to “squeeze” something.
The Oculus Touch controllers, even though they are very good, do not have this option as the finger tracking is less advanced than the Vale Index controllers.
To Squeeze something (for example a soda can in Half-Life:Alyx): press the “A” button (squeeze the right controller) or “Y” button (squeeze with the left controller).
Ad Blocking Detected Please consider disabling your ad blocker for our website.
We rely on these ads to be able to run our website.
You can of course support us in other ways (see Support Us on the left).
Taking Care of your VR Headset (HMD)
Taking good care of your headset and controllers is not only a good thing to protect your investment, it also makes playing a nicer experience.
Keep you HMD Clean – Hygiene Wipes for Face Covers and Controllers
One thing I had not thought about when purchasing my first VR headset: The amount of sweating!
You’ll be amazed by how much you start to sweat when playing a VR game, especially games like Beat Saber, but it happens also with the more mellow VR games.
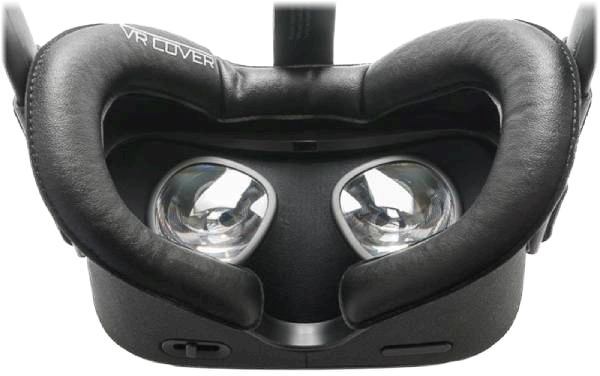
This is where the type of face cover, the part of the headset that touches the skin on your face, has a huge impact.
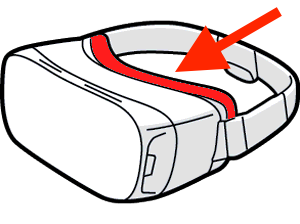
VR Headsets – The Face Cover
I always use hygiene wipes when done playing, or before letting someone else play.
You could go for the fancy schmancy expensive wipes, but you can just as well use common cheap household hygiene wipes.
- Make sure they are not alcohol based (or any kind of potential plastic solvent), as it could damage your HMD and/or Face Covers.
Consider testing the wipes on a small surface first, to make sure it doesn’t doesn’t affect the plastic type used in you face covers.
- Only clean the face cover and the Controller with these wipes – DO NOT clean the lenses with hygiene wipes (use a clean microfiber cloth for that).
- Make sure the wipes are anti-bacterial – it’s not only good for hygiene, but it will also reduce smell.
- Let the fluid/moisture from the wipes dry before putting your HMD back on again, as they may trigger an allergic reaction for some.
Clean the Lenses with Care and Only if really Needed
The lenses in your HMD are literally “priceless”.
They are hard to replace, if not expensive, and often would require replacing the entire unit if damaged.
I really only touch them when it is really needed, as they are delicate.
NEVER use a random cloth, or your finger, to clean them.
The chances that you’ll scratch them are just not worth it.
I always use a clean microfiber cloth, I have quite few of them as they came with my glasses, certain glossy devices, iPads, Laptops, etc.
Before using them I always make sure they are clean, and when in doubt I use another one. You can wash them with your laundry if needed.
Keep your HMD lenses out of Direct Sunlight (!)
Don’t forget that the lenses of your HMD are so called Convex lenses.
This means that the incoming light will be funneled to a focal point, effectively burning black spots on the displays behind the lenses.
I have not experienced this myself, but have seen quite a few folks confirming this to be a real thing.
Recommended Accessories
Face Covers – A matter of Comfort and Hygiene
The Face Cover of your VR Headset plays a significant role in how comfortable your headset will feel when playing.
But comfort is not the only factor to keep in mind when it comes to selecting your Face Cover.
Depending on your HMD and the face cover you’re using, you’ll sweat more or less, and the Face Cover will absorb your sweat more or less.
Either way: gross! Not just gross, but it will become smelly, and it is not exactly hygienic, especially in pandemic situations.
In figure 9 (above): The red part of a VR headset is considered the “Face Cover” – it’s the part that literally sits on your face.
As far as I know, there are a few basic “face covers” for the Oculus Quest, similar options can be found for other HMDs as well.
Whichever you use will depend on your personal preferences and your budget.
– The standard Face Cover – a softer Foam-like material
This one is often made of a soft foam, on the Oculus Quest and Rift models anyway, which probably absorbs sweat better than anything else.
Comfort wise, these are very good for most players, they are just not so great for proper hygiene.

Standard Face Cover – A softer foam
– Silicone Removable Sleeve for the Face Cover
These sleeves (Amazon) slip over the original face cover and are super easy to clean, removable, and help block light around the nose area better (pick a black one!).
But … they make me sweat a lot more … or is it that my sweat does not get absorbed, so I’m feeling all of my sweat much better now?
So in short: Great for hygiene, reasonably comfortable, but you feel your sweat better.
I use this one quite often and it may mix well with the fabric sleeve (next).
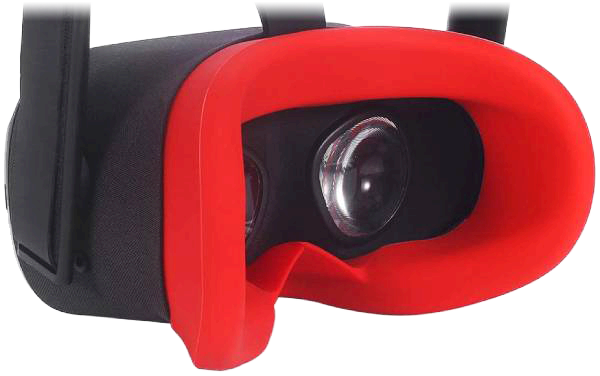
Silicone Face Cover
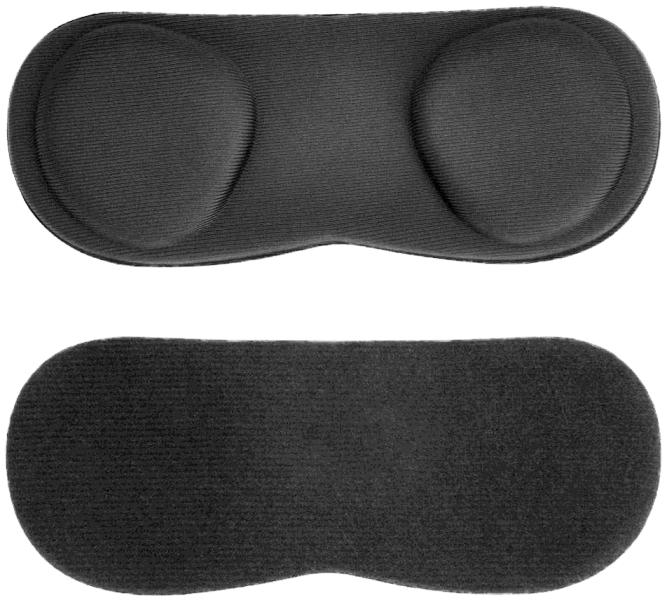
– Fabric Removable Covers for the Face Cover
These also slip over the original face cover. For some reason I cannot find them at Amazon anymore. VRCovers still sells them though.
I’ll admit that I have not yet tried these, mostly because I wanted to limit the amount of money I spend on VR.
They should be more comfortable though than silicone, and are easy to remove so you can wash them.
As they are fabric, I can imagine that your sweat will still reach the original face cover though, but not all of it.
Don’t confuse them with those silly white throw-away items – I cannot stand those (very poor fit, and things just keep shifting).
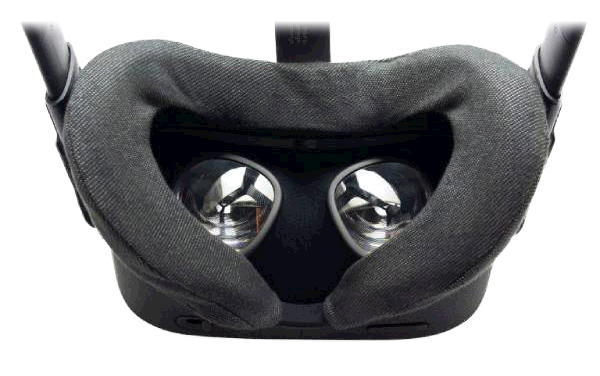
Fabric Face Cover
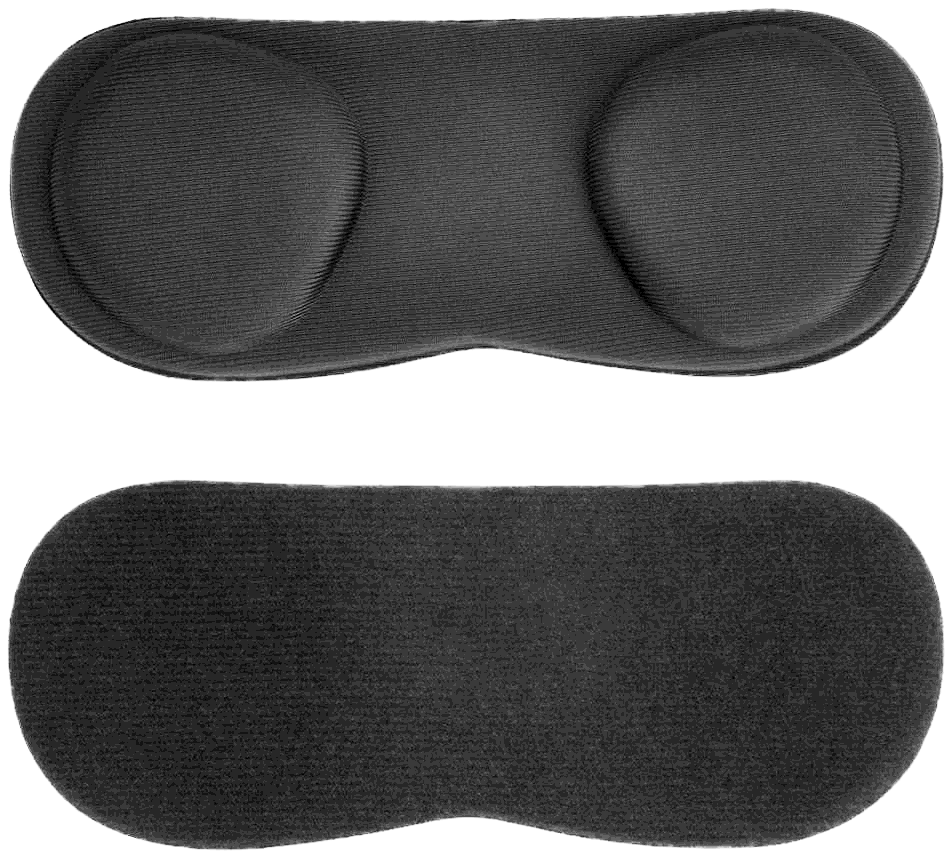
– PU Leather Face Covers
These replace the existing Face Cover with a custom one. I actually use these (Amazon) quite often as well.
Please note though that I really had to get used to these.
Initially I found them initially to be less comfortable than the original Face Cover, but now I use them frequently.
The trick here is to find the sweet spot when mounting them on the velcro, something I initially had trouble with.
Note: I didn’t know this either, but PU Leather may contain real leather, coated with a Polyurethane layer.
PU Leather Face Cover
The most well known brand is probably VRCovers, but there are alternatives out there.
The ones from VRCovers come with two pieces (thin and thick padding) that are attached with velcro.
If you wear glasses: the on from VRCOVERs are NOT compatible with the Oculus Glasses Spacer that came with your Quest!
However, it comes with 2 covers, attachable with velcro. A thin and a thicker model. For those with glasses, you will have to use the thicker one.
Comfort has been good for me, which will always be a personal preference of course.
As for hygiene I’d say they are close to silicone face covers, as they do not seem to absorb sweat, are removable and easy to clean.
Lens Covers – Not just the easiest way to protect the Lenses
I always did find them over priced, and back in the day I always wondered why I would even need one: a protective cover for my HMD lenses.
They come in different shapes and materials, I prefer the soft ones like those displayed below.
Lens Covers for the Oculus Quest
I finally got myself one of those lens covers, and I wouldn’t want to miss it, and that the HMD manufacturer should include them by default, and for these reasons:
- Direct Sunlight Protection.
Your HMD does not do well with sunlight, as described before.
The lenses of your HMD will actually focus direct sunlight and potentially damage (burn) the displays in your HMD.
- Protection from scratching by other objects when Stored.
I have my HMD in a suitable hard case, and these covers protect the lenses when stuff is accidentally moving around in my HMD storage case.
- Cover the light sensor.
The Oculus Quest will actually go into standby if not used for a bit (check your settings). A light sensor detects if you’re wearing it or not.
Sometimes I do not want that to happen (tinkering with my PC), so in those cases I just slap on the protective covers and the Quest still “thinks” it is on my face.
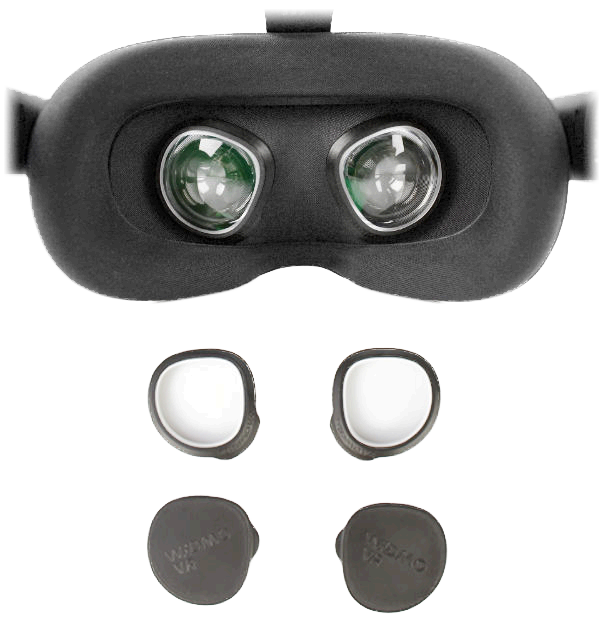
Highly Recommended – Prescription Lenses for those that wear Glasses
The lenses in your HMD assume you have regular sight and you do not need glasses, which is a bummer for those that need glasses.
It is not only very inconvenient to wear glasses in VR, but it also makes it that I have to take more breaks. My glasses and the HMD combined, seem to put more pressure on my head, making it a much more uncomfortable experience. Those that wear glasses, like myself, will know what I’m talking about.
Well, there is good news: You can get affordable prescription lenses for your HMD.
A company called WIDMO VR offers prescription lenses, for most HMDs brands and models, that you can just click over the existing lenses of your HMD.
Removing them is just as easy (for when other players want use your HMD).
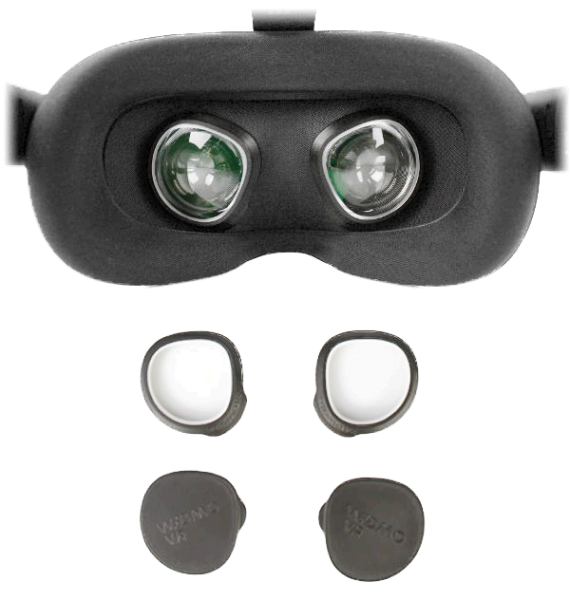
Prescription Lenses for VR HMD’s
These prescription VR lenses are very reasonably priced (€65, approximately $70) and delivery was pretty quick as well.
I got mine in less than 2 weeks – not bad if you keep in mind that the lenses will be custom made, just for you.
The lenses do come with a little pouch, in case you want to store them, and two protection caps which you could use as a lens cover.
If you’re interested in ordering: make sure you have a recent prescription laying around.
You’ll need, for each eye, Sphere (SPH), Cylinder (CYL) and Axis (AXS) – see also this article – with values from -8 to +6 (so for nearsighted and farsighted).
At the moment they have prescription lenses for (I’m pretty sure more will become available):
- Oculus (Quest, Rift, Rift S, Go)
- Valve Index
- HTC Vive (Regular, Cosmos, Pro)
- Samsung (Odyssey, Odyssey+)
I have mine now for more than a month and I have to say: I HIGHLY recommend them.
Playing VR without having my glasses on is so much more pleasant.
Very much worth the €65 (considering that my VRCOVERs were similar priced).
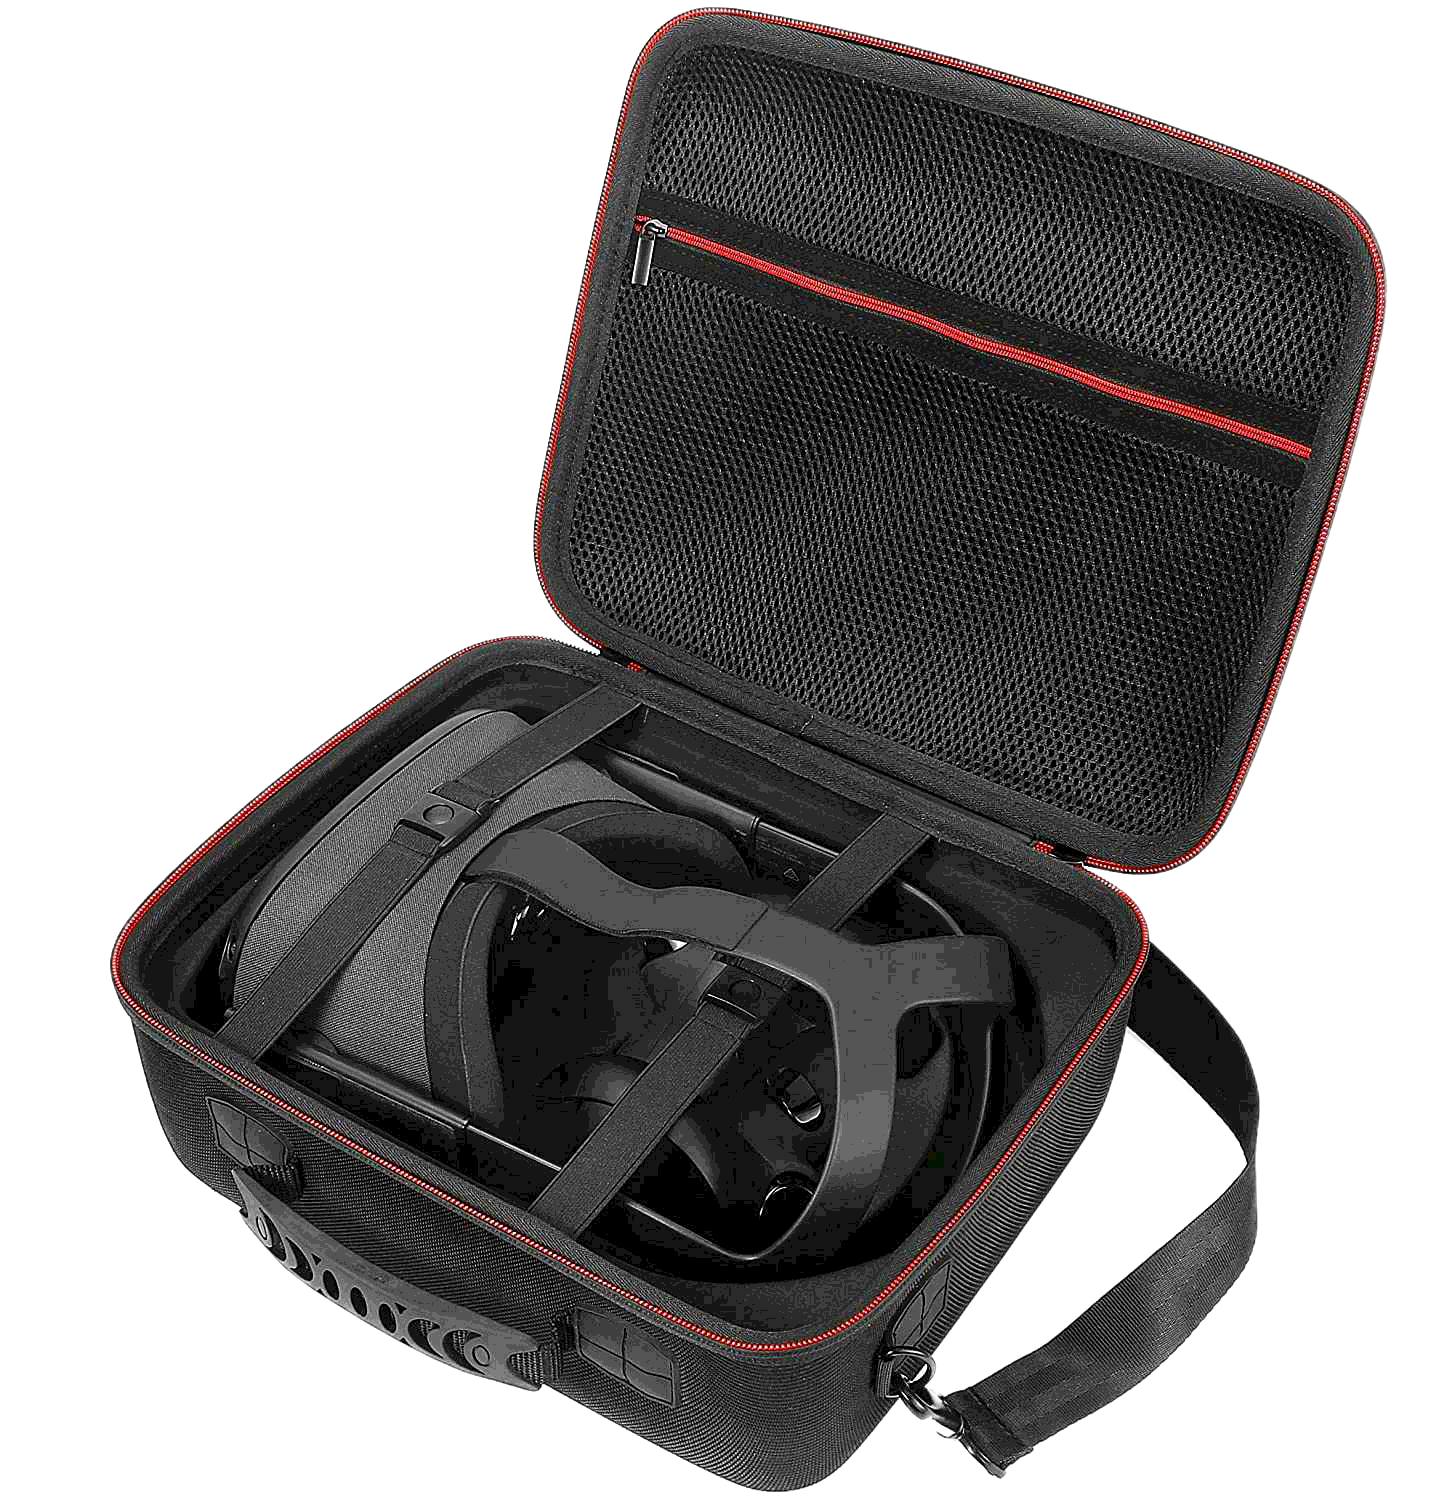
Must have – a Storage case – The easiest way to Protect your VR headset
As mentioned in the previous suggestion: I do store my HMD (with controllers, charger, cables, etc.) in a hard case (this one at Amazon).
The one I have was very affordable, and it fits everything, even though the case seems very compact.
In mine I have the Quest, 2 Controllers, a charger, 2 long USB cables (the one from Anker for Oculus Link, and the cable that came with the Quest), 4 spare AA batteries, my prescription lenses, microfiber cloths for cleaning, a small package of hygiene wipes, some velcro, a XBox One controller and even the powerbank did fit with all that.
I have used it several times when traveling as well, and it fits wonderful in my carry-on (the super compact “international” overhead-bin size) as well.
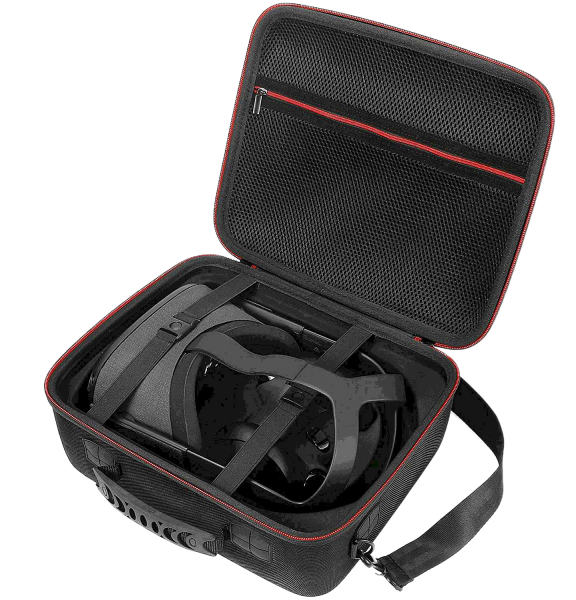
A hard case for your VR Headset
Batteries and Powerbanks
Rechargeable Batteries for you Controllers
For all HMDs, you’ll need batteries to power the controllers.
My Quest and Rift both use AA batteries, and I’m pretty sure most other brands do this as well.
Having used Alkaline batteries for a while, I realized that this not only expensive, but probably not very environment friendly either. So I switched to rechargeables.
For quite a while now, I have been using Eneloop Batteries from Panasonic/Sanyo – I have the regular 2,000 mAh and the 2,500 mAh “Pro” version and they seem to perform best.
My backup batteries (almost as good) are the 2450 mAh rechargeable AA’s from Duracell.
They all perform very well, but the Eneloop Batteries seem to last a little bit longer on a single charge, especially the Eneloop Pro’s keep running for a very long time.
Powerbank for the Oculus Quest
Now, the Oculus Quest is a different animal compared to most other HMDs.
After all, it is capable of running completely independent (not tethered to anything), and runs for about 2 hours on its internal batteries.
Now for me personally, 2 hours is long enough, since I do take breaks in between.
However, for others (like my nephew Bram who pushed beyond 6 hours in one session), this may not be enough.
You can however get a suitable Powerbank for your Quest to extend the play time.
Having done a few experiments, I found that you will need a Powerbank that can output at least 2.4A for this to work as a power supplement.
Also: start with your Oculus Quest fully charged, so the Powerbank can keep up with charging the Internal battery.
Mine are relatively cheap 10,000 mAh Powerbank (I payed $18), and if you have a need for more than 2 hours of continuous play, then this could be a good option for you.
When testing the Powerbank, I simply slipped it in my back pocket and had the wire run over my shoulder.
I have seen others attach it to their headset – which may offer a very nice counter weight and make the headset feel more comfortable as well.
Oculus Quest – Counter Weight for better Balance
As mentioned before, the Quest is a different kind of HMD.
Because of the included electronics and battery pack, it does weighs more than most other HMDs.
For example, the Quest weighs 571 g (20.1 oz), compared to the original Oculus Rift, which weighed 470 g (17 oz).
Not shocking (compared to the Rift), but still a little too much, and when playing for a longer time, you will notice this.
One way to lighten the load on your face is by using counter weights on the strap at the back of your head.
If you use a Powerbank, then consider using this as a counter weight.
Mounting it correctly can be a little challenging at times – you’ll be moving your head so you want to make sure the powerbank doesn’t shift.
I’ve seen folks using rubber bands, velcro, and electrical tape, but I have to say that I didn’t like any of those.
Tip: to do a quick test, to see if a counter weight does anything for you:
Strap something of weight (for example your Powerbank) on the back with painters tape (easy and clean to remove).
Oculus Quest – Where to put a Counter Weight
Now there are several commercial products out there, some even including a powerbank, others just being a strap to provide better support on top of your head, etc.
In the end, most look pretty nice, but as cheap as I can be: I’ll still will do some experiments, maybe one or the other lead strip will do the trick without spending an arm and a leg.
Related links that may be useful:
- This post at AdaFruit shows a simple, but effective approach.
- StudioFormCreative offers several helpful straps (I have not tested any of these)
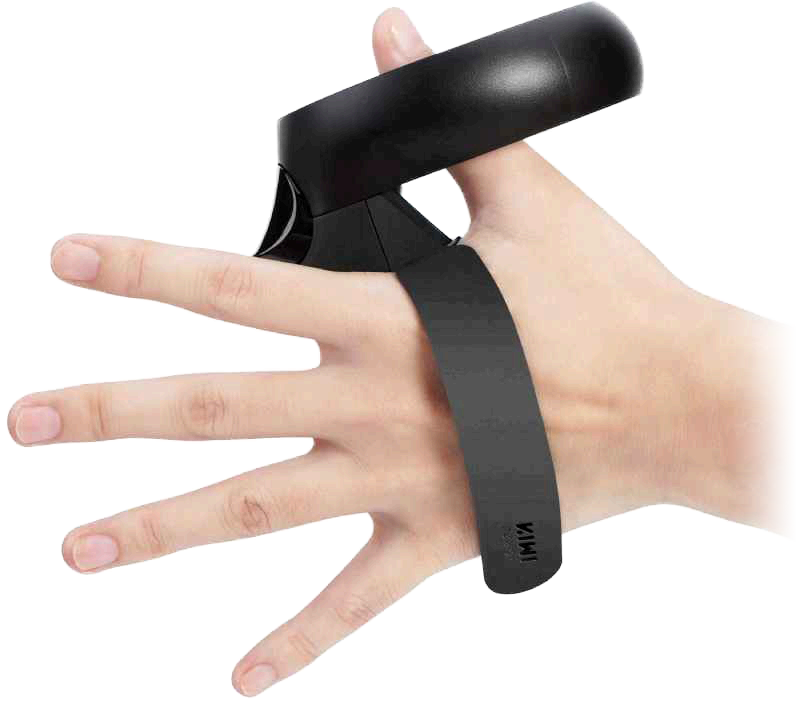
Custom Controller Straps
Standard, controllers come with a Lanyard, which I highly recommend you use, as mentioned before.
However, you can also get custom lanyards/grips/straps for your controllers, which some players seem to enjoy.
I haven’t had a use for them yet – and there is only so much I want to spend on VR accessories.
There are quite a few to be found on Amazon (of course).
Personally I’d gravitate to the more well known models and brands like Kiwi or AMVR.
I did notice that I couldn’t find the Kiwi grips at Amazon.com, but for those living in Europe, you can get them here at Amazon.de.
I did find these from Esimen at Amazon.com and they look very similar to the ones from Kiwi.
Again, I have not yet tested or needed these … they look nice though.
A good thing to keep in mind: Controllers evolve and I have seen quite a few new developments on that front, like some leaked info on Oculus developing new controllers.
Theoretically, if you have the base-stations, you may also be able to use the Valve Index controllers (too expensive for my taste) – but I haven’t tested this.
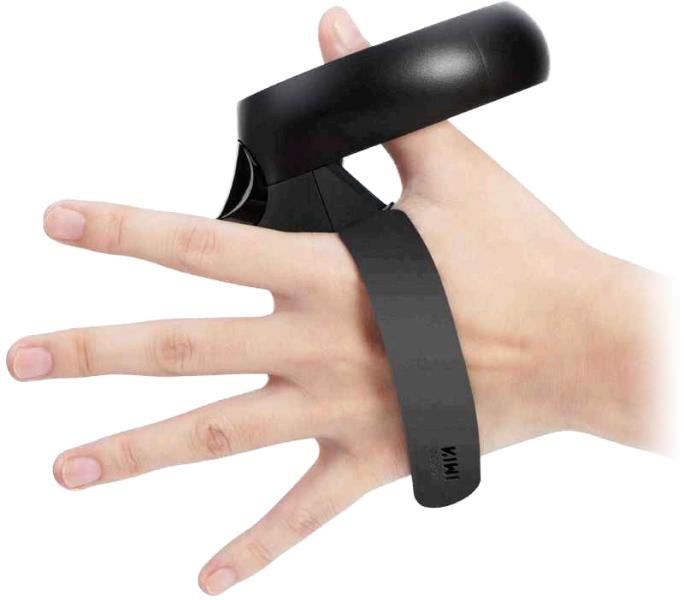
Kiwi Design – Oculus Touch Controller Straps

Comments
There are 13 comments. You can read them below.
You can post your own comments by using the form below, or reply to existing comments by using the "Reply" button.
Nice checklist dude! I knew quite a few of these, but the doormat idea is brilliant!
Johnny7
Thanks Johnny7!
I appreciate that you took the time to post a compliment. Always a good motivator
Hans
very well laid out article, a lot of work put into it…….. one tip is to fold/loop any link cable into your pants * small loop *to take the weight off it and help prevent it being yanked out resulting in breaking cable jack/connector
auzworld
Thank Auzworld!
Yes it has been a lot of work to write all this. The good thing is that these tips are based on conversations I’ve had with folks new to VR. In the end I figured it would be good to have an article about it.
Thanks for the tip! I’ll add it to the article.
I used to use a clip for this, but looping/folding it in your pants could work just as well, or maybe even loop around your belt?
I have to admit that that I’ve been spoiled by playing wireless haha. No more wires for me (I just need more space hahah).
Hans
Added!
p.s. I had to learn how to work with Blender as well to make the drawings – which was actually fun to do.
Hans
Leuke blog om te lezen. Mijn zoon houdt zich veel hiermee bezig en ik zie hoe hij geniet. Natuurlijk durf ik het niet uit te proberen, omdat ik geen kennis had over zulke ontwikkelingen. Deze blog is net wat ik nodig had. Je deelt niet alleen goede informatie erover, maar ook tips en advies. Ga zo door!
floris
Hoi Floris,
Dank je wel voor het mooie compliment – dat wordt gewaardeerd en werkt motiverend. Mooi om te horen dat je de interesses van jouw zoon probeert te volgen!
Mocht je dit artikel in het Nederlands willen lezen: alle artikelen op Tweaking4All zijn in zowel in de Engelse taal als de Nederlandse taal beschikbaar.
Voor dit artikel: zie deze link. Op elke pagina staat rechts bovenin een link naar of “English” of “Nederlands”.
Fijn weekend!
Hans
Great guide. I’m sorta new to VR and learned a lot.
I found a really good Android app for getting pupillary distance. It’s called Liingo RX Reader.
On a side note, I have a Quest 2. You adjust the IPD by physically moving the lenses. Sometimes, if you put the headset back on quick enough, you can see the number value on the screen. Other times, it doesn’t show anything at all. Anyone know how to get it to show you every time?
Chase
Hi Chase,
Thanks for the compliment! Glad you liked it!
As for the Android IPD app you recommended; suggestions are always welcome – Thanks!
I did see that some reviews are quite positive, others not so much. Oh well, anything better than nothing right?
Easiest (if you wear glasses) is to just by asking your optometrist.
I too have a QUest 2, and I recall seeing that once or twice – just do not recall how to make the IPD value visible.
Since you’re using a Quest: Look at Quest IPD on SideQuest, which helps and shows IPD settings.
Have fun and feel free to post questions if you have any!
Hans
I’m doing a school project, can you give me your full name so i can completely site this source? i was gonna tell you anything i might know about the oculus but i don’t know which one you’re talking about .
max
The article works for pretty much any VR headset currently in the market.
In this article I was talking about the Oculus Quest 1 – in the meanwhile I’ve had the Quest 2, Pico 4 and Quest 3 and the article is still valid for all those HMD’s.
As for my name; I’m not overly thrilled to share my full name. You can refer to me as Hans, and mention the website.
Sorry … hope this helps.
p.s. what’s the school project?
Hans
it’s a report on vr. thanks for the info. also, i’ve learned personally to never, ever buy a new headstrap for your oculus. unless it’s the official oculus headstrap. hope that helps
max
Nothing better than sharing experiences! Thanks!
On that note: I love the Bobo VR headstraps. I’ve had on for all my Quests.
The ones from Meta on the other hand are not so great (to say the least).
Hans