Electronic Signature vs Digital Signature
In day-to-day language the phrases Electronic Signature, e-Signature and Digital Signature can be confusing.
In this article we focus on an e-Signature also known as an Electronic Signature.
A scanned/digitized image of your hand written signature can be used as an e-Signature.
The U.S. Federal ESIGN Act defines an Electronic Signature, or e-Signature, as:
An Electronic sound, symbol, or process, attached to or logically associated with a contract or other record and executed or adopted by a person with the intent to sign the record.
A Digital Signature on the other hand is a “code” (mathematically determined) to demonstrate the authenticity of a digital message, document or for example software.
Ways of creating an electronic Signatures …
In my search for ways to place a handwritten signature on a PDF, I found two common types to create an electronic signature:
– Digitized signature (scanner or webcam based)
– Jotted signature (write your signature on a touch screen with your finger)
In this article we will only focus on the scanned or digitized signature since the jotted version really looks like a 5 year old wrote it. I personally consider the jotted version of an unacceptable quality lacking a professional look.
How to put a signature on PDF Documents
First, for those who’d like to experiment, I’ve create a test PDF form which you can download for testing your signature.
Download - Example form.pdf.zip
In the next paragraphs we will show you how to capture your handwritten signature and place it in a (suitable) PDF:
Tools to put a signature on a PDF file
MacOS X – Using Preview
MacOS X comes with a utility called “Preview” (Application Preview) which can actually handle PDF’s and PDF Forms very well, including the signature aspect of it. Preview can capture your signature with the build-in iSight webcam of your Mac (if your Mac has one).
Avoid overwriting original documents!
I strongly recommend working with a copy of the PDF you’re about to edit.
Preview has the tendency to save changes to the original (who came up with THAT stupid idea?).
Anyhow … open the original and choose “File” “Duplicate”, or simply duplicate the original in The Finder.
Step 1 – Open the PDF with Preview
If you haven’t installed any other PDF reader, then simply double clicking the PDF will do the trick as Preview is by default set as the PDF reader under MacOS X. Otherwise, open Preview, and use the File menu to open the file.
Step 2 – Create a Electronic Signature (one time only)
Note : This step is only needed the first time you want to place a signature on a PDF, for this particular computer. Preview will remember your signature. You do of course have the option to remove the signature after you used it – most certainly something to consider when you’re not the only person using this computer or if a computer is publicly accessible.
First grab a piece of white paper and write your signature on it.
I have had good experiences with a black pen, but a blue pen will work as well.

Handwritten signature example
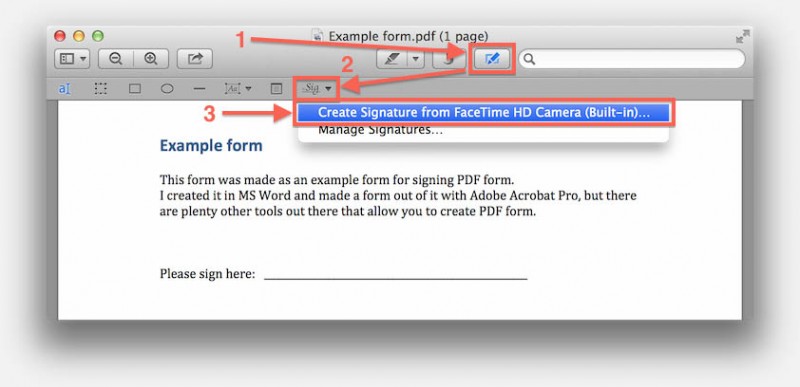
Next you’ll need to open the “Edit Toolbar” (1) in Preview, after which an extra button bar appears under the button you just clicked.
Click the “Sig” (2) button which will open a menu where you will need to select the “Create Signature from FaceTime Camera” (3). Keep in mind that with this menu option, the exact text will depend on the type of FaceTime/iSight you have – 3rd party camera’s might not appear here as an option!
Mac OS X – Preview – Create Signature
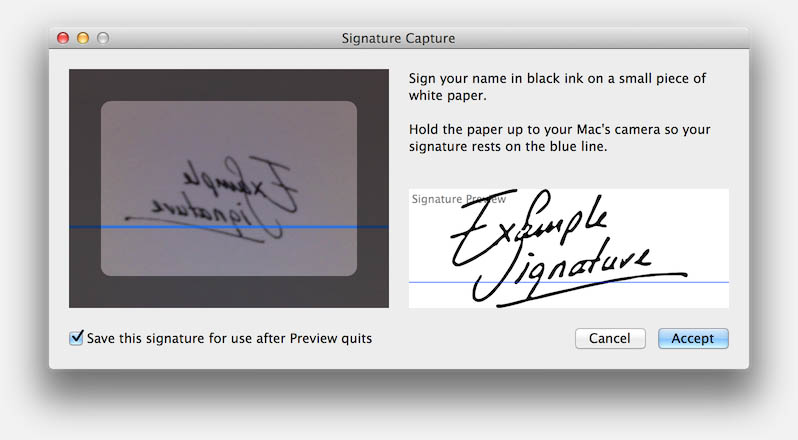
After you click the “Create Signature from …” menu option, a new window will open that allows you to digitize your signature with your webcam.
Hold your handwritten signature in front of your webcam and try to kind-a align it with the horizontal blue line (left side of the window).
If Preview recognizes a signature, you will see a vector drawn version of your signature on the right side.
SECURITY
If your computer is accessible by other, or if you have a healthy level of paranoia then you have two options to prevent that others abuse your signature:
– Uncheck the “Save this signature for use after Preview quits”
– Manual removal of the signature in the “Manage Signature …” option in the previously used “Sig” menu.
Mac OS X – Preview – Digitize handwritten signature
Once the signature on the right is to your liking, click “Accept“.
Step 3 – Placing your Signature in the PDF document
You’ve now created an electronic signature or eSignature, which now can be found in the “Sig” menu we used earlier.
Note : If you kept the “Save this signature for use after Preview quits” checked, then in the futer step 2 can be skipped.
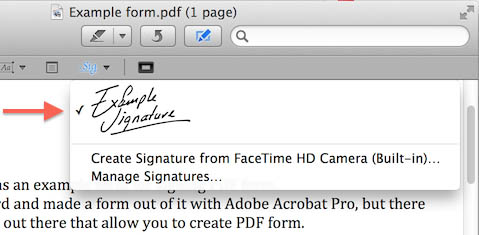
Mac OS X – Preview – Your signature can now be selected from the menu
Once you click the signature, move the mouse in the PDF document to where you’d like the signature and left click to place the signature.
From here on you can resize and reposition the signature in your PDF document.
After signing the document: don’t forget to save it.
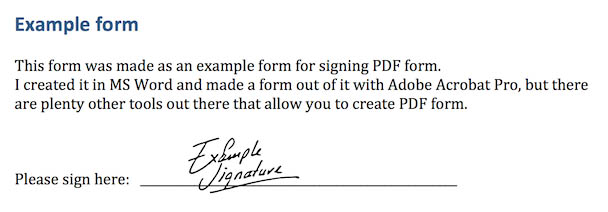
Mac OS X – Preview – Your document with Handwritten Signature
Windows – Using Adobe Acrobat Reader
Adobe Acrobat Reader, available for free for Windows and other platforms, and does support signatures as well.
Well, that is if you’re not having a too old version of course.
Step 1 – Open the PDF with Adobe Acrobat Reader
Note : If you do not have Adobe Acrobat Reader installed, then please download and install it now (screenshots are based on version XI) from the Adobe Reader website for free.
Normally, after installing Acrobat Reader, PDF files should be associated with it, so a double click on the PDF Form should open it in Acrobat Reader.
If this is, for whatever reason, not the case, then simply open Acrobat Reader and use “File” “Open” or CTRL+O to open the PDF Form.
Step 2 – Create a Electronic Signature (one time only)
Digitizing your handwritten signature works about the same in Adobe Acrobat Reader as it does in MacOS X Preview. I have to say though that with the Adobe software digitizing it right was quite a bit more challenging, but it works and we need it only once (for most situations at least).
Note : This step is only needed the first time you want to place a signature on a PDF, for this particular computer. Acrobat will remember your signature. You do of course have the option to remove the signature after you used it – most certainly something to consider when you’re not the only person using this computer or if a computer is publicly accessible.
First grab a piece of white paper and write your signature on it.
I have had good experiences with a black pen, but a blue pen will work as well.

Handwritten signature example
Next we use our webcam to digitize our handwritten signature.
Click the “Sign” button (1) on the right, and click the “Place Signature” button (2) below that.
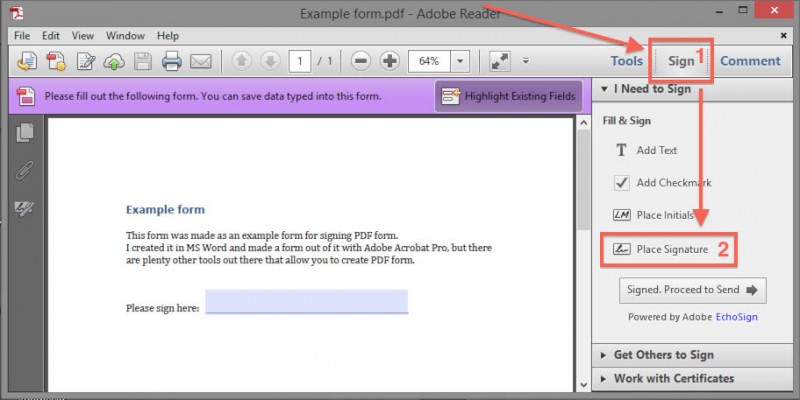
Windows – Acrobat Reader – Open PDF Form for signing
A new window will open with some interesting options. We are going to use the “Use a webcam” option (if this option is not available, please check for updates under the “Help” menu – even if you just downloaded Acrobat Reader!).
The other options are not that great or not that practical:
– “Type my signature” mimics a signature like text based on the name you enter,
– “Draw My Signature” which allows you to use a mouse or a touch screen to draw a signature,
– “Use an Image” which allows you to use a scanned image.
Check the option “Use a webcam” and hold the pice of paper in front of your webcam. Try to make the signature rests on the horizontal line. I’ve noticed that “rest properly on the blue line” can also mean something like you see below before it really grabs the signature.
The closer you can get to the webcam, the higher the capture quality seems to get.
If a signature does not get captured:
– move a little up or down
– move a little closer to the webcam
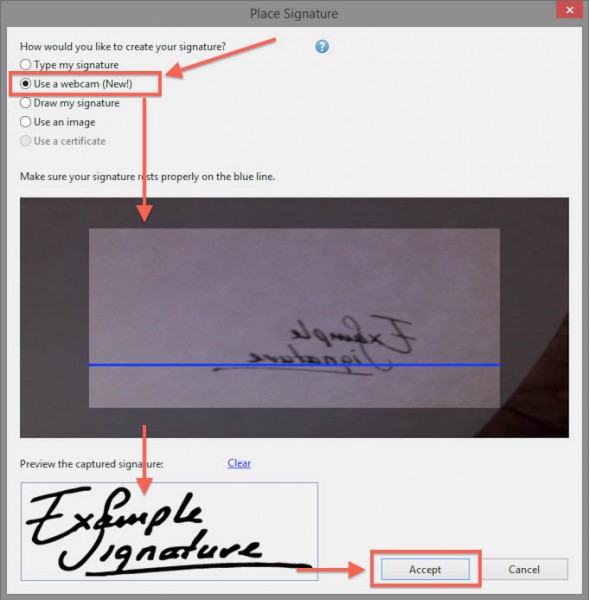
Windows – Acrobat Reader – Digitize Handwritten Signature
When the signature is captured to your liking, click “Accept“. Your digitized signature is now ready for use …
Step 3 – Placing your Signature in the PDF document
To place your signature in a document, click the “Place Signature” button on the right.
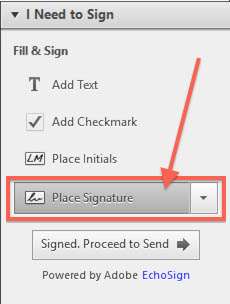
Windows – Acrobat Reader – Select “Place Signature”
Where ever you move in the PDF document, your signature can be placed. Fine tuning by Scaling, moving and even Rotating is possible.
Once satisfied, click the “Signed. Proceed to Send” button which allows you to save a copy as a file, or send the form by eMail etc.
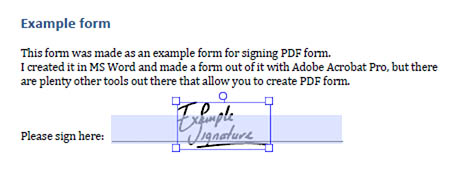
Windows – Acrobat Reader – Fine tune placement of Signature
Linux – Using Xournal
Linux seems a black sheep when it comes to certain functionality – signing PDF documents is one of them. Frankly I’m surprised about the amount of hurdles a Linux user at times has to take to get things do.
Note : There is a Adobe Acrobat Reader version for Linux – for some reason it’s old (v 9.x) and does not seem to support insert eSignatures in PDF’s.
I did find a working solution though: Xournal.
Xournal is an application for notetaking, sketching, keeping a journal using a stylus, but allows us to open a PDF file and insert a picture.
Install Xournal which can be found on their website, and Ubuntu users will be happy to find it in the “Ubuntu Software Center“.
Step 1 – Get a picture of you Handwritten signature
The process is straight forward: write you signature on a piece of white paper and scan it.
After scanning it, you might need to do some cleaning up, so that the background is either pure white or transparent. If you choose a transparent background consider saving the file as a PNG otherwise the transparency will get lost.
The advantage of a transparent file is that it will blend in better in PDF documents, but creating one with a handwritten signature can be a lot of work.
An alternative that might work with a webcam is an app called “Cheese Webcam Booth” which for example can also be found in the “Ubuntu Software Center” which allows you to capture a picture through your webcam. Just in case you don’t have a scanner.
Step 2 – Open the PDF in Xournal
Start Xournal, choose “File” “Open” and set the file type (lower right corner) to “All Files“, select your PDF File and click “Open“.
The content of your PDF file should now be visible.
Step 3 – Insert your Signature picture
First scroll to the location where you’d like to have the signature.
Next click the menu “Tools” “Image” and click on the document. A file dialog will open, allowing you to select your signature image file.
Select the image file of your signature and click “Open“.
You signature will now be place in the PDF file. Some scaling an repositioning might be needed (my example signature was way to big).
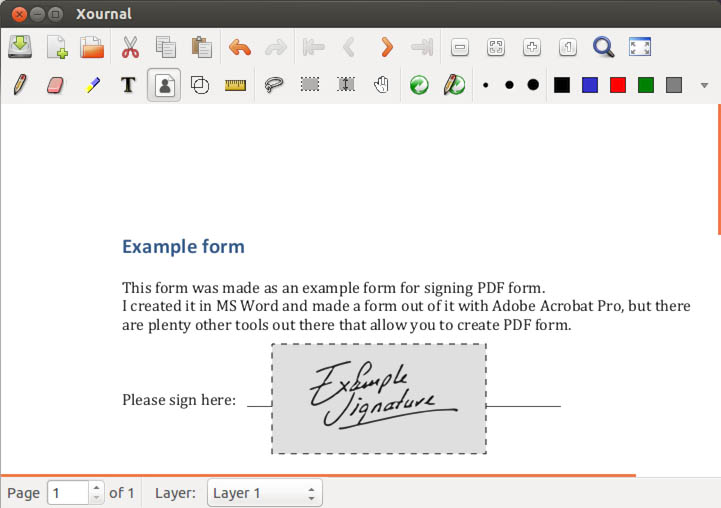
Linux – Xournal – Insert Handwritten Signature into a PDF
Next step is to export the file as a PDF by using “File” “Export to PDF” where we can save a copy of the PDF with signature.
In the screenshot below you can se that it worked but that the lack of a transparent background did break the horizontal line. Not perfect but it works.
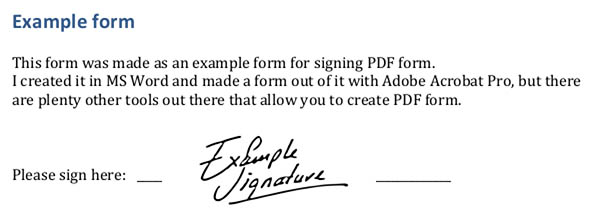
Linux – Xournal – PDF Signed …


Comments
There are 12 comments. You can read them below.
You can post your own comments by using the form below, or reply to existing comments by using the "Reply" button.
Thanks a bunch for this. I needed to sign some forms in PDF format. I’ve been running Linux for a good while on my laptop and thought I’d need to actually go find a Windows machine to get the job done until I found this. Xournal did the job perfectly.
One thing I did differently after scanning in my signature, is open it in Gimp (you may be able to do this in other photo editors too). With nothing selected, go to the Colors menu and select Color to Alpha. The default color is white, leave it as is and click OK. Export the results as a PNG (which supports transparencies) and insert that as your signature. This neatly eliminates the white box mentioned in the article.
Nelson Hoover
Thanks Nelson for leaving a useful comment, it’s very much appreciated!
Glad to hear the article was helpful for you …
Good idea to clean up the signature like that, thanks again for mentioning it.
hans
when clicking on the bitcoin donate link FF shows a 401
tom
Hi Tom,
thanks for wanting to make a donation and for reporting a potential issue with the BitCoin link.
Most BitCoin clients should pick up the “bitcoin:…” link, but not all seem to do that right.
The link is: bitcoin:1Fz9fgpj2VcRodG5A5jJcQubiZLxtfjNRx?amount=0.5&label=Tweaking4All Donation
Where 1Fz9fgpj2VcRodG5A5jJcQubiZLxtfjNRx is the address to donate to.
I’ll take a look and see if I missed something .. thank you again for notifying!
hans
I’ve updated the link, so it now shows the BitCoin code as an alternative – which can be selected and copied.
I looked it up one more time, and it seems that the “bitcoin: …” link is considered “the standard” but not all BitCoin clients have implemented this correctly yet it seems.
My apologies and thanks for trying to donate. It’s annoying and embarrassing that the link did not work.
hans
Thanks for this very useful article. I tried all those commercial websites to create my handwritten signature and none of them did a decent job and all the times, the solution was there. simple and easy!
Thanks again :)
Maral
Thanks Maral …
…
It’s always a motivator to keep writing with nice feedback like this – thanks again!
hans
Thanks very much!
I am willing to donate a doughnut and coke (or a glass of wine, more my taste) but shop already at Amazon, don’t know how bitcoin works, and have already a dropbox. Why not paypal? Rob van de zon.
Rob
Hi Rob,
Thanks for willing to donate! I agree a glass of wine would go well …
…
Unfortunately, PayPal forced me to remove the “Donate now” button.
In their “opinion” the website is unbecoming their “rules”, to say it in civil words. Obviously I’m not pleased with that …
By the way: if you shop at Amazon through our link, it won’t change anything for you, it will still work as usual and I get a small commission.
I can, if you’d like, still send you my PayPal address.
hans
I use this: https://www.foxitsoftware.com/products/pdf-reader/
– it allows you to fill out PDF forms (by placing text-boxes within the
document – to be merged on saving). Also, you can embed images – like a jpg of
your (scanned) signature. Comes in a portable version as well in: http://www.portableapps.com .
Jacques
Good idea, but didn’t work for me. When I exported from Xournal and then reopened it in Xreader (default PDF viewer in Linux Mint 18.3 Sylvia), the pages were pretty much all white.
Rick
Hi Rick,
this may be version related? I’m not using Linux very often, so I’m not able to test the latest version.
hans