You might have read the articles on using your old phones as IP Camera monitors (Android, iPhone), so you can imagine that it didn’t take me much time to set them up as IP Camera’s as well. After all: these smartphones are pretty capable devices and do come with a build in camera, often better than the camera’s build in dedicated IP Camera’s like my Foscam IP camera’s.
In this article I’ll show you how to repurpose your old Android phone as an IP Camera, so you can remotely monitor for example your house, your baby, etc.
Android Version?
Using an old phone can potentially come with a downside:
The operating system maybe outdated and not allowing the installation of needed apps, or not supporting functionality we’d like to use (other phrases used for operating system are: system software, ROM, or firmware).
With my Android devices I was much better off than with my old iPhone, since none of them required installing a newer Android version – thank you Google for not abandoning older phones like Mr. Apple does.
In case your phone is really really really old, then consider going to the XDA-Developer forums and see if there is a new firmware version available for your phone (referred to as Custom ROMs). Upgrading can be a bit cumbersome, but some of those newer custom ROMs can breath new live in your old phone.
The best way however is to just get started and try to install the app you need. If it doesn’t work, then you can still consider looking for new ROMs.
If you’d like to know what Android version your phone runs, please read: How to determine Android version?
Provider Lock – Use Android device as non-cellphone device
I’ve noticed that some Android devices are unusable because of the provider lock – thank you Verizon for being such $%#@^!* about it. If this is your own phone, then theoretically you should be able to have the old phone unlocked. Unfortunately, I have no idea if that would give us the desired result. So far an old Verizon phone a friend gave me can only be used as a paperweight …
T-Mobile devices that I have tested on the other hand (Samsung and HTC), behave nicely out of the box (kudos to T-Mobile)!
Use your old Android as an IP Camera
You may ask “What is an IP Camera? ” …
Well, an IP camera is basically a video camera, or security camera, connected to your network (wired or wireless) that can be accessed through a web-browser or special application on your PC, Phone or tablet allowing you to monitor which ever you like. Typical applications are monitoring your baby sleep, watching your dog, keeping an eye on the front door, etc. A third party even offers a case to use your old phone as a peep hole camera (see: Xavage Xentry).
What you’ll find in such an IP camera are a camera (duh) and a tiny “computer” that serves the video feed to whoever is connected to it through the network. These IP camera’s can be bought relatively cheap (starts at about $80 – see Amazon), but why buy one if you already have all the needed hardware in your old phone? Another cool thing, which is something you won’t see on commercial IP camera’s, is that with your phone you right away have a display allowing you to aim for the right spot. Possible downside is that some of the commercial IP camera’s allow panning, which obviously cannot easily be done with your phone.
For this purpose, there are boat loads of options to be found at Google Play, we will use “IP Webcam” that I like as it does work straight in your browser and it’s free. A good alternative, although less responsive with video, is Free Wi-Fi Cam (Web of Cam).
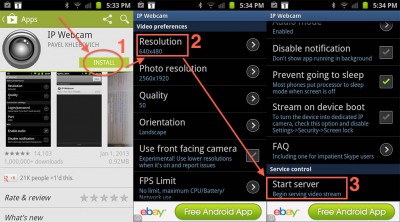
Either go to Google Play in your browser or install it through Google Play / Play Store on your phone (1).
Open “IP Webcam” after installation. At startup IP Webcam will allow quite a few settings like video resolution (2), what camera to use if you have a front facing camera o your phone, etc. Once you’ve completed your settings (you can play with those later as well), tap “Start Server” (3).
Setting up IP WebCam
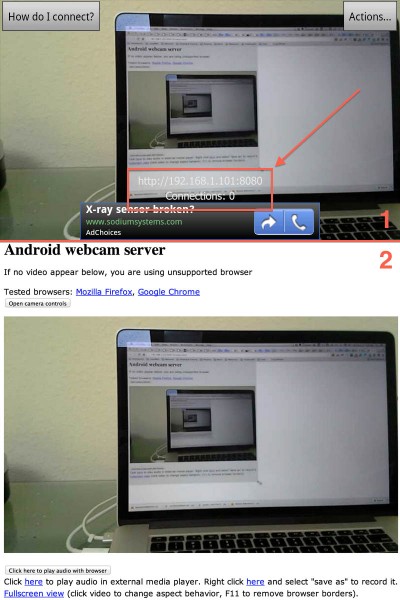
The screen will change and show what the video feed looks like as shown in the top part (1) of the illustration below, giving you the means to aim at your target.
In this screen, bottom of the screen, you’ll also find the address you will need to use in your web-browser, and the number of connections or viewers. In this example, it might be hard to read, the address I had to type in my browser was http://192.168.1.101:8080 (your setup will show most likely a different address).
When you open your web-browser at the given address, first a page will be shown with all kinds of options to view the video feed – and I highly appreciate the amount of options the developer of IP Webcam provides! Anything from your web-browser, VLC Media Player, third party IP Camera Apps, Skype, etc. Very impressive!
In the illustration below (bottom half – 2) I just used my browser (Chrome) by clicking the “Use browser built-in viewer (not supported by some browsers)” link.
IP Webcam in action
In the upper right corner of your Android screen, a button is show called “Actions“. This is where you can stop IP Webcam, refocus the camera, enable the flash led (if your phone has one), etc.
IP Webcam works so well that the App I use on my old iPhone, Live Cams Pro, connected to it without a problem (see also: How to repurpose you old iPhone and there is an article covering this for Android as well).
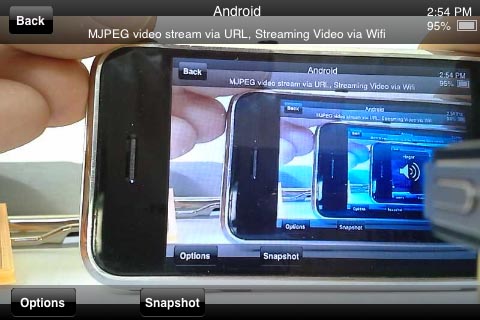
Mobile Apps can see the video feed as well!
Note : The resolution is something you should play with – the higher the resolution of your video, the slower the picture refresh rate will be. But … the resolution can often go beyond what commercial IP camera’s offer and present a much more detailed view of what you are monitoring.
Accessing your new IP camera from the Internet
So you’d like to access your new IP camera’s remotely, meaning outside of the range of your Wifi – for example at work, or when you’re on vacation. This is very well possible, as most smartphones have a fast Internet connection as well (3G, 4G, UMTS, whatever they call it). I have even had success with good old snail slow EDGE.
Before you can access you IP camera from the Internet (including 3G etc.), you’ll do need to do some Port Forwarding and possible need the use of a Dynamic DNS service. Please read the last paragraphs of the “Home Network Basics” article and consult the manual of the IP Camera App you’re using. Some App providers do provide a small tutorial for this as well.
The short version:
1) You need to be able to reach your home network.
Your home network can be reached through it’s public IP Address. This can be problematic, specially when your Public IP Address changes each time you disconnect from the Internet. A service like DynDNS.org however provides the means to work around this problem by linking a web-address (http://www.example.com) to your IP Address and having your modem for example automatically update the Public IP Address information when it changes.
2) Your Android IP Camera needs a fixed IP Address.
Most phones, by default, use DHCP (dynamic IP Address). This is not practical for port forwarding and you’ll have to go into the network settings to set it to a static IP address.
3) Redirect the IP Port(s) to your IP Camera.
To access your home network is one thing. Next you’ll need to tell your modem or router where to direct incoming traffic to. For this purpose we assign an IP Port which will be mapped or forwarded to your new Android based IP Camera.


Comments
There are 4 comments. You can read them below.
You can post your own comments by using the form below, or reply to existing comments by using the "Reply" button.
So I read the article, very informative but you stopped short at setting the DDNS options(no example). I use No-Ip with 4 Foscam cameras, they work well but they have a place in the setup to put in the dns settings where as the IP WEBCAM app is only able to take numbers in the “Port” field, and it’s for local network only. I can view and talk/listen with the phone via my tablet. I would really like to set this phone up for internet access.
Thanks
Mike Beaulieu
Hi Mike,
I intentionally didn’t go into the DDNS options too deep. It can be quite a long topic to just talk about that and accommodate all possible configuration options. However; for your Foscam camera’s you’ve used No-IP, so you are almost “there”.
You will need to pick an external port that you’d like to use for the Android camera, and set your router to forward that port to the camera – this doesn’t need to be the same port for the Internet and your local network (as an example; Internet port 8080 and the camera uses port 80). Most likely you’ve done the same thing for your Foscam camera’s?
hans
Hans I have already done all that, the part I’m having a problem with is that there’s no place inow your app to type in the DDNS settings, ie. myddns. no-ip.org:8086. Where do I enter this info in your app on my old cell phone, or is this just a local network access app? I want to be able to see my camera from anywhere .
Mike Beaulieu
Hi Mike,
Oh I see what you’re saying – sorry for not understanding that right away (only at my first coffee this morning ) …
) …
Well, first off, this is not an app I developed.
Second of all, the trick you’re trying to use requires specific features in the application. Ie. Foscam offers these kind of things off the bat. This application however doesn’t so things have to be done “old school”. This means: in your router, you will need to forward incoming traffic (port 8086 for example) to be rerouted to the phone (port 8080 for Android phone). Since No-IP hopefully already keeps track of your public IP address, this might work right away after applying the port mapping.
ps. The is done in either your router or your modem – depending on your setup. ).
).
If you’re not familiar with this, or you’re not sure how it’s done on your router or modem, the https://portforward.com/ is a great resource (since an entire website is dedicated to the topic, you’ll now see why I didn’t go into the matter any deeper
Hope this helps
hans