Content Overview
About SQLite
SQLite is a small SQL database engine used in more applications than you’d think – you’re probably using SQLite already without even knowing it. Well known companies like Apple, Adobe, Microsoft, Skype, Mozilla, and Google use SQLite for some of their products. Airbus even uses it planes (for more famous users see Well-Known SQLite users).

SQLite
Typical use of SQLite is when you’d like to use an SQL database to store application data without the need to run a large SQL database like for example MySQL (my favorite) or FireBird. Both of these actually have an embedded version as well, but are much more complex to install and use, much more resource hungry and not as widely supported as one would hope.
SQLite can be found on numerous platforms, anything from Android, Apple MacOS X, Apple iOS, Microsoft Windows, Linux, etc.
I did a lot of testing with different database engines, but SQLite is clearly the winner when you’re looking for a tiny single user SQL based database engine available that is available on multiple platforms.
A few things to keep in mind.
First of all, SQLite stores all it’s data in a single file and is intended for single user only – as with most embedded SQL engines. Single User implies that the database file can be opened by one application at a time only.
You also have to keep in mind that, unlike more advanced SQL servers, you manually have to commit changes.
Ad Blocking Detected Please consider disabling your ad blocker for our website.
We rely on these ads to be able to run our website.
You can of course support us in other ways (see Support Us on the left).
Installation or distribution of SQLite with your Lazarus application
SQLite also needs to be installed. Well maybe installed is not the right way to say this as it typically involves one single file that you can include in the distribution of your application.
Getting started however is slightly different for each Operating System – and frankly it took me a while to figure it all out (hence this article).
Getting started with SQLite under MacOS X
MacOS X comes with SQLite pre-installed since Apple uses it for applications like Apple Mail, Safari, etc. so the easiest way, is to use the version of SQLite that can be found on every Mac.
Just drop the TSQLite3Connection component from the SQLdb tab on your main form and that’s all you have to do.
In code I’d add the path to the SQLite library though it may or may not be needed:
1
2
3
4
| procedure TForm1.FormCreate(Sender: TObject);
begin
SQLiteLibraryName:='/usr/lib/libsqlite3.dylib';
end; |
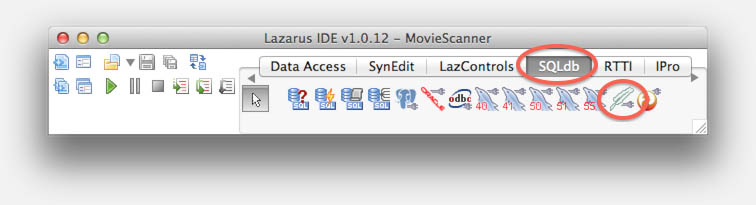
Lazarus MacOS X – Add the TSQLite3Connection to your From
Getting started with SQLite under Linux (Ubuntu/Raspbian)
I have Ubuntu (v12 at the moment) available on a virtual machine and found that the easiest way to follow the following steps. These steps work for Lazarus on Raspberry Pi 2 Model B as well.
On your developer machine (assuming you have Lazarus 1.0.x or newer installed), first install SQLite3 with apt-get.
sudo apt-get install sqlite3 libsqlite3-dev
You’ll now find the SQLite library in the following location: /usr/lib/i386-linux-gnu/libsqlite3.so.0 (Note: for Raspberry Pi 2 model B /usr/lib/arm-linux-gnueabihf/libsqlite3.so.0):
Tip : If you could not find the file there, use the “locate” statement to determine the location of “libsqlite3.so.0”.
The next step, and I’m sure there might be better ways to do this, is to copy the library in your project folder which I always like to do, just to make sure I’m testing with the right library file, and to help me make a distribution zip file later on.
In the example below we have our project files saved in ~/Desktop/MyProject and in this step we will also rename the file to libsqlite3.so .
Finally, we’d like Lazarus to find the library during design time and for that we make a soft link in the /usr/lib/ directory which we will call ‘libsqlite3.so’ as well (it’s what Lazarus will be looking for).
Note : I noticed that in some forums that people mention ‘/usr/lib64’ for 64-bit systems, but I cannot confirm this to be true or not.
Note : libsqlite3.so.0 is actually just a symbolic link to a particular library version, for example libsqlite3.so.0.8.6. Copying it will copy the actual binary, not the link. Also note that the path under Raspbian is different.
1
2
3
4
| cd ~/Desktop/MyProject
cp /usr/lib/i386-linux-gnu/libsqlite3.so.0 ./libsqlite3.so
sudo ln -s /usr/lib/i386-linux-gnu/libsqlite3.so.0 /usr/lib/libsqlite3.so |
Next drop the TSQLite3Connection component from the SQLdb tab on your main form.

Lazarus Linux (Ubuntu) – Add the TSQLite3Connection to your From
Now to make sure that our new application will use the library in our project folder, we will need to tell our application in the onCreate event of the mainform, where to find the library:
1
2
3
4
| procedure TForm1.FormCreate(Sender: TObject);
begin
SQLiteLibraryName:='./libsqlite3.so.0';
end; |
Getting started with SQLite under Windows
Using SQLite3 under Windows is a matter of copying the DLL into your project folder.
You can download the DLL from the SQLite Download Page under Precompiled Binaries for Windows (at the time of writing this article, it’s the second file that starts with ‘sqlite-dll’).
After downloading, unzip the file and copy the sqlite3.dll into your project directory.
For Lazarus to find the DLL at design time, you will need to copy the sqlite3.dll to c:\windows\system as well.
Next drop the TSQLite3Connection component from the SQLdb tab on your main form.

Lazarus Windows – Add the TSQLite3Connection to your From
Now to make sure that our new application will use the library in our project folder, we will need to tell our application in the onCreate event of the mainform, where to find the library:
1
2
3
4
| procedure TForm1.FormCreate(Sender: TObject);
begin
SQLiteLibraryName:='sqlite3.dll';
end; |
If you develop for more than one platform (eg. Windows, Linux, macOS), then you may want to do something like this:
1
2
3
4
5
6
7
8
9
10
11
12
| {$IFDEF UNIX} // Linux
{$IFNDEF DARWIN}
SQLiteDefaultLibrary := 'libsqlite3.so';
{$ENDIF}
{$IFDEF DARWIN}
SQLiteLibraryName:='/usr/lib/libsqlite3.dylib';
{$ENDIF}
{$ENDIF}
{$IFDEF WINDOWS} // Windows
SQLiteDefaultLibrary := 'sqlite3.dll';
{$ENDIF} |
Your Database file …
As mentioned before: SQLite uses a single file for an entire database. When you start your project however, you will most likely not have that file yet …
The cool part of using SQLite with the TSQLite3Connection is that when you connect to a database file (with SQLite3Connection.Open; ), and the file doesn’t exist, then SQLite will create one for you.
It’s an empty database of course, but it’s there.
You can populate the empty database with SQLite3Connection.ExecuteDirect(SQLStatements); or with the help of some tools.
There are several ways and tools to get your database populated with tables and such. An overview of available tools can be found on the SQLite Management Tools Page.
Quite a few of these tools are commercial or only useful under Windows, but some offer a trial or freeware version.
Valentina Studio is a pretty darn good editor for SQLite (and others) and is available for MacOS X, Linux and Windows in either a freeware version or a commercial version. If I could find a downside then it would be that the SQL generated in the visual designer cannot be copied with the current freeware version.
You can download it from the Valentina Studio Homepage or additionally for Mac users in the Mac App Store.
Once installed, Valentina will offer a free serial number after registration (also free).
Getting started
My preferred process might not be your preferred process … to each it’s own. My process usually involves the following steps:
- Determine data needs and table design.
- Create a SQLite database using Valentina.
- Create tables (based on step 1, in the database of step 2).
- Develop Lazarus application – possibly modify your database if needed.
- Dump SQL statements to create tables.
- Add the table creation statements to my application so it can create tables if the database file is missing.
Step 1 – Determine Data need
This step should be pretty obvious: designing tables based on the expected data need of your to build application.
My first design will typically be a rough one, which I fine tune as development of an application moves forward.
Step 2 – Create Database and Tables.
I usually do in Valentina Studio.
After downloading, installing and registrating of Valentina Studio, click in the menu “File” “New Database” and choose “SQLite files” from the popup window and click “OK“. A new window will open allowing you to enter the desired filename and file location.
All pretty obvious steps, but it can happen that Valentina complains that you’re trying to create a database file in a not legit location. Valentina limits where you can store your database file, but when you click “Edit Preferences” you can simply add your project folder as a “legit” location.
Once you have you database created, you can start creating tables.
Step 3 – Development of your application
The development of your application, will require that you close Valentina – after all, SQLite is a single user database engine and therefor we cannot have your application and Valentina connected to the database at the same time.
This will also be the case when you have your connection active in your form during design time.
Before running your new application make sure to set the “Connected” property of the TSQLite3Connection to “FALSE“.
This also means that your application will have to re-enable the connection when it starts, which can be done for example in the onCreate event of your mainform. See previous informtion when it comes to setting the SQLiteLibraryName – which is needed under Linux and Windows, but can be omitted under MacOS X.
1
2
3
4
5
| procedure TForm1.FormCreate(Sender: TObject);
begin
SQLiteLibraryName:='sqlite3.dll';
SQLite3Connection1.Open;
end; |
Now that we have our connection ready we need to add a TSQLTransaction component to our form as well (also found onder the SQLdb component tab) and connect it to the TSQLite3Connection component by setting it’s “Database” property to the TSQLite3Connection we added earlier.
Now we can do the usual adding of the usual Queries and Tables (all use the TSQLQuery component) – you will, even for tables, have to enter the proper query to retrieve data in the “SQL” property of the TSQLQuery component. For a simple table for example:
SELECT * FROM movies ORDER BY filename;
Don’t forget that for data-aware components you’ll also need to add TDataSource for each query that will be accessed through these data-aware components. TDataSource can be found under the “Data Access” component tab.
Step 4 – Dump SQL for database
In this step your application should already be good to go.
I always like to have the application create it’s database when it’s missing and for this I need all SQL statements to create tables etc. Valentina is very helpful here: Right click the database in Valentina and choose “Create Dump” from the popup menu.
In the upcoming window select “SQL” as the “Dump kind“, and click “Next“.
In the next window select “Structure only“, or “Structure and Records” if you need the data as well, and click “Next“.
In the following window I usually make sure that NOTHING is selected and click “Next“.
Finally we get a window where we can enter filename and destination of the SQL dump.
The resulting SQL code can now be opened with a simple text editor so you can copy it and paste it into your Lazarus Pascal code.
Step 5 – Code to create missing databases
Again, I’m not worlds best developer, but this is what I usually do.
First I create a procedure that will handle all this. Let’s call it “StartDatabase“.
In this procedure we will first set the SQLite library (if needed).
After that we will determine if the database file already exists and store our findings in a boolean (createTables in our example).
If the folder for the database file does not exist, then we will create it now.
Next we will open the database connection, well knowing that the database will be totally empty if the file didn’t exist before.
Once we opened the database connection, and the file didn’t exist before, tables etc. must be created before our TSQLQuery components (for example) access the tables. For the execution of these SQL statements we use the TSQLite3Connection.ExecuteDirect() function so we do not need additional components to run the queries.
Database Location
You’re free to determine where the database file of your application should be. However, keeping cross platform development in mind, you should be aware of some limitations.
MacOS X for example will typically not allow you to store your data in the same directory where the application is installed – which has to do with access rights and security.
Locations, like where temporary files are stored, are not consistent either even on the same platform (Windows likes temp locations all over the place, depending on your Windows version).
Lazarus offers a cross platform “AppConfigDir” – this is also the location where for example INI files and registry data are stored.
Personally I think this is not a bad location for your database and the function GetAppConfigDir() helps you do that cross platform.
Find below example code how this can be done. I’m using a simple table for managing movies as an illustration.
The procedure “StartDatabase” is the first thing I’d call from the form’s onCreate event. After this procedure has been completed, I open the TQSLQuery component(s) and other database related components if needed.
The database file in this example is located in the application configuration folder by using GetAppConfiDir() – the parameter “false” indicates that it’s not a global config directory but only for this application. Of course the file needs a name, ‘mydatabase.db’ in this case.
Under MacOS X this folder can be found in your home directory, for example: ~/.config/MyProject/mydatabase.db
Under Windows XP this would be: C:\Documents and Settings\<username>\Local Settings\Application Data\MyProject\mydatabase.db
1
2
3
4
5
6
7
8
9
10
11
12
13
14
15
16
17
18
19
20
21
22
23
24
25
26
27
28
29
30
31
32
33
34
35
36
37
38
39
40
41
42
| procedure TForm1.StartDatabase;
var createTables:boolean;
begin
{$IFDEF UNIX} // Linux
{$IFNDEF DARWIN}
SQLiteLibraryName := './libsqlite3.so';
{$ENDIF}
{$ENDIF}
{$IFDEF WINDOWS} // Windows
SQLiteLibraryName := 'sqlite3.dll';
{$ENDIF}
SQLite3Connection.DatabaseName:=GetAppConfigDir(false) + 'mydatabase.db';
if not DirectoryExists(GetAppConfigDir(false)) then // Check if config directory exists
MkDir(GetAppConfigDir(false)); // if not: create it
createTables := not FileExists(SQLite3Connection.DatabaseName); // no file = create new tables
SQLite3Connection.Open;
SQLTransaction1.Active:=true;
if createTables then
begin
SQLite3Connection.ExecuteDirect('CREATE TABLE "movies"('+
' "bitrate" Numeric,'+
' "duration" DateTime,'+
' "fileextension" Text,'+
' "filename" Text NOT NULL,'+
' "filesize" Numeric,'+
' "filesizetext" Text,'+
' "format_long" Text,'+
' "id" Integer NOT NULL PRIMARY KEY AUTOINCREMENT,'+
' "path" Text);');
SQLite3Connection.ExecuteDirect('CREATE INDEX "movies_filename_idx" ON "movies"( "filename" );');
SQLite3Connection.ExecuteDirect('CREATE UNIQUE INDEX "movies_id_idx" ON "movies"( "id" );');
SQLTransaction1.Commit;
end;
end; |
As you can see: once you know how it’s done, using SQLite isn’t all that hard – even cross platform.
Ad Blocking Detected Please consider disabling your ad blocker for our website.
We rely on these ads to be able to run our website.
You can of course support us in other ways (see Support Us on the left).
Tips and Tricks
As I have worked more with SQLite under Lazarus, I have tips and tricks, of issues that seem impossible to fix, which I’d like to share here.
A TEXT field shows a (memo) in a DBGrid
Sometimes, a text field of a database table or query will be interpreted as a ftMemo blob, and the grid will show “(memo)” instead of the actual text. Quite annoying at times and I’m still surprised that this happens to remain unaddressed in both Lazarus and Delphi … Anyhoo .. how do we fix this?
Option 1 (best) – Modify your SQL Query
Now this option has the intend to make the “Memo Blob” look like a regular string. We can do this with a simply type cast.
Note : this might be slightly different, depending on your SQL Database. I have used this with SQLite, and MySQL, and heard it works in PostgreSQL as well.
Say your query is something like this:
1
2
3
4
5
| SELECT
"Filename",
"Date"
FROM
"mytable"; |
And let’s assume “Filename” is the offending field.
Now (make sure to remove the fields from the TQuery component!) change your query by casting the TEXT as a VARCHAR like so:
1
2
3
4
5
| SELECT
CAST( "Filename" AS VARCHAR) AS "Filename",
"Date"
FROM
"mytable"; |
You will now see that the actual text is being displayed and not the “(memo)” text.
Option 2 (when option 1 fails) – OnGetText Event
This works only at Runtime, and takes a little bit more work.
First we need to add fields to our TQuery.
Right click the TQuery and select “Edit Fields”.
In the upcoming window click the “+” button to at least add the field that shows as “(memo)”.
Now click the newly added field. You’ll see that a TMemoField has been added in the object inspector.
Click the “Events” tab in the object inspector and double click the “OnGetText” event.
Now add this code to the event handler (assuming: TQuery = qrySomeQuery, fieldname = “SomeField”, which creates the TMemoField called “qrySomeQuerySomeField”):
1
2
| aText := Sender.AsString;
DisplayText:=true; |
So we get something like this, which now makes (at runtime) show the actual text instead if (memo):
1
2
3
4
5
| procedure TForm1.qrySomeQuerySomeFieldGetText(Sender: TField; var aText: string; DisplayText: Boolean);
begin
aText := Sender.AsString;
DisplayText:=true;
end; |
Resetting Auto Increment Fields
When flushing tables in SQLite, or removing a lot of records, you might want to reset the auto increment fields counter (1 or the next available unused number).
The following SQL statement does this for ALL tables (yes: it’s safe to do this, records of your tables will not be deleted or modified!):
1
| DELETE FROM sqlite_sequence; |
Or like so for a specific table:
1
| DELETE FROM sqlite_sequence WHERE name='your_table'; |
Compact (Vacuum) your Database file
This one proved pretty tricky – cleaning up and compacting your database at runtime, but a just slightly modified trick that I found in the Lazarus Forum makes it possible.
Normally you’d see an error message (Cannot vacuum from within a transaction) when trying to execute the “VACUUM” statement through a TSQLQuery component.
First add the unit “sqlite3ds” to your “Uses” clause.
Next add and call this procedure in your code.
It will take the name of your existing TSQLite3Connection (assuming you use only one – which is pretty common with SQLite), close the connection, vacuum (compact) your database, and restore the TSQLite3Connection if it was open when you called this function.
1
2
3
4
5
6
7
8
9
10
11
12
13
14
15
16
17
| procedure TForm1.SQLiteVacuum(db:TSQLite3Connection);
var tmpDataset : TSqlite3Dataset;
wasConnected : boolean;
begin
wasConnected := db.Connected;
db.Close;
repeat
until not db.Connected;
tmpDataset := TSqlite3Dataset.Create(nil);
tmpDataset.FileName:=db.DatabaseName;
tmpDataset.ExecSQL('VACUUM;');
tmpDataset.Free;
db.Connected:=wasConnected;
end; |
Order Text as Numbers
When trying to sort text as number in SQLite, you’ll run into some issues where it does not sort numerical.
With a little trick we can order text numerically, for fields with numbers in it.
In my example, I had a field “video_mode” with values like “480p”, “720p”, “1080p” and “2160p”.
The normal sorting by using “ORDER BY video_mode” will fail and result in:
1080p
2160p
480p
720p
Not exactly numerical (a.k.a. “natural”), or at least not the way we expected it ….
If we add a CAST to INTEGER (in the ORDER BY) however, we DO get numerical sorting, even if there is text in the field:
ORDER BY CAST(video_mode AS INTEGER)
or
ORDER BY CAST(video_mode AS DECIMAL)
The result is the desired order:
480p
720p
1080p
2160p
Sort Text, Case Insensitive
When you do a ORDER BY on a field, say “title”, which has for example the following values,
title
-----
 c
 a
 D
 Z
 B
 X
then with:
SELECT … ORDER BY title ASC;
You’ll get:
 B
 D
 X
 Z
 a
 c
To sort this case insensitive use:
SELECT … ORDER BY title COLLATE NOCASE ASC;
and you’ll get the right order:
 a
 B
 c
 D
 X
 Z
Additional Resources
Some additional resources that might prove useful if you’re starting to dig into Lazarus and SQLite:


Comments
There are 20 comments. You can read them below.
You can post your own comments by using the form below, or reply to existing comments by using the "Reply" button.
Thanks for a concise and complete explanation that works.
Henry
You’re welcome Henry – thanks for the positive feedback, it’s always appreciated!
hans
Your statement:
“Single User implies that the database file can be opened by one application at a time only.”
is NOT correct – see
http://www.sqlite.org/faq.html#q5
Kai
Thanks for pointing that out … reading the database appears possible by multiple apps/users ….
I did not know that.
Writing/Changing data however is not an option (from your link).
“Multiple processes can have the same database open at the same time. Multiple processes can be doing a SELECT at the same time. But only one process can be making changes to the database at any moment in time, however.“
You will also notice that most applications refuse to connect when another app is connected to a database …. like some of the SQLite Database Managers.
hans
Thank you for the most lucid explanation on how to get started with SQLite and Lazarus. It’s too bad thee are so many confusing web sites on this topic. Yours is GREAT.
Bob Richardson
Thanks Bob!
Yeah, I ran into the same issue – other articles and sources of information were too cryptic, incomplete, assumed a lot of pre-knowledge etc … glad to hear that the article proved helpful for you as well … thank you for taking the effort of letting me know
hans
Hi!
I managed to install Lazarus on Raspberry Pi 2 as you instructed on the other post, so many thanks for that!
Now I’m trying to install the SQLite3Laz 0.4 (or what it’s called) package, but I keep getting an error that says
Do you know how I can install this on RPi2?
I have tried to increase the Swap File size to 2000 (!) but it doesn’t work.
Also, the path
does not exist on RPi2.
Thanks!
aidv
Hi Aidv!
First thing I noticed: the path you mention would be for the wrong target (we need ARM or ARMHF instead of i386 instead).
Anyhow, the steps I followed are:
To install SQLite 3, from a shell:
Next step was to start Lazarus and install the package
Do not install any other SQLite packages – I’ve noticed that they might conflict.
Next click “Save and Rebuild IDE” – this will take a while as you might have noticed. This, as you can guess, worked fine in my setup.
Note that “libsqlite3.so” can now be found int “/usr/lib/arm-linux-gnueabihf”.
Just to test if it worked well, I dropped a SQLite3DataSet on a new form and it ran just fine (obviously, you’ll always see that, haha).
hans
Haha yeah…
I’m sorry Hans but I still get the same messages, it is the line
lazarus.pp(96,31) Warning: Object sqlitecompstrings.o not found, Linking may fail !
that is bugging me out.
A ” .o ” file is created when compiling something (according to Lazarus wiki).
The file “sqlitecompstrings.pas” exists but not the file “sqlitecompstrings.o”.
It just won’t work.
Btw I’m logged in as Pi, if thats of any importance haha
aidv
Ok it works now, I reverted my SD card back to a backup that I made right after I successfully installed Lazarus, and then followed your instruction in the comment you replied with, and now it works.
Why not make a new post which instructs how to install SQLite3 on RPi2? That would help people.
Thanks.
aidv
Hi Aidv!
Glad to hear it worked!
I could add the instructions to this article and to the RPI Lazarus article .
.
hans
Alright that would be awesome :D
Once again, Thank you so much!
aidv
I’ve modified the text in this article – seems the appropriate place to put it.
Writing an article just for this seems a bit too small .
.
hans
Awesome, great work!
Just a note: the “locate” is not preinstalled on raspbian, I had to install it but I don’t quite remember where I found the install instructions for it.
aidv
Thanks Aidv!
I did not know that (I had not needed it to this point).
Installing “locate”:
hans
First,
THANK YOU!
This has helped me complete a project at work for a custom display system.
My question is about installing new packages. I have tried to add the packages for a sqlite database but I am receiving errors when I recompile the IDE. I get:
/home/pi/.lazarus/units/arm-linux/gtk2/packagelinks.o:error adding symobls: Bad value
lazarus.pp(140,42) Error:Error while linking.
Any help would be appreciated,
Thanks again.
Daren
Hi Daren,
Thanks for the compliment and you’re most welcome!
I’ve never seen this error – even when I compiled the same package.
Doing some searching on the Internet, I did not find a good answer either.
Some say it might be related to the compiler parameters. It could also be that the package was compiled with different compiler parameters. But I’ll admit that all this is me guessing based on what I have read on the Lazarus Forums and it might not be very helpful …
Unfortunately, as I’m in the middle of a move, I do not have my Raspberry Pi available to do some tests.
I hope to be able to dig it up out of my stuff one of these days, and I’ll give it a try then – unless you found a solution in the meanwhile.
hans
UPDATE:
Added a few tips and tricks …
hans
Thank you for this very didactic article.
Eric_69
Eric_69
Hi Eric_69!
Thank you very much for taking the time to post a compliment – it’s much appreciated!
hans