MySQL Export and Import Data
A typically Export and Import of data, from one or more databases, is typically done with a large dump. This dump is a text file with all the needed SQL statements to re-import the data.
There are a few criteria to look at:
- The amount of data you’d like to Export/Import
- The destination of the export file (local or download)
- Speed (time it takes to export/import)
- Availability of tools (ie. phpMyAdmin, shell access, TCP/IP connection, etc.)
The methods/tools we’re looking at are:
- Command-line (mysqldump)
- MySQL WorkBench
- phpMyAdmin
And the winner is …
From my experience: MySQL WorkBench is the winner.
It’s easy to use, free, fast, and robust enough to do large database backups without any issues.
I did a rather large export with all 3 methods of the same databases and clocked them with a stopwatch where needed, the results:
Speed Comparison
| Application |
Export |
Import |
| Command line (mysqldump) |
52 sec. |
420 sec. |
| MySQL WorkBench |
57 sec. |
418 sec. |
| phpMyAdmin* |
>300 sec. |
>300 sec. |
Notes:
- MySQL WorkBench internally uses MySQLDump over TCP/IP.
- MySQL WorkBench and phpMyAdmin depend on network speed and were done over a local wired 1Gb network connection.
- phpMyAdmin failed both import and export due to PHP time-out, even with the “partial” option enabled.
- The export for all methods, as described here, result in one large SQL file.
- Interesting to see that Command-line and MySQL Workbench are very close when it comes to speed.
Obviously I didn’t benchmark it perfectly, so consider this just an indicator.
MySQL Export and Import Data from the Command-line
The more seasoned MySQL Database Admin will probably prefer using the command-line, but there are other options that might be easier unless a more advanced level of control is needed.
The advantage of a dump like this, from SSH/Command-line, are speed (everything remains local), full control and capable of handling pretty much any amount of data.
When to use the Command-line for Export/Import …
- Ideal for very large database(s)
- Need for advanced control
- No Web or TCP/IP access to MySQL
- Fast data export or import
- Shell or SSH access is available
Export Data from Command-line
For the export of data, we will use the “mysqldump” command, which you’ll have to locate first. I usually use:
1
2
| cd /
find -name mysqldump |
Which, on a QNAP, results in: ./mnt/ext/opt/mysql/bin/mysqldump
Use cd /mnt/ext/opt/mysql/bin/ to go there.
The proper format to execute mysqldump for a single database:
./mysqldump -u [username] -p [database_name] > [dumpfilename.sql]
“-u” is to provide the username, “-p” indicates that mysqldump needs to prompt for the password and “> [dumpfilename.sql]” redirects the output to the file.
The example below tries to login as root, prompts for a password and dumps the “test” database to the “test.sql” file:
1
| ./mysqldump -u root -p test > test.sql |
To dump multiple databases we need to add the “–databases” option. In the example below we dump the databases “test”, “information_schema” and “mysql” to the file “dump.sql”:
./mysqldump -u root -p --databases test information_schema mysql > dump.sql
To dump all database, use:
./mysqldump -u root -p --all-databases > alldatabases.sql
TRIGGER DEFINER problems …?
I’m sure there are more “issues” you can run into, but this happened to be one I ran into. It seemed that I had a few triggers on my XBMC databases, defined by the wrong (non-existing) user.
To fix this you will have to drop the trigger and recreate it, for example with the DEFINER as “root@localhost”.
This is easiest done in phpMyAdmin, where you can edit the trigger and phpMyAdmin will recreate the trigger automatically. Select the database and click the “Triggers” tab. Each trigger will now be shown with an “edit” button so you can change the DEFINER.
LOCK TABLES Error and InnoDB …?
It seems that when you’re using InnoDB as an engine, that you might run into this error:
Got error: 1449: The user specified as a definer ('...') does not exist when using LOCK TABLES .
To fix that issue, add the options --single-transaction --quick to the mysqldump statement.
Import Data from Command-line
A downside of using the command line on different servers is of course: how do I get my SQL dump to the other server. Ideally this can be done with tools like WinSCP, ForkLift or Filezilla, but you could also simply dump the file on a share that you can access from the shell.
Importing from the command line is relatively easy and follows the following command-line format:
./mysql -u [username] -p [database_name] < [dumpfilename.sql]
This uses “mysql”, where “-u” defines the username, “-p” will make it prompt for your password, optionally you can enter the database_name and “< dumpfilename.sql” will take the file “dumpfilename.sql” as input.
In our examples, we want to import multiple databases and in our exports the SQL statement to create a database, if needed, is included. So we do not have to add the “database_name” parameter for our examples.
As shown with the “mysqldump” example, we will first need to find where “mysql” is located on our server.
This executable is located in the same directory as where we found “mysqldump”, but if you need to look for it try:
On a QNAP this will result in:
1
2
3
4
5
| ./mnt/ext/opt/mysql
./mnt/ext/opt/mysql/share/mysql
./mnt/ext/opt/mysql/include/mysql
./mnt/ext/opt/mysql/bin/mysql
./mnt/ext/opt/mysql/lib/mysql |
Line 4 (highlighted) is the one we need – identified by the “/bin/” part.
Other Linux setups will return something similar, with possibly minor differences in the path.
An example of the import I did:
./mysql -u root -p < datadump.sql
MySQL Export and Import Data with phpMyAdmin
phpMyAdmin, a free web-based MySQL admin tool, quite commonly used specially with Web-Servers, can be a great tool.
One of the advantages is of course that you don’t need to access the command line and you can do your DBA tasks through a web-interface on any platform for a server located anywhere in the world.
phpMyAdmin is also very easy to use, and you do not need to memorize all specific SQL statements for tasks.
When to use phpMyAdmin for Export/Import …
- Great for quick and small exports/imports
- No need for advanced control
- Remote access through web-interface
- User friendly web-interface
- No TCP/IP connection to MySQL available
- No Shell or SSH access
Export Data with phpMyAdmin
Exporting large amounts of data is not a strong-suit of phpMyAdmin, for which we cannot really blame phpMyAdmin. I found that the problem is typically the time out limitation of your PHP setup.
Export is in phpMyAdmin is straight forward.
For a single database, simply select the desired database on the left and click the “Export” tab on the top after te page reloaded.
Select “Custom” if you need additional settings (like CREATE DATABASE), or “Quick” if you want a simple dump, and click “Go“.
The file will be downloaded to your computer.
For multiple databases, click the “Home” icon of phpMyAdmin. Once the page reloaded click the “Export” tab.
By default it will export ALL databases – click “Custom” if you’d only like to export a selection of databases.
When exporting databases you could consider checking the “Add CREATE DATABASE / USE statement” option.
Click “Go” when you’re ready to get the export file …
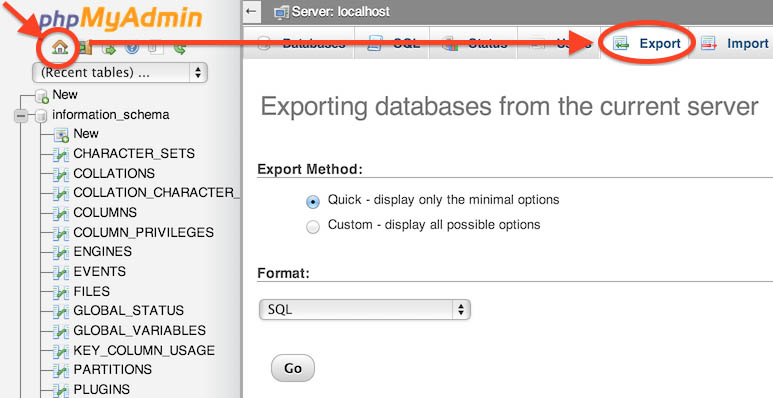
phpMyAdmin – Export Multiple Databases
Import Data with phpMyAdmin
Import in phpMyAdmin is straight forward as well, and here you might run into time-out issues as well when importing large amounts of data.
Click the “Home” icon and once the page reloaded click the “Import” tab.
Next select the file your previously exported by clicking the “Choose File” button (the way this button looks depends on your browser – the example below is done in Google Chrome).
Once you selected the desired file, make sure the “Format” drop-down is set to “SQL“.
Depending on your phpMyAdmin version, the option “Partial import” can be checked. This option will try to “fix” any PHP time-out issues, but I have to admit that I haven’t seen it work when I tried my imports.
Click “Go” to start the import.
Import through phpMyAdmin can be VERY slow, so be very patient and do not leave the page … just leave your browser open until phpMyAdmin tells you the import was completed.

phpMyAdmin – Import one or more Databases
MySQL Export and Import Data with MySQL WorkBench
MySQL WorkBench is a free MySQL admin tool that can be downloaded for several Linux versions, MacOS X and Windows. You can find the version for your platform at the MySQL WorkBench Download Page.
When to use MySQL WorkBench for Export/Import …
- Ideal for very large database(s)
- No need for very advanced control
- Easy to use GUI
- TCP/IP connect to MySQL is available
- No Shell or SSH access
Note that besides MySQL WorkBench, plenty other tools can be found that work in a similar fashion. One of my favorites, unfortunately only available on the Windows platform and not free, is EMS SQL Manager for MySQL.
Note that quite a few third party managers come with visual query designers, which can cut down the time you spend on writing SQL queries. I often use it for creating the base of more complex queries.
After installing MySQL WorkBench, you will need to setup a connection to your server. Keep in mind that typically the “root” user doesn’t have access over a TCP/IP connection, you will need to either create a user who can or modify the access for the “root” user.
The latter cannot be recommended but if you’re not storing any sensitive information, you could consider setting the access rights for “root” only for your local network. For example: if your network is 192.168.1.xxx based then you could enter “192.168.1.%”.
Once you have a working connection, open it.
Export Data with MySQL WorkBench
On your left hand side you’ll see the “Data Export” option under the “MANAGEMENT” heading. Click it.
Now on your right hand side you’ll see a list of available databases, check the ones you’d like to export.
Check the option (bottom part) called “Export to Self-Contained File” and set the filename you’d like to use for the export, and click “Start Export“. This will create a single file with SQL statements to rebuild the database(s), table(s) and record(s).
Note : MySQL WorkBench also has the option to export to a directory where for each table a file is created. Importing these files with the other methods can be cumbersome as you have to do them one at a time. Importing with MySQL WorkBench however works fine with this method of course.
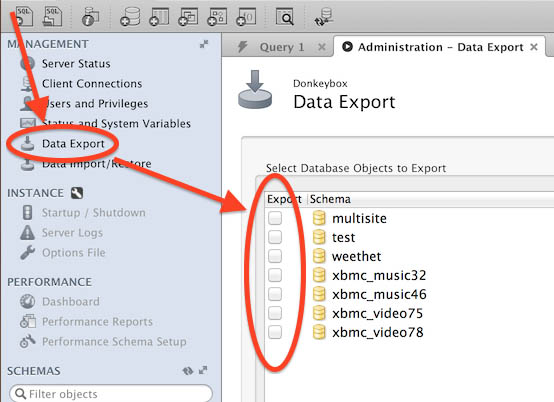
MySQL WorkBench – Export one or more Databases
LOCK TABLES Error and InnoDB …?
It seems that when you’re using InnoDB as an engine, that you might run into this error:
Got error: 1449: The user specified as a definer ('...') does not exist when using LOCK TABLES .
To fix that issue, click the “Advanced Options…” button and uncheck the “local-tables” option under “Other“.
Import Data with MySQL WorkBench
Once you’ve opened the connection, click “Data Import/Restore“, check “Import from Self-Contained File” and select the export you did earlier on and click “Start Import“.
After that it’s a matter of patience, depending on the amount of data, speed of your network connection and the speed of your server.
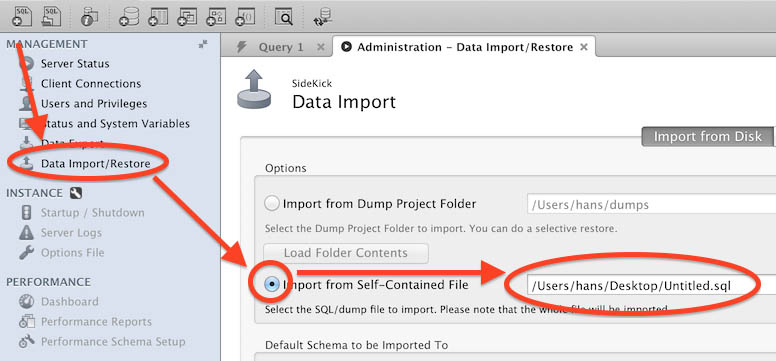
MySQL WorkBench – Import


Comments
There are 2 comments. You can read them below.
You can post your own comments by using the form below, or reply to existing comments by using the "Reply" button.
Great that you added this article – I was doing the replication trick in that other article, and this helped doing the first replication step.
Keep up the good work!
John
Thanks John!
It’s always appreciated when people post a positive “Thank you” message here!
hans