How to add a second harddisk or SSD to your MacBook Pro …
A while ago I replaced the harddisk in my Mid 2010 15″ MacBook Pro with a nice 160Gb Intel SSD. However, having both MacOS X and Bootcamp with Windows 7 installed – as you can guess – makes 160Gb eventually rather small. But getting one of those much bigger SSD’s is kind-a painful for my wallet, specially since I had a similar 160Gb Intel SSD spare laying around (long story).
But how do I get 2 harddisks in my MacBook Pro?
Fitting a second harddisk …?
The first problem I ran into was physical space. It’s a laptop and as usual, a laptop does not have spare space, let alone for a 2.5″ drive. The second problem is that, unlike a desktop main-board, laptop main-boards do not have an abundance of SATA connectors either. So how can we resolve these 2 issues?
Well, there really is no easy solution, except when you’re willing to sacrifice your optical drive (DVD drive) – which for most people shouldn’t be a big problem. Count the times that you really used you CD/DVD drive … I counted two occurrences in the past year. One to burn a XBMC live DVD and once to install my MacBook Pro completely from scratch from my original MacOS X 10.6 DVDs. Nothing an external USB DVD drive couldn’t handle …
To go this route, you will need an adapter to make a 2.5″ harddisk fit the optical drive bay, I did find one on Amazon .
.
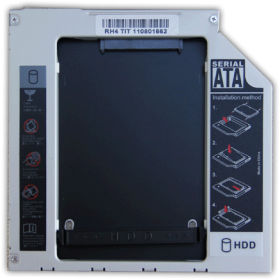
2nd SATA HDD drive adapter
You will have to pay attention here – some of the older MacBook Pro’s appear to have a PATA (classic IDE/ATA) connector and those will not work with a SATA disk. If you have a MacBook pro like I do (15″ mid 2010 MacBook Pro a.k.a. MacBookPro6,2) then this guide will work without even having to think. Newer models, and I believe any of the unibody models, will be equally easy to convert. For older models you’ll have to do some homework to figure out if the optical drive is actually using SATA. This link will help you identify the MacBook Pro model you have …
The choice of drive is completely up to you. I really like speed, so I went with another 160Gb Intel SSD (probably not for everybody’s budget), but if you’re planning to just use it for massive storage then a regular 2.5″ harddrive as well offering more storage capacity at a much lower price. Note that when you’re using two identical (size) drives then you could consider a RAID-0 setup which will be wicked fast, specially when using SSD drives. Read this article for more details on how to get RAID-0 going in a setup like this – be aware though that although wicked fast, if one disk fails: all your data will be gone … (RAID-0 writes data split to both disks – which makes it so fast).
Tools we need
Well, let’s see, this process took me about 5 minutes and I only used;
- An old towel to work on and prevent scratches …
- A Philips screw driver No. 0
- One harddrive adapter for an optical bay (I used this one from Amazon) as displayed earlier.
- A 2.5″ harddrive or SSD drive.
Opening your MacBook Pro
I absolutely LOVE Apple hardware, not just for the look, more so for the art of how they build their hardware.
[RANT] I have taking plenty laptops and dekstops apart and Apple’s laptops (specifically the unibody models) and desktops (love the Mac Pro!) win by a mile from regular PC hardware. People claiming that Apple charges a “premium” price probably never owned an Apple computer, and should realize it is because you buy real quality hardware, superior to any of its plastic counter parts in Windows world.[/RANT]
Anyhow … I side tracked a little there …
Opening your MacBook Pro is EASY … flip your MacBook Pro upside down and remove the screws as show below (from Apple’s website). Mind that all screws are very small with the exception of the 3 long ones (as indicated below):
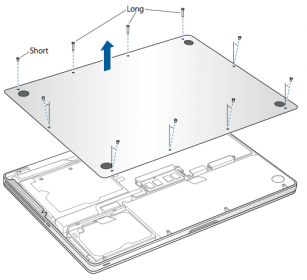
Opening your MacBook Pro
Removing the optical drive
Removing the optical isn’t difficult but requires finesse. First gently disconnect the flat-cable marked A in the picture below by gently lifting it – you’ll notice it pop out of it’s socket without the need for any force. You only need to disconnect one side – the end that is closest to the fan (where the arrow is pointing to).
Once disconnected remove the screws indicated by the B arrows. You’ll notice that you can no gently lift the black plastic piece where the cable go to. Don’t force it, don’t try to completely remove it (it’s not needed).
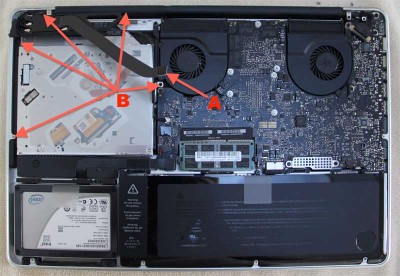
Remove the cable (A) and screws (B)
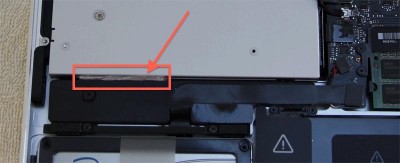
Once the screws have been removed you can slowly lift the optical drive, start by gently lifting the lower side up (in the picture blow; indicated with arrow A). Once you lifted it a little bit, you can disconnect the SATA connector and gently slide the entire drive out in the direction indicated by arrow B.
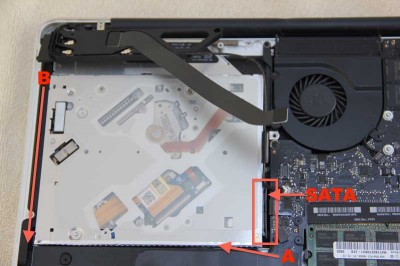
SATA connector and slide direction
Mounting and installing the harddrive
Once the drive has been removed, compare it with the drive adapter. You will notice that two things are different. One is the two screw holes of the screws you earlier removed near the slot where you’d normally would insert a DVD or CD – not a big deal, so we will just ignore it. Second difference is a little metal piece that holds the drive in place as well as show in the image below. Remove the metal piece from the original drive and screw it on the adapter:

The missing metal piece …
Next we have to place the harddrive or SSD drive in the adapter, which is pretty straight forward. Don’t forget the black plastic part to “lock” the drive in, and the 2 screws at the bottom to secure the drive as much as we can.
Once the disk is mounted in the adapter, slide the adapter in the place where the original optical drive was located by sliding it in in the reverse order – don’t forget to connect the SATA cable while placing the adapter. Also not that you’ll have only one screw to mount the adapter (the missing metal piece). After placing the drive I noticed a little wiggle space so I shoved some plastic (I actually rolled up the little zip-lock bag in which the screws from the adapter came) next to the adapter to make it fit snug, as shown below. Yeah, I know, it’s maybe half-assed, but it works.
Make the adapter fit snug …
Now you have to place the black plastic (top) back and reconnect the black flat cable (gently place it on the connector and gently push it on it until you feel a gently click). After that – and verifying that you didn’t forget anything – time to put the back of the MacBook Pro. Remember the long and short screws we found when we took the back off (take a look at the image in the beginning of this article).
Finishing up …
Well, now it’s time for a first boot with your new disk drive … you might need the Disk Utility (Applications → Utilities → Disk Utility) to partition and format your drive … and that’s all there is to it.
Next you can start moving stuff to the new drive, for example your download folder, or your virtual machines (if you use VMWare Fusion or Parallel’s Desktop), or your photo/movie/music collection, or even move your BootCamp over to the second drive.
The original optical drive … well you can store it or consider finding an enclosure so you can still use it as an external USB drive.


Comments
There are 2 comments. You can read them below.
You can post your own comments by using the form below, or reply to existing comments by using the "Reply" button.
I did the same, and put in a 1 Tb drive on the optical SATA position. However I cannot seem to backup the drive now to a USB drive. It gets about 5 Gb done then just stops the copying process. I have to reboot to get copying again. Very frustrating.
Chris Spitzer
That must be frustrating indeed – it could be that the 1Tb drive is pulling to much power (mA) for the computer to keep up.
Would you be able to use a smaller drive for testing purposes?
hans