After building my own Ambient Light for my TV (Boblight project), several users asked how to control the light intensity of the LEDs based on the ambient light.
So the LEDs should be brighter during the day, and more dimm at night.
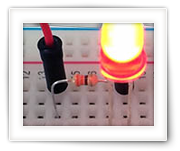
This brought me to explore the use of different light sensors on an Arduino, where the cheapest and most common one is a so called LDR (Light Dependent Resistor). An LDR decreases in it’s resistance as light increases.
Looking at what I could find online, I did find that there is enough information available when using an Analog pin of the Arduino. In this article however, we will also look at using a Digital pin to read an ON/OFF state. So in this article I’ll show you some of the basics on how to use an LDR with your Arduino.
In this article I’ll discuss both options.
Ad Blocking Detected Please consider disabling your ad blocker for our website.
We rely on these ads to be able to run our website.
You can of course support us in other ways (see Support Us on the left).
In one of my current projects, I’d like to use a few motion or proximity sensors, also known as PIR sensors.
PIR sensors, or Passive Infra Red sensors, can be great for Arduino and Raspberry Pi projects, and can be bought really cheap – I only paid about a dollar per sensors in bundle of 10 PIR sensors from eBay, but you can get them really cheap at places like Amazon or AliExpress as well.
In this short article we will see how we these sensors work, how the can be used, how we can test them, and possible fine tine them a little bit.
No Arduino, Raspberry Pi or anything like that is needed. Just a PIR, a LED, a battery and a resistor.
In a previous article, I demonstrated how to use “Data Pull” to read sensor data over a computer network using an Arduino ENC28J60 Ethernet shield/module and some sensors (DS18B20 for example). In this article we will do the opposite: Data Push.
This means that we will make the Arduino send data to our server, which stored the results in a database. For this we will use an Apache, MySQL and PHP setup, which can be a full-size web-server or an easy to install “WAMPServer” setup on your desktop or laptop computer.
Some basic experience with PHP and web-servers will be helpful when working your way through this article.
Playing with the Arduino is definitely fun, specially when you start looking into fun little add-ons like the Arduino ENC28J60 Ethernet shield/module we will looked.
Now sending a “Hello World!” message might be cool, but it’s hardly functional and since the Arduino is great with all kinds of sensors (like the DS18B20 temperature sensor), why not combine the two to retrieve Arduino Data over a network connection? With that comes the question … how the heck do I get my data? Obviously the “see it my web-browser” is one option, but how about a server application that is to store the sensor data?
In this article we will look at a trick we can use to “Pull” data to our server, server-application or even web-browser. This is probably the easiest way to get your data.
Ad Blocking Detected Please consider disabling your ad blocker for our website.
We rely on these ads to be able to run our website.
You can of course support us in other ways (see Support Us on the left).
One day I ran into this particular Arduino ENC28J60 Ethernet module on eBay for $18. It included an Arduino ENC28J60 Ethernet shield/module and an Arduino USB Nano V3.0. Well, that’s pretty much for free isn’t it? So I could not resist and bought it, fully well knowing that it might not work. It took a little bit of figuring out, but I finally got it to work.
Playing with the Arduino is definitely fun, specially when you start looking into these kind of fun gadgets (snoop around on eBay and Amazon to see what’s out there!). If you look at eBay, or for example Amazon, for an Arduino ENC28J60 Ethernet shield, then you’ll notice that there are plenty models variations.
In this article we will focus on selecting a good ethernet library for the ENC28J60 and run a “Hello World” example.
The code discussed in this article will probably work for all of them.
In this example project we will be combining an Arduino and a DS18B20 temperature sensor.
The DS18B20 is a so called 1-wire digital temperature sensor. The words “digital” and “1-wire” make this sensor really cool and allows you, with a super simple setup, to read the temperature of one or more sensors. You can even connect multiple devices together, utilizing only one pin on your Arduino.
The more I play with the Arduino, the more fun it gets  …
…

Back in the day, when the first LED TV’s appeared, Philips came with a great feature: Ambient TV lighting.
Ambient TV lighting consisted out of lights that would project to the wall behind your TV, one or more colors matching the content on your TV. So if the majority of the screen would be red, then the light emitted would be red, if the majority of the screen is green, then green light would be emitted, etc.
Over the years this has been refined to multiple colors, matching small parts of the screen. Unfortunately though, this wonderful feature is not something you can simply add to your TV. You will have to buy a Philips TV with this feature, …
Until now though, and only for XBMC (Kobi) users. Some smart guy(s) created Boblight, which is opensource and can run (for example) on your XBMC computer. The computer analyzes the video content and “converts” it to signals for LED strands, so you can attach these strands behind your TV and have a DYI Ambient TV lighting effect.
Note : This will only work for content played through your XBMC Media player (I used OpenElec)! So your regular TV shows, your XBox or PlayStation, none of these will have an influence on the “Ambient TV lighting” we will be discussing in this article.
Ad Blocking Detected Please consider disabling your ad blocker for our website.
We rely on these ads to be able to run our website.
You can of course support us in other ways (see Support Us on the left).
When I started building my own “AmbiLight” project, based on OpenElec (XBMC) and Boblight, the first problem I ran into is finding a tool to create a Boblight config files for use under MacOS X. Naturally, there are quite a few great tools out there that do a good job, but it’s either a script, web-based or limited to Windows users (Boblight Config Tool), and again … not for MacOS X …
Creating a config file for Boblight can be quite tedious when you have a large amount of LEDs (I had 290 LEDs), when you mix up the orientation of your LEDs (pretty common issue), or when you do not have your LEDs spread out evenly.
So here is my tool, for Windows, MacOS X and Linux, written in Lazarus Pascal – enjoy!
UPDATE: Another minor bug fixed, added test video and Boblight Config Maker can now also be found at Alternativeto.net.
In this article I’ll show you how I connected a SainSmart 1.8″ Color display to my Arduino Uno and I’ll show you how to get some basic things to work.
The Arduino does not come with a display, and that’s perfectly fine as it’s intended to be used as a micro-controller and not a micro-computer.
Adding a display however, may be needed at times though to provide user feedback for when a user is using your marvelous Arduino invention.
User feedback can be done in several ways of course: a simple beep, a simple LED, a simple LCD screen, or like in this case, a more advanced Color Display.
Considering the price I decided to get one ($20 at Amazon, $13 at SainSmart, starting at $13 on eBay, or an Arduino version at AdaFruit for $20) and experiment with it.
The main reason why I bought my first Arduino board was to be able to play with LED strips with applications like BobLight and LightPack that offer colored backlighting to your TV comparable to what Philips offers with it’s beautiful AmbiLight TV’s.
I like really Philips, and I like Ambilight, so why not buy a Philips AmbiLight TV?
Well, pretty simple … first of all Philips does not carry 80″ AmbiLight enabled TV’s, smaller models are significantly more expensive than non-AmbiLight models, and it appears that these AmbiLight TV’s are hard to find in the US.
In this article we will be using an Arduino Uno connected to a strip of WS2812/WS2811 LEDs.
Ad Blocking Detected Please consider disabling your ad blocker for our website.
We rely on these ads to be able to run our website.
You can of course support us in other ways (see Support Us on the left).
I recently aquired an Arduino UNO from Amazon, which can be had under $15 and for a few bucks extra you can get a nice starters kit with Breadboard, jumper wires and some components to play with.
To get familiar with an Arduino I ran my first basic project which switches an LED on and off. The good thing is that this first tiny project get’s you familiarized with the Arduino development tools, how to hook your Arduino up to your computer, and some very basic programming (C/C++ based).
When I started my first experiments with electronics, solderless breadboards, in Europe anyway, were not very common or at least not cheap.
Instead me and my dad wired everything together (the good old times!). We either used air to old everything together for the simpler designs, or we used an Open Hole Board PCB (a.k.a. Prototype PCB) for the more complex designs.
Once our design was completed and working we either left it as is – a bundle of components and wires soldered together – or we made a nice PCB to accommodate the components and connections. With Breadboards we’re only looking at the initial prototype …
Breadboards allow us to make our initial prototype much easier and much cleaner, and when I started dabbling with MicroControllers (BASICStamp) it became obvious that creating prototypes with Breadboards was the best way to go – even if it’s just to be able to handle the more expensive components more careful.
In this article a brief into to Solderless Breadboards.