This week was an interesting week – I travel quite often between my home in the USA and family and friends in Europe. With a world that has become smaller due to the Internet, you’d expect that services you’re used to are still available when traveling … well that’s not the case. I guess the movie industry still hasn’t gotten the message that region limitations is simply ridiculous. So my NetFlix suddenly got neutered and forced to the Dutch version.
I didn’t ask for this, and I most certainly did not pay for this … why not simply link content to your account, which has an address and therefor determines where you reside? Or even better: Just drop the nonsense with regions entirely … I’m sure it will reduce piracy as well.
Anyhow, long story short: to get to my real account (US) I could spoof my location by using well known VPN service like Astrill. Works great, looks a little suspicious, slows down your connection due to encryption and it’s not always “cheap” or easy to use.
Along comes UnoTelly (and I’m sure there are other services like that) offering to try their DNS service for free (8 day trial). This article is about my findings with their services (DNS and VPN) … in short: it’s worth it!
Ad Blocking Detected Please consider disabling your ad blocker for our website.
We rely on these ads to be able to run our website.
You can of course support us in other ways (see Support Us on the left).
For the veterans amongst us, we all know FourCC Changer from fourcc.org, a small utility which allows you to change the video stream Four Character Code that identifies the codec used to compress/store the video stream.
If you’ve used it before, then you will know that it’s a nifty little Windows program that can be used as a last resort when AVI files do not playback. Since FourCC Changer only exists for the Windows platform: here a free version for Windows, Linux (32 and 64bit) and MacOS X (intel).
This application also support batches, offers a backup function and is very fast even for files in network shares.

Back in the day, when the first LED TV’s appeared, Philips came with a great feature: Ambient TV lighting.
Ambient TV lighting consisted out of lights that would project to the wall behind your TV, one or more colors matching the content on your TV. So if the majority of the screen would be red, then the light emitted would be red, if the majority of the screen is green, then green light would be emitted, etc.
Over the years this has been refined to multiple colors, matching small parts of the screen. Unfortunately though, this wonderful feature is not something you can simply add to your TV. You will have to buy a Philips TV with this feature, …
Until now though, and only for XBMC (Kobi) users. Some smart guy(s) created Boblight, which is opensource and can run (for example) on your XBMC computer. The computer analyzes the video content and “converts” it to signals for LED strands, so you can attach these strands behind your TV and have a DYI Ambient TV lighting effect.
Note : This will only work for content played through your XBMC Media player (I used OpenElec)! So your regular TV shows, your XBox or PlayStation, none of these will have an influence on the “Ambient TV lighting” we will be discussing in this article.
Boxee Box, a Linux box from D-Link that runs a fork of XBMC called Boxee, is dead … maybe we will see some of it return in a re-incarnation with Samsung, but I wouldn’t hold my breath … I’m sure others agree with me that Boxee went the wrong direction and I’m sure quite a few of us Boxee owners have returned to XBMC, or a XBMC variation like OpenElec.
So what are we doing with the old Boxee Box? Trying to sell it, toss it in the garbage, or … run XBMC on Boxee Box as if it’s a regular HTPC …? I gave the later a try and to my surprise it works pretty well …
Ad Blocking Detected Please consider disabling your ad blocker for our website.
We rely on these ads to be able to run our website.
You can of course support us in other ways (see Support Us on the left).
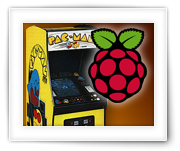
The Raspberry Pi is one fun little computer perfectly capable of emulation Classic Computers like the Commodore 64, ZX-81, ZX-Spectrum, Apple ][, Atari ST and even DOS/Windows 3.1. Emulation on the Raspberry Pi however is not limited to classic computers. Emulation of Classic Game Consoles like the Atari 2600, SEGA Genesis, Super Nintendo, Nintendo Entertainment System (or: NES) and Gameboy handheld work great as well.
My favorite in this however remains the emulation of classic Arcade Games with MAME.
Unfortunately, I did not find an emulator for one of my childhood consoles, the Magnavox Odyssey² (a.k.a. Philips VideoPac G7000).
In this article an introduction to CHAMELEONPI, an awesome distribution by Carles Oriol, which can be downloaded for free. It offers all of these emulators, with a beautiful interface and an easy way to upload ROMs and applications for the Classic Computers, Game Consoles, and Arcade Emulator (MAME).
MAME, the Multiple Arcade Machine Emulator, has been around for a while and is readily available from the MAME website for Windows users.
MAME is an emulator that allows you to run the ROMs (games) of the old Arcade Hall machines, like Pac-Man, Out-Run, Scramble, Donkey Kong, etc.
Installation on MacOS X is unfortunately not very obvious. There are some precompiled MAME versions out there and in this article I’ll show you how to install and use MAME under MacOS X Mavericks (will probably work for older and newer Intel based MacOS X versions as well).
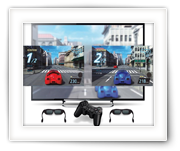
With the introduction of LG’s Dual Play “technology”, two players playing a splitscreen game, can now each enjoy playing with a full screen view for each player at the same time. Sony has something similar called SimulView for active 3D TV’s.
This sounds very high-tech and maybe even confusing,… but it’s not. It’s actually the simple [ab]use of existing 3D technology of your 3D TV in a smart way.
In this article we will show you what Dual Play does and how it works, but also … how to use it with older split-screen games that do not claim to be Dual Play compatible. The trick works with ANY split-screen capable game, on ANY passive 3D TV. Even your old original XBox or PlayStation can do this … as long as the game supports split screen playing for 2 players.
Active 3D TV’s might work as well, but you might have a harder time finding suitable glasses.
Ad Blocking Detected Please consider disabling your ad blocker for our website.
We rely on these ads to be able to run our website.
You can of course support us in other ways (see Support Us on the left).
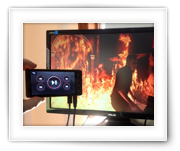
TV’s become “smarter” and cell phones and tablet more capable, and with that the question arises:
How do I play video from my phone on my TV?
In this article we’ll cover the playback of videos on your TV, from your cellphone or tablet, for both Android and iOS (iPhone etc) devices.
For this to work you will briefly touch on the use of cables, but then show you a way that’s completely wireless …
To watch a 3D Movie, you’d need a 3D TV or a computer with 3D capable video-card and/or 3D capable monitor, and not everybody has one of those.
With a few simple tricks however, modern 3D movies can be viewed on a regular TV or computer sans 3D capable display.
To maintain the 3D effect, or better said the depth perception, the good old red/blue glasses will be used (Anaglyph).
This trick works for Windows, MacOS X and Linux.
While writing an article on how 3D movies work, I couldn’t help thinking back about the red and blue 3D pictures from back in the day (anaglyph). They were considered pretty cool and how difficult would it be to make them yourselves? Sure, you might not want to stare at them the whole day, but cool none the less.
After figuring that out, I was started to wonder if it would be possible and how difficult it would be to create 3D pictures for 3D capable TV’s (see also: How 3D Movies work).
So in this article I’ll show you how to make a 3D picture with your own digital photo camera for either the good old red and blue 3D glasses, or for use on a 3D capable TV in full color.
Ad Blocking Detected Please consider disabling your ad blocker for our website.
We rely on these ads to be able to run our website.
You can of course support us in other ways (see Support Us on the left).
Every now and then you’d like to see if the movie of video file that you have is the one with a particular resolution, or the one with subtitles embedded, or not. Specially when you’ve ripped your DVD collection in the past and now you’re doing the same with your Blu-Ray collection.
For this purpose I threw together a simple front-end for FFProbe, a tool from the ffmpeg project, which rather quickly scans a movie file for it’s details.
MovieScanner is completely free, and available for Windows and MacOS X. Under Linux however I ran into some impracticalities … so no Linux version. Sorry.
Keep in mind that it was written for personal use and to try a few things with Lazarus Pascal, so don’t expect any super miracles.
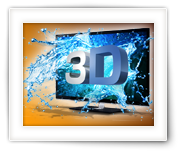
After the era of regular 2D TV, the era of the red and blue glasses, and all kinds of other attempts to get 3D movies, we’ve now reached the era where most of us have a 3D capable TV at home.
It’s a fun experience to watch a 3D movie, maybe once or twice. It remains a gimmick for now and I suspect that it’s not here to stay, specially when looking at the latest developments of 3D TV without the need for special glasses, and the fact that current 3D movies are not really 3D, it’s just the illusion of depth perception …
In this article a quick intro how it works, the variations, and … how to play 3D movies on your TV with applications like XBMC.
You’ll find some info on Dual Play for computer games as well.
One can have numerous reasons why one would want to connect a PC to a TV …
The most important one is probably to playback Movies or TV Shows using XBMC (I use OpenElec), or a slide show of photographs, but I’ve also used it for presentation purposes at work (PowerPoint slideshows) or for Skype sessions with family members and business meetings.
In this article I’ll try to cover as much as I can, covering different “PC’s” (desktop, laptop, tablet, etc), different Operating Systems (Windows, MacOS X, Linux) and as many connection types as I could find.
On our old website, we already had an article describing how to connect your PC to your TV. It’s unfortunately an old and kind-a outdated article, so I decided to write a new article for Tweaking4All with more up to date information.
Ad Blocking Detected Please consider disabling your ad blocker for our website.
We rely on these ads to be able to run our website.
You can of course support us in other ways (see Support Us on the left).
Making your own Ringtone isn’t difficult, but it can be a bit daunting at times how to exactly do it.
In this article I’ll show you how you can create your own ringtones, from music files like MP3’s or even from movie files like AVI, MP4, etc. For this we will use WavePad which is available for Windows and MacOS X for free (for home use).
Note that if you only want to create ringtones from an MP3 that’s already on your Android phone, an app like RingDroid (free) can do the editing right on your phone as well.
iPhone users can read these 2 articles for doing exactly the same: Windows and MacOS X make Ringtones from MP3 or Movies.
Unfortunately, creating a ringtone for an iPhone can be surprisingly daunting … and in my opinion that doesn’t exactly match the Apple philosophy … oh well. It’s even more difficult than with the good old flip-phone, so much for “smart” phones.
After writing an article how to do this under MacOS X, utilizing iTools and QuickTime, I of course had to write an article for Windows users as well.
In this article: How to make a ringtone for your iPhone, from an Audio file (WAV, MP3, etc) or a Video file (AVI, MP4, etc), trimmed to the desired length and uploaded to your phone using totally free tools.