How can we optimize PNG images even MORE …?
You might have looked at some of the PNG optimization tools out there like PNGOUT, although great tools, they can’t quite keep up with JPEG compression when it comes to photographs and other more complex graphics – but you’d like fast loading webpages yet still want to use transparency which is something JPEG and GIF do not [properly] support.
Another trick that will nibble off quite a few bytes is “Posterization” – a function found in Adobe Photoshop and most other graphics programs.
In this article I’ll show you how to use it and how beneficial it can be.
What is Posterization?
Posterization is basically the effect (often used for other purposes) where the color depth of an image is changed in such a way that gradients change color more abrupt.
What does this mean? Well, imagine that you have a gradient from white to say blue as shown in the (extreme) example below:
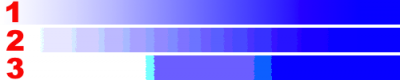
Posterization example
Line 1 is the original gradient from white to blue.
Line 2 is that same line, now we applied a certain level of Posterization.
Line 3 is the same line as line 1 again, with even more Posterization applied.
We are going to use this technique to “compress” an image by reducing it’s color depth without serious visual impact (obviously the example above is more distortion than we’d like to see of course).
Adobe Photoshop, GiMP, Paint.net, and others offer this functionality. It’s a straight forward process for any of these guys. In this article we will illustrate posterization using Adobe Photoshop.
Reducing Filesize
Tip:For normal photographs I’d still use
JPG as the file format used in my webpages.
But in some cases I really like to have
transparency available and
JPG /
GIF unfortunately do not support that (properly) so I find myself diverting to the
PNG file format which can produce some big files, and that is the main reason for this article …Also note that posterization is a technique that will work for other image formats as well!
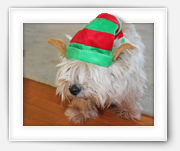
OK, let’s get started. In this example I’m using a picture of my personal hero: Puck … here temporary dressed up as a Christmas Elf (the hat stayed on about 2 seconds – oh, and no animals were hurt during this event).
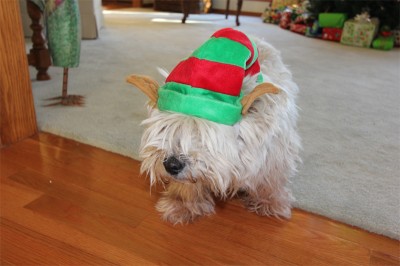
Puck – The original picture
I reduced the image size for demonstration purposes.
With some JPG tweaking the file became only 150 Kb. Saved as a PNG however this file is 608 Kb … a lot bigger – over 4 times bigger! Ouch!
Utilizing a tool like tool like PNGOUT helps, but with a photograph like this one the results are not exactly stunning (with other types of images you might gain a lot more – so this tool is far from useless!); this file reduced to 607 Kb – we gained one miserable Kb.
PNG-8?
Images that do not use as many colors can be saved in the so called PNG-8 format, which reduces the size significantly (PNG default uses 24 bit depth called PNG-24). Two downsides though, are that a photograph will typically not look all that great and … transparency will look like crap as well.
Posterization in Photoshop
Let’s open this image in Photoshop.
When you look at the bottom of the “Layers” window, you will see the icon for the icon for “New fill or adjustment layer” (see image below). When you click that icon a popup menu will appear with the option “Posterize…“, click that option.
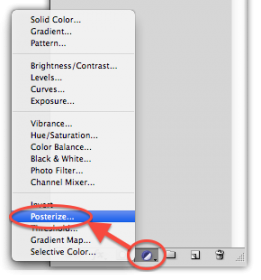
Photoshop posterization tool
The inital value (in my case it was 4) was simply way to much …
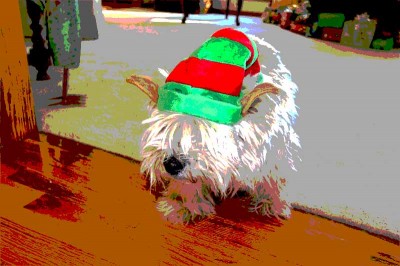
Posterized way to much … poor Puck
Go to the posterize window and start sliding the “Levels” slider to the right until you think the image still looks OK.
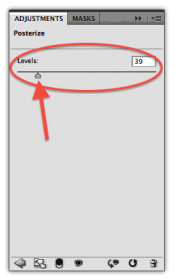
Photoshop – Posterize slider
Once you found your sweet spot, save the file again as a PNG.
In my example, the sweet spot was (you guessed it) 39 which resulted in a 352 Kb PNG file! We just shaved of 256 Kb a 42% file size reduction … and still looking good.

Puck posterized, and pulled through PNGOUT … 52% filesize reduction!
Mangling the file through PNGOUT (utilizing ImageOptim) made it a 291 Kb file, taking off an additional 61 Kb bringing it to a total file size reduction of 52%!
So the original 608 Kb file ended up to be a 291 Kb file … with a little help of posterization.
Still twice the size of a JPEG file, but … now supporting transparency!


Comments
There are 4 comments. You can read them below.
You can post your own comments by using the form below, or reply to existing comments by using the "Reply" button.
Would it be possible to incorporate optimization (pngout etc) to the resizing process? There are so many resizing tools, and so many optimization tools, but so few that do both quickly and easily (ie. services or droplets) – while also using the best optimizers that ie. ImageOptim has integrated.
Having a service that would both resize a png AND optimize it after (ie. a screenshot) would be amazing!
dan
Hi Dan,
couldn’t agree more!
Unfortunately PNGOut (etc) are “owned” by other, not sure how happy they would be if I’d redistribute it in a package that handles resizing and optimizing.
I’ll put this on my To-Do list. I will be traveling soon, so that will give me time to toy with that some more.
hans
Ahh ok. Makes sense! I’ll wait patiently then :) Thank you though, for sharing your tweaks. Inspiring and helpful. Safe travels!
dan
Thanks Dan!
hans